

LTV 1200 Operator's Manual - CareFusion Emergency Preparedness
LTV 1200 Operator's Manual - CareFusion Emergency Preparedness
LTV 1200 Operator's Manual - CareFusion Emergency Preparedness

You also want an ePaper? Increase the reach of your titles
YUMPU automatically turns print PDFs into web optimized ePapers that Google loves.
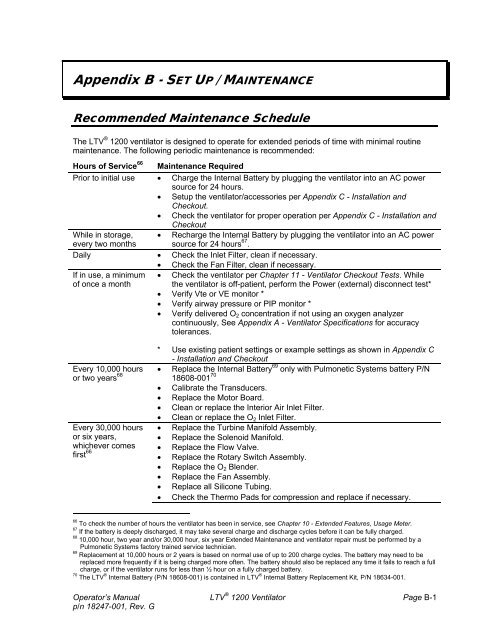
Appendix B - SET UP / MAINTENANCE<br />
Recommended Maintenance Schedule<br />
The <strong>LTV</strong> ® <strong>1200</strong> ventilator is designed to operate for extended periods of time with minimal routine<br />
maintenance. The following periodic maintenance is recommended:<br />
Hours of Service 66 Maintenance Required<br />
Prior to initial use • Charge the Internal Battery by plugging the ventilator into an AC power<br />
source for 24 hours.<br />
• Setup the ventilator/accessories per Appendix C - Installation and<br />
Checkout.<br />
• Check the ventilator for proper operation per Appendix C - Installation and<br />
Checkout<br />
While in storage,<br />
every two months<br />
• Recharge the Internal Battery by plugging the ventilator into an AC power<br />
source for 24 hours 67 .<br />
Daily • Check the Inlet Filter, clean if necessary.<br />
• Check the Fan Filter, clean if necessary.<br />
If in use, a minimum<br />
of once a month<br />
Every 10,000 hours<br />
or two years 68<br />
Every 30,000 hours<br />
or six years,<br />
whichever comes<br />
first 66<br />
• Check the ventilator per Chapter 11 - Ventilator Checkout Tests. While<br />
the ventilator is off-patient, perform the Power (external) disconnect test*<br />
• Verify Vte or VE monitor *<br />
• Verify airway pressure or PIP monitor *<br />
• Verify delivered O2 concentration if not using an oxygen analyzer<br />
continuously, See Appendix A - Ventilator Specifications for accuracy<br />
tolerances.<br />
* Use existing patient settings or example settings as shown in Appendix C<br />
- Installation and Checkout<br />
• Replace the Internal Battery 69 only with Pulmonetic Systems battery P/N<br />
18608-001 70<br />
• Calibrate the Transducers.<br />
• Replace the Motor Board.<br />
• Clean or replace the Interior Air Inlet Filter.<br />
• Clean or replace the O2 Inlet Filter.<br />
• Replace the Turbine Manifold Assembly.<br />
• Replace the Solenoid Manifold.<br />
• Replace the Flow Valve.<br />
• Replace the Rotary Switch Assembly.<br />
• Replace the O2 Blender.<br />
• Replace the Fan Assembly.<br />
• Replace all Silicone Tubing.<br />
• Check the Thermo Pads for compression and replace if necessary.<br />
66 To check the number of hours the ventilator has been in service, see Chapter 10 - Extended Features, Usage Meter.<br />
67 If the battery is deeply discharged, it may take several charge and discharge cycles before it can be fully charged.<br />
68 10,000 hour, two year and/or 30,000 hour, six year Extended Maintenance and ventilator repair must be performed by a<br />
Pulmonetic Systems factory trained service technician.<br />
69 Replacement at 10,000 hours or 2 years is based on normal use of up to 200 charge cycles. The battery may need to be<br />
replaced more frequently if it is being charged more often. The battery should also be replaced any time it fails to reach a full<br />
charge, or if the ventilator runs for less than ½ hour on a fully charged battery.<br />
70 The <strong>LTV</strong> ® Internal Battery (P/N 18608-001) is contained in <strong>LTV</strong> ® Internal Battery Replacement Kit, P/N 18634-001.<br />
Operator’s <strong>Manual</strong> <strong>LTV</strong> ® <strong>1200</strong> Ventilator Page B-1<br />
p/n 18247-001, Rev. G