

Contents - Volkspage
Contents - Volkspage
Contents - Volkspage

Create successful ePaper yourself
Turn your PDF publications into a flip-book with our unique Google optimized e-Paper software.
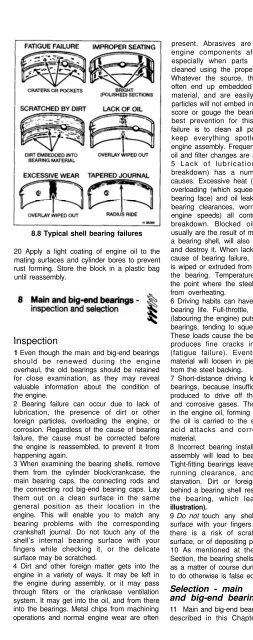
8.8 Typical shell bearing failures<br />
20 Apply a light coating of engine oil to the<br />
mating surfaces and cylinder bores to prevent<br />
rust forming. Store the block in a plastic bag<br />
until reassembly.<br />
Inspection<br />
1 Even though the main and big-end bearings<br />
should be renewed during the engine<br />
overhaul, the old bearings should be retained<br />
for close examination, as they may reveal<br />
valuable information about the condition of<br />
the engine.<br />
2 Bearing failure can occur due to lack of<br />
lubrication, the presence of dirt or other<br />
foreign particles, overloading the engine, or<br />
corrosion. Regardless of the cause of bearing<br />
failure, the cause must be corrected before<br />
the engine is reassembled, to prevent it from<br />
happening again.<br />
3 When examining the bearing shells, remove<br />
them from the cylinder block/crankcase, the<br />
main bearing caps, the connecting rods and<br />
the connecting rod big-end bearing caps. Lay<br />
them out on a clean surface in the same<br />
general position as their location in the<br />
engine. This will enable you to match any<br />
bearing problems with the corresponding<br />
crankshaft journal. Do not touch any of the<br />
shell’s internal bearing surface with your<br />
fingers while checking it, or the delicate<br />
surface may be scratched.<br />
4 Dirt and other foreign matter gets into the<br />
engine in a variety of ways. It may be left in<br />
the engine during assembly, or it may pass<br />
through filters or the crankcase ventilation<br />
system. It may get into the oil, and from there<br />
into the bearings. Metal chips from machining<br />
operations and normal engine wear are often<br />
present. Abrasives are sometimes left in<br />
engine components after reconditioning,<br />
especially when parts are not thoroughly<br />
cleaned using the proper cleaning methods.<br />
Whatever the source, these foreign objects<br />
often end up embedded in the soft bearing<br />
material, and are easily recognised. Large<br />
particles will not embed in the bearing, but will<br />
score or gouge the bearing and journal. The<br />
best prevention for this cause of bearing<br />
failure is to clean all parts thoroughly, and<br />
keep everything spotlessly-clean during<br />
engine assembly. Frequent and regular engine<br />
oil and filter changes are also recommended.<br />
5 Lack of lubrication (or lubrication<br />
breakdown) has a number of interrelated<br />
causes. Excessive heat (which thins the oil),<br />
overloading (which squeezes the oil from the<br />
bearing face) and oil leakage (from excessive<br />
bearing clearances, worn oil pump or high<br />
engine speeds) all contribute to lubrication<br />
breakdown. Blocked oil passages, which<br />
usually are the result of misaligned oil holes in<br />
a bearing shell, will also oil-starve a bearing,<br />
and destroy it. When lack of lubrication is the<br />
cause of bearing failure, the bearing material<br />
is wiped or extruded from the steel backing of<br />
the bearing. Temperatures may increase to<br />
the point where the steel backing turns blue<br />
from overheating.<br />
6 Driving habits can have a definite effect on<br />
bearing life. Full-throttle, low-speed operation<br />
(labouring the engine) puts very high loads on<br />
bearings, tending to squeeze out the oil film.<br />
These loads cause the bearings to flex, which<br />
produces fine cracks in the bearing face<br />
(fatigue failure). Eventually, the bearing<br />
material will loosen in pieces, and tear away<br />
from the steel backing.<br />
7 Short-distance driving leads to corrosion of<br />
bearings, because insufficient engine heat is<br />
produced to drive off the condensed water<br />
and corrosive gases. These products collect<br />
in the engine oil, forming acid and sludge. As<br />
the oil is carried to the engine bearings, the<br />
acid attacks and corrodes the bearing<br />
material.<br />
8 Incorrect bearing installation during engine<br />
assembly will lead to bearing failure as well.<br />
Tight-fitting bearings leave insufficient bearing<br />
running clearance, and will result in oil<br />
starvation. Dirt or foreign particles trapped<br />
behind a bearing shell result in high spots on<br />
the bearing, which lead to failure (see<br />
illustration).<br />
9 Do not touch any shell’s internal bearing<br />
surface with your fingers during reassembly;<br />
there is a risk of scratching the delicate<br />
surface, or of depositing particles of dirt on it.<br />
10 As mentioned at the beginning of this<br />
Section, the bearing shells should be renewed<br />
as a matter of course during engine overhaul;<br />
to do otherwise is false economy.<br />
Selection - main<br />
and big-end bearings<br />
11 Main and big-end bearings for the engines<br />
described in this Chapter are available in<br />
standard sizes and a range of undersizes to<br />
suit reground crankshafts - refer to Specifications<br />
for details.<br />
12 The running clearances will need to be<br />
checked when the crankshaft is refitted with<br />
its new bearings. This procedure is described<br />
in the Section 10.<br />
1 Before reassembly begins, ensure that all<br />
new parts have been obtained, and that all<br />
necessary tools are available. Read through<br />
the entire procedure to familiarise yourself<br />
with the work involved, and to ensure that all<br />
items necessary for reassembly of the engine<br />
are at hand. In addition to all normal tools and<br />
materials, thread-locking compound will be<br />
needed. A suitable tube of liquid sealant will<br />
also be required for the joint faces that are<br />
fitted without gaskets. It is recommended that<br />
the manufacturers own products are used,<br />
which are specially formulated for this<br />
purpose; the relevant product names are<br />
quoted in the text of each Section where they<br />
are required.<br />
2 In order to save time and avoid problems,<br />
engine reassembly should ideally be carried<br />
out in the following order:<br />
a) Crankshaft.<br />
b) Piston/connecting rod assemblies.<br />
c) Oil pump (see Chapter 2A)<br />
d) Sump (see Chapter 2A)<br />
e) Flywheel (see Chapter 2A)<br />
f) Cylinder head and gasket (see Chapter 2A)<br />
g) Timing belt sprockets and timing be/t (see<br />
Chapter 2A)<br />
h) Engine external components and<br />
ancillaries.<br />
i) Auxiliary drive pulleys and belts.<br />
3 At this stage, all engine components should<br />
be absolutely clean and dry, with all faults<br />
repaired. The components should be laid out<br />
(or in individual containers) on a completely<br />
clean work surface.<br />
1 Crankshaft refitting is the first stage of<br />
engine reassembly following overhaul. At this<br />
point, it is assumed that the crankshaft,<br />
cylinder block/crankcase and bearings have<br />
been cleaned, inspected and reconditioned or<br />
renewed.<br />
2 Place the cylinder block on a clean, level<br />
work surface, with the crankcase facing<br />
upwards. Unbolt the bearing caps and carefully<br />
release them from the crankcase; lay them out<br />
in order to ensure correct reassembly. If they<br />
are still in place, remove the bearing shells from<br />
the caps and the crankcase and wipe out the


