

Contents - Volkspage
Contents - Volkspage
Contents - Volkspage

You also want an ePaper? Increase the reach of your titles
YUMPU automatically turns print PDFs into web optimized ePapers that Google loves.
5A.4 Starting and charging systems<br />
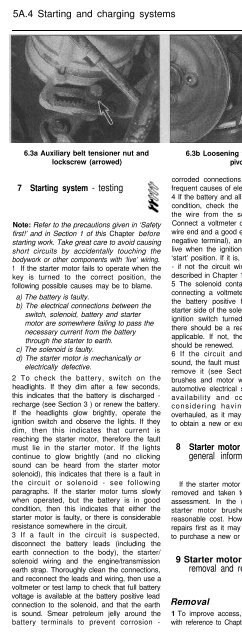
6.3a Auxiliary belt tensioner nut and 6.3b Loosening the tensioner strut<br />
lockscrew (arrowed)<br />
pivot bolt<br />
6.5 Removing the alternator<br />
upper pivot bolt<br />
7 Starting system - testing<br />
Note: Refer to the precautions given in ‘Safety<br />
first!’ and in Section 1 of this Chapter before<br />
starting work. Take great care to avoid causing<br />
short circuits by accidentally touching the<br />
bodywork or other components with ‘live’ wiring.<br />
1 If the starter motor fails to operate when the<br />
key is turned to the correct position, the<br />
following possible causes may be to blame.<br />
a) The battery is faulty.<br />
b) The electrical connections between the<br />
switch, solenoid, battery and starter<br />
motor are somewhere failing to pass the<br />
necessary current from the battery<br />
through the starter to earth.<br />
c) The solenoid is faulty.<br />
d) The starter motor is mechanically or<br />
electrically defective.<br />
2 To check the battery, switch on the<br />
headlights. If they dim after a few seconds,<br />
this indicates that the battery is discharged -<br />
recharge (see Section 3 ) or renew the battery.<br />
If the headlights glow brightly, operate the<br />
ignition switch and observe the lights. If they<br />
dim, then this indicates that current is<br />
reaching the starter motor, therefore the fault<br />
must lie in the starter motor. If the lights<br />
continue to glow brightly (and no clicking<br />
sound can be heard from the starter motor<br />
solenoid), this indicates that there is a fault in<br />
the circuit or solenoid - see following<br />
paragraphs. If the starter motor turns slowly<br />
when operated, but the battery is in good<br />
condition, then this indicates that either the<br />
starter motor is faulty, or there is considerable<br />
resistance somewhere in the circuit.<br />
3 If a fault in the circuit is suspected,<br />
disconnect the battery leads (including the<br />
earth connection to the body), the starter/<br />
solenoid wiring and the engine/transmission<br />
earth strap. Thoroughly clean the connections,<br />
and reconnect the leads and wiring, then use a<br />
voltmeter or test lamp to check that full battery<br />
voltage is available at the battery positive lead<br />
connection to the solenoid, and that the earth<br />
is sound. Smear petroleum jelly around the<br />
battery terminals to prevent corrosion -<br />
corroded connections are amongst the most<br />
frequent causes of electrical system faults.<br />
4 If the battery and all connections are in good<br />
condition, check the circuit by disconnecting<br />
the wire from the solenoid blade terminal.<br />
Connect a voltmeter or test lamp between the<br />
wire end and a good earth (such as the battery<br />
negative terminal), and check that the wire is<br />
live when the ignition switch is turned to the<br />
‘start’ position. If it is, then the circuit is sound<br />
- if not the circuit wiring can be checked as<br />
described in Chapter 12.<br />
5 The solenoid contacts can be checked by<br />
connecting a voltmeter or test lamp between<br />
the battery positive feed connection on the<br />
starter side of the solenoid, and earth. With the<br />
ignition switch turned to the ‘start’ position,<br />
there should be a reading or lighted bulb, as<br />
applicable. If not, the solenoid is faulty and<br />
should be renewed.<br />
6 If the circuit and solenoid are proved<br />
sound, the fault must lie in the starter motor -<br />
remove it (see Section 9 ), and have the<br />
brushes and motor windings checked by an<br />
automotive electrical specialist. Check on the<br />
availability and cost of spares before<br />
considering having the starter motor<br />
overhauled, as it may prove more economical<br />
to obtain a new or exchange motor.<br />
8 Starter motor testing -<br />
general information<br />
If the starter motor is suspect, it should be<br />
removed and taken to an auto-electrician for<br />
assessment. In the majority of cases, new<br />
starter motor brushes can be fitted at a<br />
reasonable cost. However, check the cost of<br />
repairs first as it may prove more economical<br />
to purchase a new or exchange motor.<br />
9 Starter motor -<br />
removal and refitting<br />
Removal<br />
1 To improve access, remove the air cleaner<br />
with reference to Chapter 4A or B as applicable.<br />
2 Disconnect the battery negative lead.<br />
3 Identify the wiring for position then<br />
disconnect it from the solenoid.<br />
4 Jack up the front of the car and support it<br />
on axle stands (see “Jacking and vehicle<br />
support”). Apply the handbrake.<br />
5 Unscrew the bolt securing the exhaust pipe<br />
to the support strap beneath the starter.<br />
6 Where applicable unscrew the nuts and<br />
bolts and remove the support bracket from<br />
the cylinder block.<br />
7 Unscrew and remove the retaining bolts,<br />
then unbolt the exhaust bracket and withdraw<br />
the starter motor (see illustrations).<br />
Refitting<br />
8 Refitting is a reversal of removal, but tighten<br />
the bolts to the specified torque. Where a<br />
support bracket is fitted, do not fully tighten<br />
the nuts and bolts until the bracket is correctly<br />
located and free of any tension.<br />
9.7a Starter motor retaining bolts,<br />
showing exhaust bracket location<br />
9.7b Removing the starter motor


