

Contents - Volkspage
Contents - Volkspage
Contents - Volkspage

Create successful ePaper yourself
Turn your PDF publications into a flip-book with our unique Google optimized e-Paper software.
12.8 Body electrical system<br />
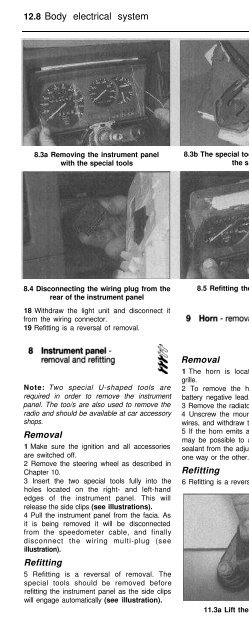
8.3a Removing the instrument panel 8.3b The special tools are used to hold in<br />
with the special tools<br />
the side clips<br />
8.4 Disconnecting the wiring plug from the<br />
rear of the instrument panel<br />
8.5 Refitting the instrument panel<br />
Note: It is not necessary to remove the<br />
instrument panel when removing the<br />
speedometer drive cable.<br />
Removal<br />
1 Open the bonnet and then reach down<br />
behind the engine and unscrew the<br />
speedometer cable nut from the gearbox.<br />
Recover the washer.<br />
2 Where necessary for improved access,<br />
remove the air cleaner and ducting as<br />
described in Chapter 3.<br />
3 In the plenum chamber at the rear of the<br />
engine compartment, unscrew the plastic nut<br />
on the bulkhead then withdraw the<br />
speedometer cable and rubber grommet<br />
through the secondary panel and remove it<br />
from the engine compartment. Release the<br />
cable from the clips and cable-ties as<br />
necessary.<br />
Refitting<br />
4 Refitting is a reversal of removal.<br />
18 Withdraw the light unit and disconnect it<br />
from the wiring connector.<br />
19 Refitting is a reversal of removal.<br />
Note: Two special U-shaped tools are<br />
required in order to remove the instrument<br />
panel. The too/s are also used to remove the<br />
radio and should be available at car accessory<br />
shops.<br />
Removal<br />
1 Make sure the ignition and all accessories<br />
are switched off.<br />
2 Remove the steering wheel as described in<br />
Chapter 10.<br />
3 Insert the two special tools fully into the<br />
holes located on the right- and left-hand<br />
edges of the instrument panel. This will<br />
release the side clips (see illustrations).<br />
4 Pull the instrument panel from the facia. As<br />
it is being removed it will be disconnected<br />
from the speedometer cable, and finally<br />
disconnect the wiring multi-plug (see<br />
illustration).<br />
Refitting<br />
5 Refitting is a reversal of removal. The<br />
special tools should be removed before<br />
refitting the instrument panel as the side clips<br />
will engage automatically (see illustration).<br />
Removal<br />
1 The horn is located behind the radiator<br />
grille.<br />
2 To remove the horn, first disconnect the<br />
battery negative lead.<br />
3 Remove the radiator grille (see Chapter 11).<br />
4 Unscrew the mounting bolt, disconnect the<br />
wires, and withdraw the horn.<br />
5 If the horn emits an unsatisfactory sound it<br />
may be possible to adjust it by removing the<br />
sealant from the adjusting screw and turning it<br />
one way or the other.<br />
Refitting<br />
6 Refitting is a reversal of removal.<br />
Removal<br />
1 Operate the wiper motor then switch it off<br />
so that the wiper arm returns to the at-rest<br />
position.<br />
2 Stick a piece of masking tape along the<br />
edge of the wiper blade to use as an<br />
alignment aid on refitting.<br />
3 Lift the hinged cover then slacken and<br />
remove the spindle nut and washer (see<br />
illustrations). Lift the blade off the glass and<br />
pull the wiper arm off its spindle. If necessary<br />
use a flat-bladed screwdriver to lever the arm<br />
off the spindle.<br />
Refitting<br />
4 Ensure that the wiper arm and spindle<br />
splines are clean and dry then refit the arm to<br />
11.3a Lift the hinged cover. . . 11.3b . . . and unscrew the<br />
tailgate wiper arm spindle nut


