

Contents - Volkspage
Contents - Volkspage
Contents - Volkspage

Create successful ePaper yourself
Turn your PDF publications into a flip-book with our unique Google optimized e-Paper software.
5A.2 Starting and charging systems<br />
the battery disconnected, capacitive<br />
discharge could occur if a component’s live<br />
terminal is earthed trough a metal object<br />
This could cause a shock or nasty bum.<br />
Do not reverse the battev connections.<br />
Components such as the alternator,<br />
electronic control units, or any other<br />
components having semiconductor circuitry<br />
could & irreparably damaged.<br />
If the engine is being started using jump<br />
leads and a slave battery, connect the<br />
batteries positive-to-positive and negativeto-negative<br />
(see ‘Booster battery (jump)<br />
starting’). This also applies when connecting<br />
a battety charger.<br />
Never disconnect the battery terminals,<br />
the alternator, any electrical wiring or any<br />
test instruments when the engine is running.<br />
Do not run the alternator with its output<br />
open circuit disconnected.<br />
Never ‘test’ for alternator output by<br />
‘flashing’ the output lead to earth.<br />
Never use an ohmmeter or continuity<br />
tester of the type incorporating a handcranked<br />
generator for circuit or continuity<br />
testing.<br />
Always ensure that the battery negative<br />
lead is disconnected when working on the<br />
electrical system.<br />
Before using electric-arc welding<br />
equipment on the car, disconnect the<br />
battery, alternator and components such as<br />
the engine management system electronic<br />
control unit to protect them from the risk of<br />
damage.<br />
Certain radio/cassette units fitted as<br />
standard equipment by VW are equipped<br />
with a built-in security code to deter thieves.<br />
Refer to ´Radio/cassette unit anti- theft<br />
system precaution’ in the Reference section<br />
of this manual for further information.<br />
Removal<br />
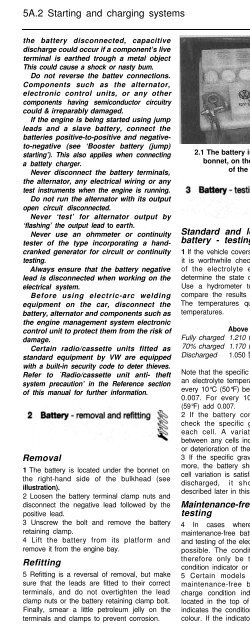
1 The battery is located under the bonnet on<br />
the right-hand side of the bulkhead (see<br />
illustration).<br />
2 Loosen the battery terminal clamp nuts and<br />
disconnect the negative lead followed by the<br />
positive lead.<br />
3 Unscrew the bolt and remove the battery<br />
retaining clamp.<br />
4 Lift the battery from its platform and<br />
remove it from the engine bay.<br />
Refitting<br />
5 Refitting is a reversal of removal, but make<br />
sure that the leads are fitted to their correct<br />
terminals, and do not overtighten the lead<br />
clamp nuts or the battery retaining clamp bolt.<br />
Finally, smear a little petroleum jelly on the<br />
terminals and clamps to prevent corrosion.<br />
2.1 The battery is located under the<br />
bonnet, on the right-hand side<br />
of the bulkhead<br />
Standard and low maintenance<br />
battery - testing<br />
1 If the vehicle covers a small annual mileage<br />
it is worthwhile checking the specific gravity<br />
of the electrolyte every three months to<br />
determine the state of charge of the battery.<br />
Use a hydrometer to make the check and<br />
compare the results with the following table.<br />
The temperatures quoted are ambient (air)<br />
temperatures.<br />
Above 25°C Below 25°C<br />
Fully charged 1.210 to 1.230 1.270 to 1.290<br />
70% charged 1.170 to 1.190 1.230 to 1.250<br />
Discharged 1.050 to 1.070 1.110 to 1.130<br />
Note that the specific gravity readings assume<br />
an electrolyte temperature of 15°C (59°F); for<br />
every 10°C (50°F) below 15°C (59°F) subtract<br />
0.007. For every 10°C (50°F) above 15°C<br />
(59°F) add 0.007.<br />
2 If the battery condition is suspect, first<br />
check the specific gravity of electrolyte in<br />
each cell. A variation of 0.040 or more<br />
between any cells indicates loss of electrolyte<br />
or deterioration of the internal plates.<br />
3 If the specific gravity variation is 0.040 or<br />
more, the battery should be renewed. If the<br />
cell variation is satisfactory but the battery is<br />
discharged, it should be charged as<br />
described later in this Section.<br />
Maintenance-free battery -<br />
testing<br />
4 In cases where a ‘sealed for life’<br />
maintenance-free battery is fitted, topping-up<br />
and testing of the electrolyte in each cell is not<br />
possible. The condition of the battery can<br />
therefore only be tested using a battery<br />
condition indicator or a voltmeter.<br />
5 Certain models may be fitted with a<br />
maintenance-free battery, with a built-in<br />
charge condition indicator. The indicator is<br />
located in the top of the battery casing, and<br />
indicates the condition of the battery from its<br />
colour. If the indicator shows green, then the<br />
battery is in a good state of charge. If the<br />
indicator turns darker, eventually to black,<br />
then the battery requires charging, as<br />
described later in this Section. If the indicator<br />
shows clear/yellow, then the electrolyte level<br />
in the battery is too low to allow further use,<br />
and the battery should be renewed. Do not<br />
attempt to charge, load or jump start a battery<br />
when the indicator shows clear/yellow.<br />
6 If testing the battery using a voltmeter,<br />
connect the voltmeter across the battery and<br />
compare the result with those given in the<br />
Specifications under ‘charge condition’. The<br />
test is only accurate if the battery has not<br />
been subjected to any kind of charge for the<br />
previous six hours. If this is not the case,<br />
switch on the headlights for 30 seconds, then<br />
wait four to five minutes before testing the<br />
battery after switching off the headlights. All<br />
other electrical circuits must be switched off,<br />
so check that the doors and tailgate are fully<br />
shut when making the test.<br />
7 If the voltage reading is less than 12.2 volts,<br />
then the battery is discharged, whilst a<br />
reading of 12.2 to 12.4 volts indicates a<br />
partially discharged condition.<br />
8 If the battery is to be charged, remove it<br />
from the vehicle and charge it as described<br />
later in this Section.<br />
Standard and low maintenance<br />
battery - charging<br />
Note: The following is intended as a guide<br />
only. Always refer to the manufacturer’s recommendations<br />
(often printed on a label<br />
attached to the battery) before charging a<br />
battery.<br />
9 Charge the battery at a rate equivalent to<br />
10% of the battery capacity (eg for a 45 Ah<br />
battery charge at 4.5 A) and continue to<br />
charge the battery at this rate until no further<br />
rise in specific gravity is noted over a four<br />
hour period.<br />
10 Alternatively, a trickle charger charging at<br />
the rate of 1.5 amps can be used overnight.<br />
11 Specially rapid ‘boost’ charges which are<br />
claimed to restore the power of the battery<br />
in 1 to 2 hours are not recommended, as they<br />
can cause serious damage to the battery<br />
plates through overheating.<br />
12 While charging the battery, note that the<br />
temperature of the electrolyte should never<br />
exceed 37.8°C (100°F).<br />
Note: The following is intended as a guide<br />
only. Always refer to the manufacturer’s recommendations<br />
(often printed on a label<br />
attached to the battery) before charging a<br />
battery.<br />
13 This battery type takes considerably<br />
longer to fully recharge than the standard<br />
type, the time taken being dependent on the<br />
extent of discharge, but it can take anything<br />
up to three days.<br />
14 A constant voltage type charger is<br />
required, to be set to 13.9 to 14.9 volts with a


