

Contents - Volkspage
Contents - Volkspage
Contents - Volkspage

Create successful ePaper yourself
Turn your PDF publications into a flip-book with our unique Google optimized e-Paper software.
1 1 .1 2 Bodywork and fittings<br />
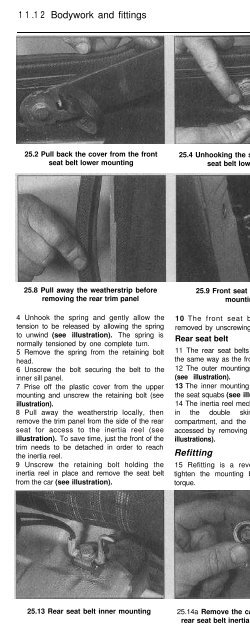
25.2 Pull back the cover from the front<br />
seat belt lower mounting<br />
25.4 Unhooking the spring from the front<br />
seat belt lower mounting<br />
25.7 Removing the plastic cover from the<br />
front seat belt upper mounting<br />
25.8 Pull away the weatherstrip before<br />
removing the rear trim panel<br />
4 Unhook the spring and gently allow the<br />
tension to be released by allowing the spring<br />
to unwind (see illustration). The spring is<br />
normally tensioned by one complete turn.<br />
5 Remove the spring from the retaining bolt<br />
head.<br />
6 Unscrew the bolt securing the belt to the<br />
inner sill panel.<br />
7 Prise off the plastic cover from the upper<br />
mounting and unscrew the retaining bolt (see<br />
illustration).<br />
8 Pull away the weatherstrip locally, then<br />
remove the trim panel from the side of the rear<br />
seat for access to the inertia reel (see<br />
illustration). To save time, just the front of the<br />
trim needs to be detached in order to reach<br />
the inertia reel.<br />
9 Unscrew the retaining bolt holding the<br />
inertia reel in place and remove the seat belt<br />
from the car (see illustration).<br />
25.9 Front seat belt inertia reel<br />
mounting bolt<br />
10 The front seat belt central stalk is<br />
removed by unscrewing the mounting bolt.<br />
Rear seat belt<br />
11 The rear seat belts are removed in much<br />
the same way as the front belts,<br />
12 The outer mountings are held by one bolt<br />
(see illustration).<br />
13 The inner mounting is undone after lifting<br />
the seat squabs (see illustration).<br />
14 The inertia reel mechanism is held in place<br />
in the double skin of the luggage<br />
compartment, and the upper mounting bolt-is<br />
accessed by removing the plastic cover (see<br />
illustrations).<br />
Refitting<br />
15 Refitting is a reversal of removal but<br />
tighten the mounting bolts to the specified<br />
torque.<br />
25.12 Rear seat belt outer mounting<br />
Interior trim panels<br />
1 The interior trim panels are secured using<br />
either screws or various types of trim<br />
fasteners, usually studs or clips,<br />
2 Check that there are no other panels<br />
overlapping the one to be removed; usually<br />
there is a sequence that has to be followed<br />
that will become obvious on close inspection.<br />
3 Remove all obvious fasteners, such as<br />
screws. If the panel will not come free, it is<br />
held by hidden clips or fasteners. These are<br />
usually situated around the edge of the panel<br />
and can be prised up to release them; note,<br />
25.13 Rear seat belt inner mounting 25.14a Remove the cap for access to the<br />
rear seat belt inertia reel mounting bolt


