

Contents - Volkspage
Contents - Volkspage
Contents - Volkspage

You also want an ePaper? Increase the reach of your titles
YUMPU automatically turns print PDFs into web optimized ePapers that Google loves.
3.2 Cooling, heating and ventilation systems<br />
1 General information and<br />
precautions<br />
General information<br />
1 The cooling system is of pressurised type,<br />
including a pump, an aluminium crossflow<br />
radiator, electric cooling fan, and a<br />
thermostat. The system functions as follows.<br />
Cold coolant is pumped around the cylinder<br />
block, head passages, expansion tank, inlet<br />
manifold and heater matrix by the coolant<br />
pump. After cooling the cylinder bores,<br />
combustion surfaces and valve seats, the<br />
coolant is returned to the water pump via the<br />
metal tube at the rear of the engine. With the<br />
engine cold, the thermostat is initially closed<br />
and there is no circulation through the<br />
radiator.<br />
2 When the coolant reaches a predetermined<br />
temperature, the thermostat opens and the<br />
coolant passes through to the radiator. As the<br />
coolant circulates through the radiator it is<br />
cooled by the inrush of air when the car is in<br />
forward motion. Airflow is supplemented by<br />
the action of the electric cooling fan when<br />
necessary. From the bottom of the radiator<br />
the coolant passes through the thermostat to<br />
the coolant pump and the cycle is repeated. In<br />
this system the thermostat is located in the<br />
return line to the coolant pump.<br />
3 The electric cooling fan mounted on the rear<br />
of the radiator is controlled by a thermostatic<br />
switch. At a predetermined coolant<br />
temperature the switch actuates the fan.<br />
Precautions<br />
A<br />
Warning:<br />
!<br />
Do not attempt to<br />
remove the expansion tank filler<br />
cap or disturb any part of the<br />
cooling system while the engine<br />
is hot, as there is a high risk of scalding. If<br />
the expansion tank filler cap must be<br />
removed before the engine and radiator<br />
have fully cooled (even though this is not<br />
recommended) the pressure in the cooling<br />
system must first be relieved. Cover the<br />
cap with a thick layer of cloth, to avoid<br />
scalding, and slowly unscrew the filler cap<br />
until a hissing sound can be heard. When<br />
the hissing has stopped, indicating that<br />
the pressure has reduced, slowly unscrew<br />
the filler cap until it can be removed; if<br />
more hissing sounds are heard, wait until<br />
they have stopped before unscrewing the<br />
cap completely. At all times keep well<br />
away from the filler cap opening.<br />
A<br />
Warning: Do not allow<br />
!<br />
antifreeze to come into contact<br />
with skin or pain ted surfaces of<br />
the vehicle. Rinse off spills<br />
immediately with plenty of water. Never<br />
leave antifreeze in an open container or in<br />
a puddle in the driveway or on the garage<br />
floor. Children and pets are attracted by its<br />
sweet smell. Antifreeze can be fatal if<br />
ingested.<br />
A<br />
Warning:<br />
!<br />
If the engine is hot,<br />
the electric cooling fan may<br />
start rotating even if the engine<br />
is not running, so be careful to<br />
keep hands, hair and loose clothing well<br />
clear when working in the engine<br />
compartment.<br />
Note: Refer to the warnings given in Section 1<br />
of this Chapter before proceeding.<br />
1 If the checks described in Chapter 1 reveal<br />
a faulty hose, it must be renewed as follows.<br />
2 First drain the cooling system (see<br />
Chapter 1). If the coolant is not due for<br />
renewal, it may be re-used if it is collected in a<br />
clean container.<br />
3 To disconnect a hose, release its retaining<br />
clips, then move them along the hose, clear of<br />
the relevant inlet/outlet union. Carefully work<br />
the hose free. Do not attempt to disconnect<br />
any part of the system while it is still hot.<br />
4 Note that the radiator inlet and outlet<br />
unions are fragile; do not use excessive force<br />
when attempting to remove the hoses. If a<br />
hose proves to be difficult to remove, try to<br />
release it by rotating the hose ends before<br />
attempting to free it.<br />
5 When fitting a hose, first slide the clips<br />
onto the centre of the hose, then work the<br />
hose into position. If clamp type clips were<br />
originally fitted, it is a good idea to replace<br />
them with screw type clips when refitting the<br />
hose. If the hose is stiff, use a little soapy<br />
water as a lubricant.<br />
6 Work the hose into position, checking that it<br />
is correctly routed, then slide each clip along<br />
the hose until it passes over the flared end of<br />
the relevant inlet/outlet union, before securing<br />
it in position with the retaining clip.<br />
7 Refill the cooling system with reference to<br />
Chapter 1.<br />
8 Check thoroughly for leaks as soon as<br />
possible after disturbing any part of the<br />
cooling system.<br />
Removal<br />
1 Disconnect the battery negative lead. Note:<br />
Make sure you know the anti-theft code for<br />
the radio so that it can be reactivated later.<br />
2 Drain the cooling system as described in<br />
Chapter 1 by disconnecting the radiator<br />
bottom hose.<br />
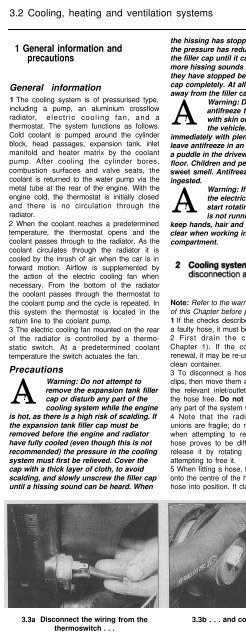
3 Disconnect the wiring from the thermoswitch<br />
and cooling fan motor (see<br />
illustrations).<br />
4 Disconnect the top hose from the radiator<br />
(see illustration).<br />
5 Remove the upper mounting screws and<br />
washers, move the top of the radiator<br />
rearwards, and withdraw the mounting<br />
rubbers (see illustrations).<br />
6 Lift the radiator out of the lower mounting<br />
rubbers and withdraw it from the engine<br />
compartment taking care not to damage the<br />
matrix.<br />
7 Remove the screws and withdraw the<br />
cowling and fan from the radiator.<br />
3.3a Disconnect the wiring from the 3.3b . . . and cooling fan motor 3.4 Disconnecting the top hose<br />
thermoswitch . . .


