

Contents - Volkspage
Contents - Volkspage
Contents - Volkspage

Create successful ePaper yourself
Turn your PDF publications into a flip-book with our unique Google optimized e-Paper software.
2B.16 Engine removal and overhaul procedures<br />
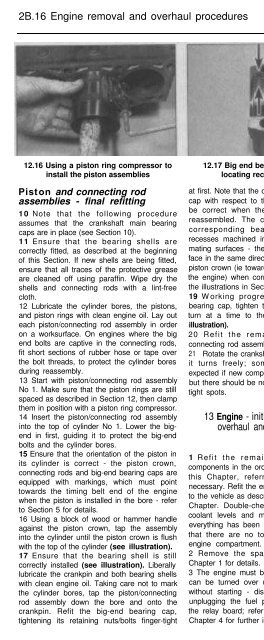
12.16 Using a piston ring compressor to<br />
install the piston assemblies<br />
Piston and connecting rod<br />
assemblies - final refitting<br />
10 Note that the following procedure<br />
assumes that the crankshaft main bearing<br />
caps are in place (see Section 10).<br />
11 Ensure that the bearing shells are<br />
correctly fitted, as described at the beginning<br />
of this Section. If new shells are being fitted,<br />
ensure that all traces of the protective grease<br />
are cleaned off using paraffin. Wipe dry the<br />
shells and connecting rods with a lint-free<br />
cloth.<br />
12 Lubricate the cylinder bores, the pistons,<br />
and piston rings with clean engine oil. Lay out<br />
each piston/connecting rod assembly in order<br />
on a worksurface. On engines where the big<br />
end bolts are captive in the connecting rods,<br />
fit short sections of rubber hose or tape over<br />
the bolt threads, to protect the cylinder bores<br />
during reassembly.<br />
13 Start with piston/connecting rod assembly<br />
No 1. Make sure that the piston rings are still<br />
spaced as described in Section 12, then clamp<br />
them in position with a piston ring compressor.<br />
14 Insert the piston/connecting rod assembly<br />
into the top of cylinder No 1. Lower the bigend<br />
in first, guiding it to protect the big-end<br />
bolts and the cylinder bores.<br />
15 Ensure that the orientation of the piston in<br />
its cylinder is correct - the piston crown,<br />
connecting rods and big-end bearing caps are<br />
equipped with markings, which must point<br />
towards the timing belt end of the engine<br />
when the piston is installed in the bore - refer<br />
to Section 5 for details.<br />
16 Using a block of wood or hammer handle<br />
against the piston crown, tap the assembly<br />
into the cylinder until the piston crown is flush<br />
with the top of the cylinder (see illustration).<br />
17 Ensure that the bearing shell is still<br />
correctly installed (see illustration). Liberally<br />
lubricate the crankpin and both bearing shells<br />
with clean engine oil. Taking care not to mark<br />
the cylinder bores, tap the piston/connecting<br />
rod assembly down the bore and onto the<br />
crankpin. Refit the big-end bearing cap,<br />
tightening its retaining nuts/bolts finger-tight<br />
12.17 Big end bearing shell lug and<br />
locating recess (arrowed)<br />
at first. Note that the orientation of the bearing<br />
cap with respect to the connecting rod must<br />
be correct when the two components are<br />
reassembled. The connecting rod and its<br />
corresponding bearing cap both have<br />
recesses machined into them, close to their<br />
mating surfaces - these recesses must both<br />
face in the same direction as the arrow on the<br />
piston crown (ie towards the timing belt end of<br />
the engine) when correctly installed - refer to<br />
the illustrations in Section 5 for details.<br />
19 Working progressively around each<br />
bearing cap, tighten the retaining nuts half a<br />
turn at a time to the specified torque (see<br />
illustration).<br />
20 Refit the remaining three piston/<br />
connecting rod assemblies in the same way.<br />
21 Rotate the crankshaft by hand. Check that<br />
it turns freely; some stiffness is to be<br />
expected if new components have been fitted,<br />
but there should be no indication of binding or<br />
tight spots.<br />
13 Engine - initial start-up after<br />
overhaul and reassembly<br />
1 Refit the remainder of the engine<br />
components in the order listed in Section 9 of<br />
this Chapter, referring to Part A where<br />
necessary. Refit the engine (and transmission)<br />
to the vehicle as described in Section 2 of this<br />
Chapter. Double-check the engine oil and<br />
coolant levels and make a final check that<br />
everything has been reconnected. Make sure<br />
that there are no tools or rags left in the<br />
engine compartment.<br />
2 Remove the spark plugs, referring to<br />
Chapter 1 for details.<br />
3 The engine must be immobilised so that it<br />
can be turned over using the starter motor,<br />
without starting - disable the fuel pump by<br />
unplugging the fuel pump power relay from<br />
the relay board; refer to the relevant Part of<br />
Chapter 4 for further information.<br />
12.19 Tightening the big-end bearing caps<br />
Caution: If the vehicle is fitted with<br />
catalyst, it is potentially damaging to<br />
immobilise the engine by disabling the<br />
ignition system without first disabling the<br />
fuel system, as unburnt fuel could be<br />
supplied to the catalyst.<br />
4 Turn the engine using the starter motor until<br />
the oil pressure warning lamp goes out. If the<br />
lamp fails to extinguish after several seconds<br />
of cranking, check the engine oil level and oil<br />
filter security. Assuming these are correct,<br />
check the security of the oil pressure switch<br />
cabling - do not progress any further until you<br />
are satisfied that oil is being pumped around<br />
the engine at sufficient pressure.<br />
5 Refit the spark plugs, and reconnect the<br />
fuel pump relay.<br />
6 Start the engine, but be aware that as fuel<br />
system components have been disturbed, the<br />
cranking time may be a little longer than<br />
usual.<br />
7 While the engine is idling, check for fuel,<br />
water and oil leaks. Don’t be alarmed if there<br />
are some odd smells and the occasional<br />
plume of smoke as components heat up and<br />
burn off oil deposits.<br />
8 Assuming all is well, keep the engine idling<br />
until hot water is felt circulating through the<br />
top hose.<br />
9 Check the ignition timing idle speed and<br />
idle mixture setting as described in Chapter 1,<br />
then switch the engine off.<br />
10 After a few minutes, recheck the oil and<br />
coolant levels as described in Chapter 1 and<br />
top-up as necessary.<br />
11 On all the engines described in this<br />
Chapter, there is no need to re-tighten the<br />
cylinder head bolts once the engine has been<br />
run following reassembly.<br />
12 If new pistons, piston rings or crankshaft<br />
bearings have been fitted, the engine must be<br />
treated as new, and run-in for the first<br />
600 miles (1000 km). Do not operate the engine<br />
at more than three-quarter throttle, or allow it to<br />
labour at low engine speeds in any gear. It is<br />
also recommended that the engine oil and filter<br />
are changed at the end of this period.


