

Contents - Volkspage
Contents - Volkspage
Contents - Volkspage

Create successful ePaper yourself
Turn your PDF publications into a flip-book with our unique Google optimized e-Paper software.
Body electrical system 12.11<br />
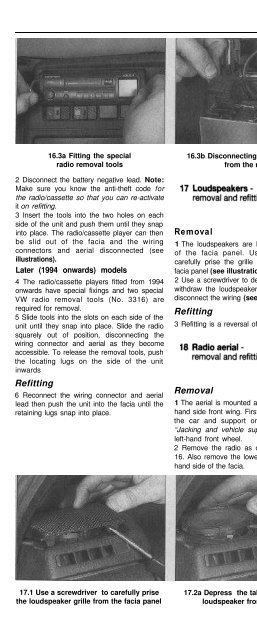
16.3a Fitting the special 16.3b Disconnecting the wiring plug<br />
radio removal tools<br />
from the radio<br />
16.3c Disconnecting the aerial<br />
from the radio<br />
2 Disconnect the battery negative lead. Note:<br />
Make sure you know the anti-theft code for<br />
the radio/cassette so that you can re-activate<br />
it on refitting.<br />
3 Insert the tools into the two holes on each<br />
side of the unit and push them until they snap<br />
into place. The radio/cassette player can then<br />
be slid out of the facia and the wiring<br />
connectors and aerial disconnected (see<br />
illustrations).<br />
Later (1994 onwards) models<br />
4 The radio/cassette players fitted from 1994<br />
onwards have special fixings and two special<br />
VW radio removal tools (No. 3316) are<br />
required for removal.<br />
5 Slide tools into the slots on each side of the<br />
unit until they snap into place. Slide the radio<br />
squarely out of position, disconnecting the<br />
wiring connector and aerial as they become<br />
accessible. To release the removal tools, push<br />
the locating lugs on the side of the unit<br />
inwards<br />
Refitting<br />
6 Reconnect the wiring connector and aerial<br />
lead then push the unit into the facia until the<br />
retaining lugs snap into place.<br />
Removal<br />
1 The loudspeakers are located at each end<br />
of the facia panel. Using a screwdriver<br />
carefully prise the grille from the top of the<br />
facia panel (see illustration).<br />
2 Use a screwdriver to depress the tabs, then<br />
withdraw the loudspeaker from the facia and<br />
disconnect the wiring (see illustrations).<br />
Refitting<br />
3 Refitting is a reversal of removal.<br />
Removal<br />
1 The aerial is mounted at the rear of the lefthand<br />
side front wing. First jack up the front of<br />
the car and support on axle stands (see<br />
“Jacking and vehicle support”). Remove the<br />
left-hand front wheel.<br />
2 Remove the radio as described in Section<br />
16. Also remove the lower shelf from the lefthand<br />
side of the facia.<br />
3 Unscrew the screws and remove the<br />
wheelarch liner from inside the wheelarch.<br />
4 Note the routing of the aerial then withdraw<br />
it from the passenger compartment into the<br />
wheelarch.<br />
5 Unscrew the top nut and remove the aerial<br />
from under the wing.<br />
Refitting<br />
6 Refitting is a reversal of removal.<br />
19 Heated front seat<br />
components -<br />
general information<br />
Heater mats<br />
On models equipped with heated front<br />
seats, a heater pad is fitted to both the seat<br />
back and seat cushion. Renewal of either<br />
heater mat involves peeling back the<br />
upholstery, removing the old mat, sticking the<br />
new mat in position and then refitting the<br />
upholstery. Note that upholstery removal and<br />
refitting requires considerable skill and<br />
experience if it is to be carried out<br />
successfully and is therefore best entrusted to<br />
your VW dealer. In practice, it will be very<br />
difficult for the home mechanic to carry out<br />
the job without ruining the upholstery.<br />
Heated seat switches<br />
Refer to Section 4.<br />
17.1 Use a screwdriver to carefully prise<br />
the loudspeaker grille from the facia panel<br />
17.2a Depress the tabs to release the<br />
loudspeaker from the facia<br />
17.2b Disconnecting the<br />
loudspeaker wiring


