

Contents - Volkspage
Contents - Volkspage
Contents - Volkspage

You also want an ePaper? Increase the reach of your titles
YUMPU automatically turns print PDFs into web optimized ePapers that Google loves.
7.2 Manual transmission<br />
case and planetary gears, thus driving the sun<br />
gears and driveshafts. The rotation of the<br />
planetary gears on their shaft allows the inner<br />
roadwheel to rotate at a slower speed than<br />
the outer roadwheel during cornering.<br />
5 Transmission fluid drain and filler plugs are<br />
provided, and a magnetic swarf collector is<br />
located in the bottom of the transmission<br />
casing.<br />
6 When overhauling the transmission, due<br />
consideration should be given to the costs<br />
involved, since it is often more economical to<br />
obtain a service exchange or good<br />
secondhand transmission rather than fit new<br />
parts to the existing transmission.<br />
7 This Chapter covers the 084 4-speed and<br />
085 5-speed transmissions.<br />
Manual transmission overhaul -<br />
genera/ information<br />
8 The overhaul of a manual transmission is a<br />
complex (and often expensive) engineering<br />
task for the DIY home mechanic to undertake,<br />
which requires access to specialist<br />
equipment. It involves the dismantling and<br />
reassembly of many small components, the<br />
precise measurement of clearances and if<br />
necessary, adjustment by the selection shims<br />
and spacers. Internal transmission<br />
components are also often difficult to obtain<br />
and in many instances, extremely expensive.<br />
Because of this, if the transmission develops<br />
a fault or becomes noisy, the best course of<br />
action is to have the unit overhauled by a<br />
specialist repairer or to obtain an exchange,<br />
reconditioned unit.<br />
9 Nevertheless, it is not impossible for the<br />
more experienced mechanic to overhaul the<br />
transmission if the special tools are available<br />
and the job is carried out in a deliberate stepby-step<br />
manner, to ensure that nothing is<br />
overlooked.<br />
10 The tools necessary for an overhaul<br />
include internal and external circlip pliers,<br />
bearing pullers, a slide hammer, a set of pin<br />
punches, a dial test indicator and possibly a<br />
hydraulic press. In addition, a large, sturdy<br />
workbench and a vice will be required.<br />
11 During dismantling of the transmission,<br />
make careful notes of how each component is<br />
fitted to make reassembly easier and<br />
accurate.<br />
12 Before dismantling the transmission, it will<br />
help if you have some idea of where the<br />
problem lies. Certain problems can be closely<br />
related to specific areas in the transmission<br />
which can make component examination and<br />
renewal easier. Refer to “Fault finding” at the<br />
end of this manual for more information.<br />
Note: The following paragraphs describe how<br />
to remove the transmission leaving the engine<br />
in situ. However, if work is necessary on the<br />
engine as well, the engine and transmission<br />
can be removed as one unit then separated on<br />
the bench as described in Chapter 2B.<br />
Removal<br />
1 The engine must be supported before the<br />
transmission can be removed and it is<br />
recommended that a hoist or lifting beam is<br />
used. As the transmission is removed from<br />
underneath the engine bay, first jack up the<br />
front of the car and support it securely on axle<br />
stands (see “Jacking and vehicle support”),<br />
then apply the handbrake.Take the weight of<br />
the engine with the hoist or lifting beam.<br />
2 Remove the air cleaner/throttle body<br />
ducting as described in Chapter 4A or B as<br />
applicable.<br />
3 Disconnect the battery negative cable and<br />
position it away from the terminal.<br />
4 Remove the windscreen washer bottle (see<br />
Chapter 12) and place it to one side.<br />
5 Disconnect the clutch cable from the<br />
transmission with reference to Chapter 6.<br />
6 Unscrew and remove the engine to<br />
transmission bolts that can be reached from<br />
the top of the transmission.<br />
7 Remove the starter motor with reference to<br />
Chapter 5A.<br />
8 Loosen the clip securing the support<br />
bracket to the coolant pipe at the rear of the<br />
engine, remove the upper starter bolt if<br />
necessary, and move the bracket away from<br />
the transmission (see illustration).<br />
9 Remove the left-hand front engine<br />
mounting bracket by unscrewing the nuts<br />
securing it to the transmission, removing the<br />
mounting bolt, and removing the bolt securing<br />
the earth strap.<br />
10 Working beneath the car, unbolt and<br />
remove the cover plate from the clutch<br />
housing (see illustration).<br />
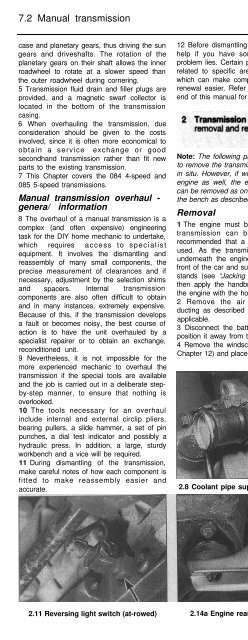
11 Disconnect the wiring from the reversing<br />
light switch (see illustration)<br />
12 Disconnect the inner ends of the<br />
driveshafts from the transmission flanges with<br />
reference to Chapter 8 and tie them out of the<br />
way.<br />
13 Refer to Chapter 12 and unscrew the<br />
collar and disconnect the speedometer cable<br />
from the transmission.<br />
14 Unscrew and remove the remaining<br />
engine to transmission bolts noting the<br />
location of the rear mounting bracket (see<br />
illustrations)<br />
15 Unscrew the rear mounting nut and<br />
remove the bracket, or leave the mounting on<br />
the bracket and remove the mounting bolts<br />
(see illustration).<br />
2.8 Coolant pipe support bracket location 2.10 Clutch housing cover plate<br />
2.11 Reversing light switch (at-rowed) 2.14a Engine rear mounting bracket 2.14b Removing the rear mounting<br />
bracket bolts


