

Contents - Volkspage
Contents - Volkspage
Contents - Volkspage

Create successful ePaper yourself
Turn your PDF publications into a flip-book with our unique Google optimized e-Paper software.
11.4 Bodywork and fittings<br />
and fuse a plastic filler rod into the groove.<br />
Any excess plastic is then removed, and the<br />
area rubbed down to a smooth finish. It is<br />
important that a filler rod of the correct plastic<br />
is used, as body components can be made of<br />
a variety of different types (eg polycarbonate,<br />
ABS, polypropylene).<br />
Damage of a less serious nature (abrasions,<br />
minor cracks etc) can be repaired by the DIY<br />
owner using a two-part epoxy filler repair<br />
material which can be used directly from the<br />
tube. Once mixed in equal proportions, this is<br />
used in similar fashion to the bodywork filler<br />
used on metal panels. The filler is usually<br />
cured in twenty to thirty minutes, ready for<br />
sanding and painting.<br />
If the owner is renewing a complete<br />
component himself, or if he has repaired it<br />
with epoxy filler, he will be left with the<br />
problem of finding a suitable paint for finishing<br />
which is compatible with the type of plastic<br />
used. At one time, the use of a universal paint<br />
was not possible, owing to the complex range<br />
of plastics met with in body component<br />
applications. Standard paints, generally<br />
speaking, will not bond to plastic or rubber<br />
satisfactorily, but professional matched<br />
paints, to match any plastic or rubber finish,<br />
can be obtained from some dealers. However,<br />
it is now possible to obtain a plastic body<br />
parts finishing kit which consists of a preprimer<br />
treatment, a primer and coloured top<br />
coat. Full instructions are normally supplied<br />
with a kit, but basically the method of use is to<br />
first apply the pre-primer to the component<br />
concerned, and allow it to dry for up to<br />
30 minutes. Then the primer is applied, and<br />
left to dry for about an hour before finally<br />
applying the special-coloured top coat. The<br />
result is a correctly coloured component,<br />
where the paint will flex with the plastic or<br />
rubber, a property that standard paint does<br />
not normally posses.<br />
welding-in, and this is best left to<br />
professionals. If the damage is due to impact,<br />
it will also be necessary to check completely<br />
the alignment of the bodyshell, and this can<br />
only be carried out accurately by a VW dealer<br />
using special jigs. If the body is left<br />
misaligned, it is primarily dangerous, as the<br />
car will not handle properly, and secondly,<br />
uneven stresses will be imposed on the<br />
steering, suspension and possibly<br />
transmission, causing abnormal wear, or<br />
complete failure, particularly to such items as<br />
the tyres.<br />
Removal<br />
1 Support the bonnet in its open position.<br />
2 Release the clips from the top of the grille<br />
by pressing them down with a screwdriver<br />
(see illustration).<br />
3 Move the top of the grille forwards then lift it<br />
from the lower mounting holes in the front<br />
valance (see illustration).<br />
Refitting<br />
4 Refitting is a reversal of removal.<br />
Removal<br />
1 Jack up the front of the car and support on<br />
axle stands (see “Jacking and vehicle<br />
support”). Apply the handbrake.<br />
2 Remove the radiator grille (see Section 6).<br />
3 Unscrew the three upper mounting bolts<br />
from the top edge of the front bumper.<br />
4 Unscrew the lower mounting bolts, then<br />
pull the bumper forwards and disengage it<br />
from the side guide plates (see illustration).<br />
Where headlamp washers are fitted,<br />
disconnect the tubing from the jets.<br />
Refitting<br />
5 Refitting is a reversal of removal.<br />
Removal<br />
Hatchback and Coupe models<br />
1 Open the tailgate then prise out the covers<br />
and unscrew the upper mounting bolts from the<br />
top edge of the rear bumper (see illustration).<br />
2 Unscrew the lower mounting bolts then pull<br />
the rear bumper rearwards and disengage it<br />
from the side guide plates (see illustration).<br />
Where serious damage has occurred, or<br />
large areas need renewal due to neglect, it<br />
means that complete new panels will need<br />
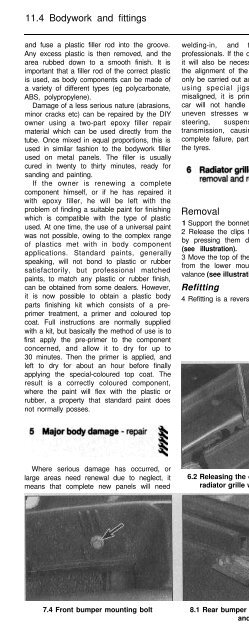
6.2 Releasing the clips at the top of the<br />
radiator grille with a screwdriver<br />
6.3 Removing the radiator grille<br />
7.4 Front bumper mounting bolt 8.1 Rear bumper upper mounting bolt<br />
and cover


