

Contents - Volkspage
Contents - Volkspage
Contents - Volkspage

You also want an ePaper? Increase the reach of your titles
YUMPU automatically turns print PDFs into web optimized ePapers that Google loves.
Fuel system: single-point injection models 4A.7<br />
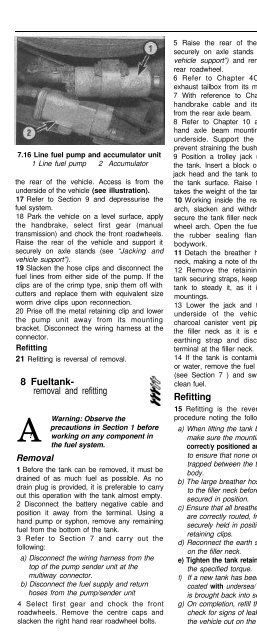
7.16 Line fuel pump and accumulator unit<br />
1 Line fuel pump 2 Accumulator<br />
the rear of the vehicle. Access is from the<br />
underside of the vehicle (see illustration).<br />
17 Refer to Section 9 and depressurise the<br />
fuel system.<br />
18 Park the vehicle on a level surface, apply<br />
the handbrake, select first gear (manual<br />
transmission) and chock the front roadwheels.<br />
Raise the rear of the vehicle and support it<br />
securely on axle stands (see “Jacking and<br />
vehicle support”).<br />
19 Slacken the hose clips and disconnect the<br />
fuel lines from either side of the pump. If the<br />
clips are of the crimp type, snip them off with<br />
cutters and replace them with equivalent size<br />
worm drive clips upon reconnection.<br />
20 Prise off the metal retaining clip and lower<br />
the pump unit away from its mounting<br />
bracket. Disconnect the wiring harness at the<br />
connector.<br />
Refitting<br />
21 Refitting is reversal of removal.<br />
8 Fueltankremoval<br />
and refitting<br />
A<br />
Warning:<br />
!<br />
Removal<br />
Observe the<br />
precautions in Section 1 before<br />
working on any component in<br />
the fuel system.<br />
1 Before the tank can be removed, it must be<br />
drained of as much fuel as possible. As no<br />
drain plug is provided, it is preferable to carry<br />
out this operation with the tank almost empty.<br />
2 Disconnect the battery negative cable and<br />
position it away from the terminal. Using a<br />
hand pump or syphon, remove any remaining<br />
fuel from the bottom of the tank.<br />
3 Refer to Section 7 and carry out the<br />
following:<br />
a) Disconnect the wiring harness from the<br />
top of the pump sender unit at the<br />
multiway connector.<br />
b) Disconnect the fuel supply and return<br />
hoses from the pump/sender unit<br />
4 Select first gear and chock the front<br />
roadwheels. Remove the centre caps and<br />
slacken the right hand rear roadwheel bolts.<br />
5 Raise the rear of the vehicle, support it<br />
securely on axle stands (see “Jacking and<br />
vehicle support”) and remove the right hand<br />
rear roadwheel.<br />
6 Refer to Chapter 4C and unhook the<br />
exhaust tailbox from its mounting bracket.<br />
7 With reference to Chapter 9, detach the<br />
handbrake cable and its mounting bracket<br />
from the rear axle beam.<br />
8 Refer to Chapter 10 and unbolt the right<br />
hand axle beam mounting from the vehicle<br />
underside. Support the axle on blocks to<br />
prevent straining the bushes.<br />
9 Position a trolley jack under the centre of<br />
the tank. Insert a block of wood between the<br />
jack head and the tank to prevent damage to<br />
the tank surface. Raise the jack until it just<br />
takes the weight of the tank.<br />
10 Working inside the rear right hand wheel<br />
arch, slacken and withdraw the screws that<br />
secure the tank filler neck to the inside of the<br />
wheel arch. Open the fuel filler flap and peel<br />
the rubber sealing flange away from the<br />
bodywork.<br />
11 Detach the breather hoses from the filler<br />
neck, making a note of their order of fitment.<br />
12 Remove the retaining screws from the<br />
tank securing straps, keeping one hand on the<br />
tank to steady it, as it is released from its<br />
mountings.<br />
13 Lower the jack and tank away from the<br />
underside of the vehicle; disconnect the<br />
charcoal canister vent pipe from the port on<br />
the filler neck as it is exposed. Locate the<br />
earthing strap and disconnect it from the<br />
terminal at the filler neck.<br />
14 If the tank is contaminated with sediment<br />
or water, remove the fuel lift pump/sender unit<br />
(see Section 7 ) and swill the tank out with<br />
clean fuel.<br />
Refitting<br />
15 Refitting is the reverse of the removal<br />
procedure noting the following points.<br />
a) When lifting the tank back into position<br />
make sure the mounting rubbers are<br />
correct/y positioned and take great care<br />
to ensure that none of the hoses become<br />
trapped between the tank and vehicle<br />
body.<br />
b) The large breather hose must be secured<br />
to the filler neck before the tank is<br />
secured in position.<br />
c) Ensure that all breather pipes and hoses<br />
are correctly routed, free of kinks and<br />
securely held in position with their<br />
retaining clips.<br />
d) Reconnect the earth strap to its terminal<br />
on the filler neck.<br />
e) Tighten the tank retaining strap bolts to<br />
the specified torque.<br />
f) If a new tank has been fitted, it must be<br />
coated with undersea/ before the vehicle<br />
is brought back into service.<br />
g) On completion, refill the tank with fuel and<br />
check for signs of leakage prior to taking<br />
the vehicle out on the road.<br />
2 Refer to Section 5 and locate the fuel pump<br />
relay. Remove the relay from its socket, then<br />
crank the engine for a few seconds. The<br />
engine may fire and run for a while, but<br />
continue cranking until it stops. The fuel<br />
injector should have opened enough times<br />
during cranking to considerably reduce the<br />
line fuel pressure.<br />
3 Switch off the ignition ,then disconnect the<br />
battery negative cable and position it away<br />
from the terminal<br />
4 Place a suitable container beneath the<br />
connection/union that is to be disconnected,<br />
and have a rag ready to soak up any escaping<br />
fuel not being caught by the container.<br />
5 Slowly loosen the connection or union nut<br />
(as applicable) to avoid a sudden release of<br />
pressure and position the rag around the<br />
connection to catch any fuel spray which may<br />
be expelled. Once the pressure has been<br />
released, disconnect the fuel line completely<br />
and insert plugs to minimise fuel loss and to<br />
prevent the entry of dirt into the fuel system.<br />
1 If a fault appears in the fuel injection system<br />
first ensure that all the system wiring<br />
connectors are securely connected and free<br />
of corrosion. Then ensure that the fault is not<br />
due to poor maintenance; ie, check that the<br />
air cleaner filter element is clean, the spark<br />
plugs are in good condition and correctly<br />
gapped, the cylinder compression pressures<br />
are correct, the ignition timing is correct and


