

Contents - Volkspage
Contents - Volkspage
Contents - Volkspage

You also want an ePaper? Increase the reach of your titles
YUMPU automatically turns print PDFs into web optimized ePapers that Google loves.
1.6 Maintenance procedures<br />
The following series of operations are those<br />
which are most often required to improve the<br />
performance of a generally poor-running<br />
engine:<br />
Primary operations<br />
a) Clean, inspect and test the battery (refer<br />
to “Weekly checks”).<br />
b) Check all the engine-related fluids (refer<br />
to “Weekly checks”).<br />
cl Check the condition and tension of the<br />
auxiliary drivebelt (Section 15).<br />
d) Renew the spark plugs (Section 7.6).<br />
e) inspect the distributor cap and rotor<br />
arm (refer to the relevant Section of<br />
Chapter 5B).<br />
f) Check the condition of the air filter, and<br />
renew if necessary (Section 1 7).<br />
g) Renew the fuel filter (Section 21).<br />
h) Check the condition of all hoses, and<br />
check for fluid leaks (Section 5).<br />
i) Check the exhaust gas emissions (refer to<br />
Section 14).<br />
If the above operations do not prove fully<br />
effective, carry out the following secondary<br />
operations:<br />
Secondary operations<br />
All items listed under “Primary operations”,<br />
plus the following:<br />
a) Check the charging system (refer to the<br />
relevant Section of Chapter 5A).<br />
b) Check the ignition system (refer to the<br />
relevant Section of Chapter 5B).<br />
c) Check the fuel system (see relevant<br />
Section of Chapter 4A or B as applicable).<br />
d) Renew the distributor cap and rotor am,<br />
(refer to the relevant Section of Chapter 5B).<br />
e) Renew the ignition HT leads (refer to the<br />
relevant Section of Chapter 50).<br />
10 000 mile/12 month service<br />
1 Frequent oil and filter changes are the most<br />
important preventative maintenance<br />
procedures which can be undertaken by the<br />
DIY owner. As engine oil ages, it becomes<br />
diluted and contaminated, which leads to<br />
premature engine wear.<br />
2 Before starting this procedure, gather all<br />
the necessary tools and materials. Also make<br />
sure that you have plenty of clean rags and<br />
newspapers handy, to mop up any accidental<br />
spills.<br />
3 The oil draining procedure should ideally be<br />
carried out when the engine is warm, as warm<br />
oil runs more freely than cold oil. In addition,<br />
more built-up engine ‘sludge’ will be removed<br />
with the oil, as it is drained . Take care,<br />
however, not to touch the exhaust or any<br />
other hot parts of the engine when working<br />
under the vehicle. To avoid any possibility of<br />
scalding, and to protect yourself from<br />
possible skin irritants and other harmful<br />
contaminants in used engine oils, it is<br />
advisable to wear gloves when carrying out<br />
this work.<br />
4 Access to the underside of the vehicle will<br />
be greatly improved if it can be raised on a lift,<br />
driven onto ramps, or jacked up and<br />
supported on axle stands (see “Jacking and<br />
vehicle support”). Whichever method is<br />
chosen, make sure that the vehicle remains<br />
level, or (if it has been jacked-up at an angle),<br />
that the drain plug is at the lowest point.<br />
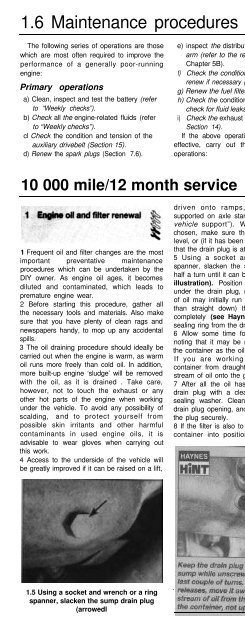
5 Using a socket and wrench or a ring<br />
spanner, slacken the sump drain plug about<br />
half a turn until it can be rotated by hand (see<br />
illustration). Position the draining container<br />
under the drain plug, (noting that the stream<br />
of oil may initially run out at an angle, rather<br />
than straight down) then unscrew the plug<br />
completely (see Haynes Hint). Recover the<br />
sealing ring from the drain plug.<br />
6 Allow some time for the old oil to drain,<br />
noting that it may be necessary to reposition<br />
the container as the oil flow slows to a trickle.<br />
If you are working outside, shield the<br />
container from draughts that may splash the<br />
stream of oil onto the ground.<br />
7 After all the oil has drained, wipe off the<br />
drain plug with a clean rag, and fit a new<br />
sealing washer. Clean the area around the<br />
drain plug opening, and refit the plug. Tighten<br />
the plug securely.<br />
8 If the filter is also to be renewed, move the<br />
container into position under the oil filter,<br />
which is located on the front side of the<br />
cylinder block, below the inlet manifold.<br />
9 Using an oil filter removal tool if necessary,<br />
slacken the filter initially (by turning it in an<br />
anticlockwise direction), then unscrew it by<br />
hand the rest of the way (see illustration).<br />
Note that the filter will still contain some oil -<br />
be prepared for an amount of leakage as the<br />
filter is unscrewed. Hold it with the sealing<br />
face uppermost until it can be emptied into<br />
the draining container.<br />
10 Use a clean rag to remove all oil, dirt and<br />
sludge from the filter sealing area on the<br />
engine. Check the old filter to make sure that<br />
the rubber sealing ring has not stuck to the<br />
engine. If it has, carefully remove it.<br />
11 Apply a light coating of clean engine oil to<br />
the sealing ring on the new filter, then screw it<br />
into position on the engine. Tighten the filter<br />
firmly by hand only - do not use any tools, as<br />
these may damage the outer surface filter.<br />
12 Remove the old oil and all tools from<br />
under the car then lower the car to the ground<br />
(if applicable).<br />
13 Remove the dipstick, then unscrew the oil<br />
filler cap from the cylinder head cover or oil<br />
filler/breather neck (as applicable). Fill the<br />
engine, using the correct grade and type of oil<br />
(refer to “Lubricants fluids and capacities”). An<br />
oil can spout or funnel may help to reduce<br />
spillage. Pour in half the specified quantity of<br />
oil first, then wait a few minutes for the oil to<br />
.<br />
1.5 Using a socket and wrench or a ring<br />
spanner, slacken the sump drain plug<br />
(arrowedl<br />
1.9 Turn the oil filter anticlockwise to<br />
slacken it - use a chain wrench if<br />
necessary<br />
,


