

Contents - Volkspage
Contents - Volkspage
Contents - Volkspage

You also want an ePaper? Increase the reach of your titles
YUMPU automatically turns print PDFs into web optimized ePapers that Google loves.
2A.4 Engine in-car repair procedures<br />
manufacturer. Note the lower compression<br />
ratio of the supercharged G40 model (engine<br />
code PY).<br />
9 If the pressure in any cylinder is low, carry<br />
out the following test to isolate the cause.<br />
Introduce a teaspoonful of clean oil into that<br />
cylinder through its spark plug hole, and<br />
repeat the test.<br />
10 If the addition of oil temporarily improves<br />
the compression pressure, this indicates that<br />
bore or piston wear is responsible for the<br />
pressure loss. No improvement suggests that<br />
leaking or burnt valves, or a blown head<br />
gasket, may be to blame.<br />
11 A low reading from two adjacent cylinders<br />
is almost certainly due to the head gasket<br />
having blown between them: the presence of<br />
coolant in the engine oil will confirm this.<br />
12 If one cylinder is about 20 percent lower<br />
than the others and the engine has a slightly<br />
rough idle, a worn camshaft lobe could be the<br />
cause.<br />
13 If the compression reading is unusually<br />
high, the combustion chambers are probably<br />
coated with carbon deposits. If this is the<br />
case, the cylinder head should be removed<br />
and decarbonised.<br />
14 On completion of the test, refit the spark<br />
plugs and restore the ignition system.<br />
General information<br />
1 The primary function of the toothed timing<br />
belt is to drive the camshaft(s), but it is also<br />
used to drive the coolant pump. Should the<br />
belt slip or break in service, the valve timing will<br />
be disturbed and piston to valve contact may<br />
occur, resulting in serious engine damage.<br />
2 For this reason, it is important that the<br />
timing belt is tensioned correctly and<br />
inspected regularly for signs of wear or<br />
deterioration.<br />
Removal<br />
3 Disconnect the battery negative cable and<br />
position it away from the terminal.<br />
4 With reference to Section 2, remove the<br />
timing belt outer cover and set the engine to<br />
TDC on cylinder No1 .<br />
5 If the timing belt is relatively new and is to<br />
be refitted later, check to see if it has<br />
manufacturers markings to indicate the<br />
correct direction of rotation. If none are<br />
present, make your own using a dab of paint<br />
or typists correction fluid.<br />
Caution: If the belt is refitted differently,<br />
accelerated wear leading to premature<br />
failure may occur.<br />
6 With reference to Chapter 3, loosen the<br />
water pump retaining bolts, then turn the<br />
pump body clockwise to relieve the tension<br />
from the timing belt. Slide the timing belt from<br />
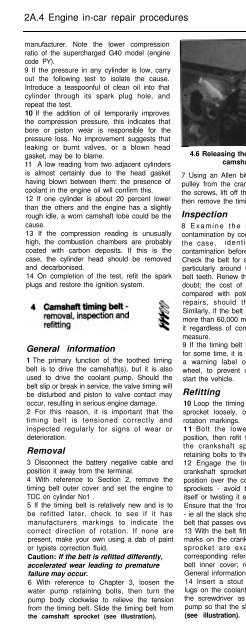
the camshaft sprocket (see illustration).<br />
4.6 Releasing the timing belt from the<br />
camshaft sprocket<br />
7 Using an Allen bit, unbolt the auxiliary belt<br />
pulley from the crankshaft sprocket. Remove<br />
the screws, lift off the timing belt lower cover,<br />
then remove the timing belt.<br />
Inspection<br />
8 Examine the belt for evidence of<br />
contamination by coolant or lubricant. If this is<br />
the case, identify the source of the<br />
contamination before progressing any further.<br />
Check the belt for signs of wear or damage,<br />
particularly around the leading edges of the<br />
belt teeth. Renew the belt if its condition is in<br />
doubt; the cost of belt renewal is negligible<br />
compared with potential cost of the engine<br />
repairs, should the belt fail in service.<br />
Similarly, if the belt is known to have covered<br />
more than 60,000 miles, it is prudent to renew<br />
it regardless of condition, as a precautionary<br />
measure.<br />
9 If the timing belt is not going to be refitted<br />
for some time, it is a wise precaution to hang<br />
a warning label on the vehicles’ steering<br />
wheel, to prevent others from attempting to<br />
start the vehicle.<br />
Refitting<br />
10 Loop the timing belt under the crankshaft<br />
sprocket loosely, observing the direction of<br />
rotation markings.<br />
11 Bolt the lower timing belt cover in<br />
position, then refit the auxiliary belt pulley to<br />
the crankshaft sprocket and tighten the<br />
retaining bolts to the specified torque.<br />
12 Engage the timing belt teeth with the<br />
crankshaft sprocket, then manoeuvre it into<br />
position over the coolant pump and camshaft<br />
sprockets - avoid bending the belt back on<br />
itself or twisting it excessively as you do this.<br />
Ensure that the ‘front run’ of the belt is taught<br />
- ie all the slack should be in the section of the<br />
belt that passes over the coolant pump pulley.<br />
13 With the belt fitted, ensure that the timing<br />
marks on the crankshaft pulley and camshaft<br />
sprocket are exactly aligned with their<br />
corresponding reference marks on the timing<br />
belt inner cover; refer to the illustrations in<br />
General information for details.<br />
14 Insert a stout screwdriver between the<br />
lugs on the coolant pump casting, then using<br />
the screwdriver as a lever, turn the coolant<br />
pump so that the slack in the belt is taken up<br />
(see illustration).<br />
4.14 Adjusting the timing belt tension by<br />
rotating the coolant pump<br />
15 Test the belt tension by grasping it<br />
between the fingers at a point mid-way<br />
between the coolant pump and camshaft<br />
sprockets and twisting it; the belt tension is<br />
correct when it can just be twisted through<br />
90° (quarter of a turn) and no further (see<br />
illustration).<br />
16 When the correct belt tension has been<br />
achieved, tighten the coolant pump mounting<br />
bolts to the specified torque.<br />
17 Using a spanner or wrench and socket on<br />
the crankshaft sprocket centre bolt, rotate the<br />
crankshaft through two complete revolutions<br />
and reset the engine to TDC on cylinder No1 ,<br />
with reference to Section 2. Re-check the belt<br />
tension, adjusting it if necessary.<br />
18 Refit the timing belt cover and fasten the<br />
retaining clips securely.<br />
Camshaft sprocket<br />
Removal<br />
1 With reference to Section 2 remove the<br />
timing belt cover, set the engine to TDC on<br />
cylinder No1 and remove the timing belt.<br />
2 The camshaft sprocket must be held<br />
stationary whilst its retaining bolt is<br />
4.15 Testing the timing belt tension


