

Contents - Volkspage
Contents - Volkspage
Contents - Volkspage

You also want an ePaper? Increase the reach of your titles
YUMPU automatically turns print PDFs into web optimized ePapers that Google loves.
,<br />
9.8 Braking system<br />
Removal<br />
1 Apply the handbrake, then jack up the front<br />
of the vehicle and support it on axle stands<br />
(see “Jacking and vehicle support”). Remove<br />
the appropriate roadwheel.<br />
2 Minimise fluid loss by first removing the<br />
master cylinder reservoir cap, and then<br />
tightening it down onto a piece of polythene,<br />
to obtain an airtight seal. Alternatively, use a<br />
brake hose clamp, a G-clamp or a similar tool<br />
to clamp the flexible hose.<br />
3 Clean the area around the union, then<br />
loosen the brake hose union nut.<br />
4 Follow the procedure described in Section<br />
4 for the removal of the brake pads, however<br />
leave the pads in the carrier bracket.<br />
5 Unscrew the caliper from the end of the<br />
brake hose and remove it from the vehicle.<br />
Overhaul<br />
6 With the caliper on the bench, wipe away all<br />
traces of dust and dirt, but avoid inhaling the<br />
dust, as it is injurious to health.<br />
7 Withdraw the partially ejected piston from<br />
the caliper body, and remove the dust seal.<br />
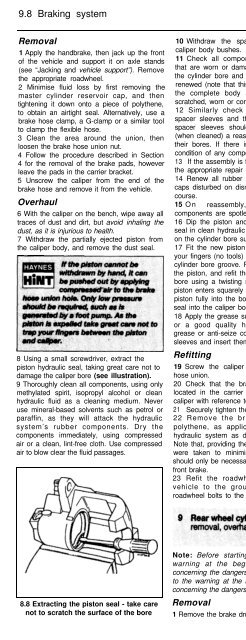
8 Using a small screwdriver, extract the<br />
piston hydraulic seal, taking great care not to<br />
damage the caliper bore (see illustration).<br />
9 Thoroughly clean all components, using only<br />
methylated spirit, isopropyl alcohol or clean<br />
hydraulic fluid as a cleaning medium. Never<br />
use mineral-based solvents such as petrol or<br />
paraffin, as they will attack the hydraulic<br />
system’s rubber components. Dry the<br />
components immediately, using compressed<br />
air or a clean, lint-free cloth. Use compressed<br />
air to blow clear the fluid passages.<br />
8.8 Extracting the piston seal - take care<br />
not to scratch the surface of the bore<br />
10 Withdraw the spacers/sleeves from the<br />
caliper body bushes.<br />
11 Check all components, and renew any<br />
that are worn or damaged. Check particularly<br />
the cylinder bore and piston; these should be<br />
renewed (note that this means the renewal of<br />
the complete body assembly) if they are<br />
scratched, worn or corroded in any way.<br />
12 Similarly check the condition of the<br />
spacer sleeves and their bushes/bores; both<br />
spacer sleeves should be undamaged and<br />
(when cleaned) a reasonably tight sliding fit in<br />
their bores. If there is any doubt about the<br />
condition of any component, renew it.<br />
13 If the assembly is fit for further use, obtain<br />
the appropriate repair kit.<br />
14 Renew all rubber seals, dust covers and<br />
caps disturbed on dismantling as a matter of<br />
course.<br />
15 On reassembly, ensure that all<br />
components are spotlessly clean.<br />
16 Dip the piston and the new piston (fluid)<br />
seal in clean hydraulic fluid. Smear clean fluid<br />
on the cylinder bore surface.<br />
17 Fit the new piston (fluid) seal, using only<br />
your fingers (no tools) to manipulate it into the<br />
cylinder bore groove. Fit the new dust seal to<br />
the piston, and refit the piston to the cylinder<br />
bore using a twisting motion; ensure that the<br />
piston enters squarely into the bore. Press the<br />
piston fully into the bore, then press the dust<br />
seal into the caliper body.<br />
18 Apply the grease supplied in the repair kit,<br />
or a good quality high-temperature brake<br />
grease or anti-seize compound, to the spacer<br />
sleeves and insert them into their bushes.<br />
Refitting<br />
19 Screw the caliper fully onto the flexible<br />
hose union.<br />
20 Check that the brake pads are correctly<br />
located in the carrier bracket, then refit the<br />
caliper with reference to Section 4.<br />
21 Securely tighten the brake hose union nut.<br />
22 Remove the brake hose clamp or<br />
polythene, as applicable, and bleed the<br />
hydraulic system as described in Section 2.<br />
Note that, providing the precautions described<br />
were taken to minimise brake fluid loss, it<br />
should only be necessary to bleed the relevant<br />
front brake.<br />
23 Refit the roadwheel, then lower the<br />
vehicle to the ground and tighten the<br />
roadwheel bolts to the specified torque.<br />
Note: Before starting work, refer to the<br />
warning at the beginning of Section 2<br />
concerning the dangers of hydraulic fluid, and<br />
to the warning at the beginning of Section 5<br />
concerning the dangers of asbestos dust.<br />
Removal<br />
1 Remove the brake drum (see Section 7).<br />
2 Using pliers, carefully unhook the upper<br />
brake shoe return spring, and remove it from<br />
both brake shoes. Pull the upper ends of the<br />
shoes away from the wheel cylinder to<br />
disengage them from the pistons.<br />
3 Minimise fluid loss by first removing the<br />
master cylinder reservoir cap, and then<br />
tightening it down onto a piece of polythene,<br />
to obtain an airtight seal. Alternatively, use a<br />
brake hose clamp, G-clamp or a similar tool to<br />
clamp the flexible hose at the nearest<br />
convenient point to the wheel cylinder.<br />
4 Wipe away all traces of dirt around the<br />
brake pipe union at the rear of the wheel<br />
cylinder, and unscrew the union nut. Carefully<br />
ease the pipe out of the wheel cylinder, and<br />
plug or tape over its end to prevent dirt entry.<br />
Wipe off any spilt fluid immediately.<br />
5 Unscrew the two wheel cylinder retaining<br />
bolts from the rear of the backplate, and<br />
remove the cylinder, taking great care not to<br />
allow surplus hydraulic fluid to contaminate<br />
the brake shoe linings.<br />
Overhaul<br />
6 Brush the dirt and dust from the wheel<br />
cylinder, but take care not to inhale it.<br />
7 Pull the rubber dust seals from the ends of<br />
the cylinder body.<br />
8 The pistons will normally be ejected by the<br />
pressure of the coil spring, but if they are not,<br />
tap the end of the cylinder body on a piece of<br />
wood, or apply low air pressure - eg, from a<br />
foot pump - to the hydraulic fluid union hole to<br />
eject the pistons from their bores.<br />
9 Inspect the surfaces of the pistons and their<br />
bores in the cylinder body for scoring, or<br />
evidence of metal-to-metal contact. If evident,<br />
renew the complete wheel cylinder assembly.<br />
10 If the pistons and bores are in good<br />
condition, remove and discard the seals and<br />
obtain a repair kit, which will contain all the<br />
necessary renewable items. Note the correct<br />
fitted orientation of the seals to ensure correct<br />
fitment of the new seals.<br />
11 Lubricate the new piston seals with clean<br />
brake fluid, and fit them onto the pistons with<br />
their larger diameters innermost.<br />
12 Insert the spring in the cylinder,<br />
13 Insert the pistons into the cylinder bores<br />
using a twisting motion.<br />
14 Fit the dust seals, and check that the<br />
pistons can move freely in their bores.<br />
Refitting<br />
15 Ensure that the backplate and wheel<br />
cylinder mating surfaces are clean, then<br />
spread the brake shoes and manoeuvre the<br />
wheel cylinder into position.<br />
16 Insert the brake pipe, and screw in the<br />
union nut two or three turns to ensure that the<br />
thread has started.<br />
17 Insert the two wheel cylinder retaining<br />
bolts, and tighten them to the specified torque.<br />
Now fully tighten the brake pipe union nut.<br />
18 Remove the clamp from the flexible brake<br />
hose, or the polythene from the master<br />
cylinder reservoir (as applicable). ’


