

Contents - Volkspage
Contents - Volkspage
Contents - Volkspage

You also want an ePaper? Increase the reach of your titles
YUMPU automatically turns print PDFs into web optimized ePapers that Google loves.
1.12 20 000 mile service<br />
16.3 It is advisable to remove any debris<br />
from the spark plug recesses using a clean<br />
brush before removing the plugs, to<br />
prevent it from dropping into the cylinders<br />
16.4a Unscrew the plugs using a<br />
spark plug spanner, or a spark plug socket<br />
and extension bar<br />
It Is very often difficult to Insert spark<br />
plugs into their ho/es without crossthreading<br />
them. To avoid this<br />
possibility, fit a short length of 5/ 16<br />
inch internal diameter rubber hose over<br />
the and of the spark plug. The flexible<br />
hose acts as a universal joint to help<br />
align the plug with the plug hole.<br />
Should the plug begin to cruss-thread,<br />
the hose will slip on the spark plug,<br />
preventing thread damage to the<br />
aluminium. cylinderer head<br />
16.4b Removing a spark plug<br />
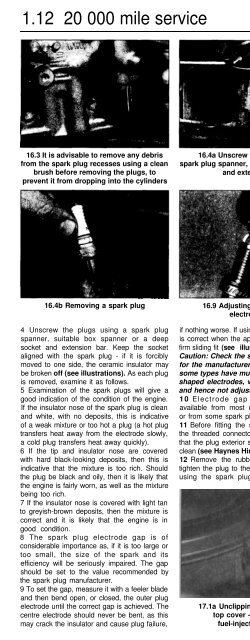
4 Unscrew the plugs using a spark plug<br />
spanner, suitable box spanner or a deep<br />
socket and extension bar. Keep the socket<br />
aligned with the spark plug - if it is forcibly<br />
moved to one side, the ceramic insulator may<br />
be broken off (see illustrations). As each plug<br />
is removed, examine it as follows.<br />
5 Examination of the spark plugs will give a<br />
good indication of the condition of the engine.<br />
If the insulator nose of the spark plug is clean<br />
and white, with no deposits, this is indicative<br />
of a weak mixture or too hot a plug (a hot plug<br />
transfers heat away from the electrode slowly,<br />
a cold plug transfers heat away quickly).<br />
6 If the tip and insulator nose are covered<br />
with hard black-looking deposits, then this is<br />
indicative that the mixture is too rich. Should<br />
the plug be black and oily, then it is likely that<br />
the engine is fairly worn, as well as the mixture<br />
being too rich.<br />
7 If the insulator nose is covered with light tan<br />
to greyish-brown deposits, then the mixture is<br />
correct and it is likely that the engine is in<br />
good condition.<br />
8 The spark plug electrode gap is of<br />
considerable importance as, if it is too large or<br />
too small, the size of the spark and its<br />
efficiency will be seriously impaired. The gap<br />
should be set to the value recommended by<br />
the spark plug manufacturer.<br />
9 To set the gap, measure it with a feeler blade<br />
and then bend open, or closed, the outer plug<br />
electrode until the correct gap is achieved. The<br />
centre electrode should never be bent, as this<br />
may crack the insulator and cause plug failure,<br />
16.9 Adjusting the spark plug<br />
electrode gap<br />
if nothing worse. If using feeler blades, the gap<br />
is correct when the appropriate-size blade is a<br />
firm sliding fit (see illustration).<br />
Caution: Check the spark plug packaging<br />
for the manufacturers recommendations -<br />
some types have multiple or speciallyshaped<br />
electrodes, which are pm-gapped<br />
and hence not adjustable.<br />
10 Electrode gap adjusting tools are<br />
available from most motor accessory shops,<br />
or from some spark plug manufacturers.<br />
11 Before fitting the spark plugs, check that<br />
the threaded connector sleeves are tight, and<br />
that the plug exterior surfaces and threads are<br />
clean (see Haynes Hint).<br />
12 Remove the rubber hose (if used), and<br />
tighten the plug to the specified torque setting<br />
using the spark plug socket and a torque<br />
17.1a Unclipping the air cleaner<br />
top cover - single-point<br />
fuel-injected models<br />
wrench. Refit the remaining spark plugs in the<br />
same manner.<br />
13 Connect the HT leads in their correct<br />
order, and refit any components removed for<br />
access.<br />
17 Air filter renewal<br />
1 Prise open the spring clips and lift off the air<br />
cleaner top cover (see illustrations)<br />
Caution: On multi-point fuel-injected<br />
models, the air flow meter is integral with<br />
the air cleaner top cover - handle this<br />
component very carefully as it can easily<br />
be damaged.<br />
17.1 b Removing the air cleaner top<br />
cover/air flow meter - multi-point<br />
fuel-injected models


