

Contents - Volkspage
Contents - Volkspage
Contents - Volkspage

Create successful ePaper yourself
Turn your PDF publications into a flip-book with our unique Google optimized e-Paper software.
9.4 Braking system<br />
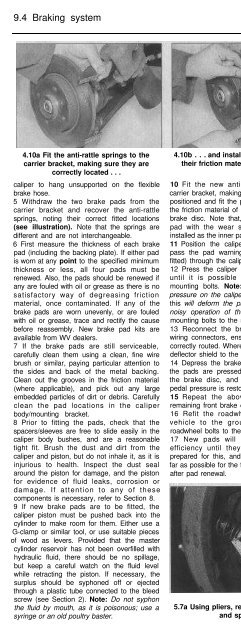
4.10a Fit the anti-rattle springs to the<br />
carrier bracket, making sure they are<br />
correctly located . . .<br />
caliper to hang unsupported on the flexible<br />
brake hose.<br />
5 Withdraw the two brake pads from the<br />
carrier bracket and recover the anti-rattle<br />
springs, noting their correct fitted locations<br />
(see illustration). Note that the springs are<br />
different and are not interchangeable.<br />
6 First measure the thickness of each brake<br />
pad (including the backing plate). If either pad<br />
is worn at any point to the specified minimum<br />
thickness or less, all four pads must be<br />
renewed. Also, the pads should be renewed if<br />
any are fouled with oil or grease as there is no<br />
satisfactory way of degreasing friction<br />
material, once contaminated. If any of the<br />
brake pads are worn unevenly, or are fouled<br />
with oil or grease, trace and rectify the cause<br />
before reassembly. New brake pad kits are<br />
available from WV dealers.<br />
7 If the brake pads are still serviceable,<br />
carefully clean them using a clean, fine wire<br />
brush or similar, paying particular attention to<br />
the sides and back of the metal backing.<br />
Clean out the grooves in the friction material<br />
(where applicable), and pick out any large<br />
embedded particles of dirt or debris. Carefully<br />
clean the pad locations in the caliper<br />
body/mounting bracket.<br />
8 Prior to fitting the pads, check that the<br />
spacers/sleeves are free to slide easily in the<br />
caliper body bushes, and are a reasonable<br />
tight fit. Brush the dust and dirt from the<br />
caliper and piston, but do not inhale it, as it is<br />
injurious to health. Inspect the dust seal<br />
around the piston for damage, and the piston<br />
for evidence of fluid leaks, corrosion or<br />
damage. If attention to any of these<br />
components is necessary, refer to Section 8.<br />
9 If new brake pads are to be fitted, the<br />
caliper piston must be pushed back into the<br />
cylinder to make room for them. Either use a<br />
G-clamp or similar tool, or use suitable pieces<br />
of wood as levers. Provided that the master<br />
cylinder reservoir has not been overfilled with<br />
hydraulic fluid, there should be no spillage,<br />
but keep a careful watch on the fluid level<br />
while retracting the piston. If necessary, the<br />
surplus should be syphoned off or ejected<br />
through a plastic tube connected to the bleed<br />
screw (see Section 2). Note: Do not syphon<br />
the fluid by mouth, as it is poisonous; use a<br />
syringe or an old poultry baster.<br />
4.10b . . . and install the brake pads with<br />
their friction material facing the disc<br />
10 Fit the new anti-rattle springs to the<br />
carrier bracket, making sure they are correctly<br />
positioned and fit the pads, and ensuring that<br />
the friction material of each pad is against the<br />
brake disc. Note that, where necessary, the<br />
pad with the wear sensor wire should be<br />
installed as the inner pad (see illustrations).<br />
11 Position the caliper over the pads, and<br />
pass the pad warning sensor wiring (where<br />
fitted) through the caliper aperture.<br />
12 Press the caliper into position sufficiently<br />
until it is possible to install the caliper<br />
mounting bolts. Note: Do not exert excess<br />
pressure on the caliper in either direction, as<br />
this will deform the pad springs, resulting in<br />
noisy operation of the brakes. Tighten the<br />
mounting bolts to the specified torque setting.<br />
13 Reconnect the brake pad wear sensor<br />
wiring connectors, ensuring that the wiring is<br />
correctly routed. Where necessary, refit the air<br />
deflector shield to the caliper.<br />
14 Depress the brake pedal repeatedly, until<br />
the pads are pressed into firm contact with<br />
the brake disc, and normal (non-assisted)<br />
pedal pressure is restored.<br />
15 Repeat the above procedure on the<br />
remaining front brake caliper.<br />
16 Refit the roadwheels, then lower the<br />
vehicle to the ground and tighten the<br />
roadwheel bolts to the specified torque.<br />
17 New pads will not give full braking<br />
efficiency until they have bedded-in. Be<br />
prepared for this, and avoid hard braking as<br />
far as possible for the first hundred miles or so<br />
after pad renewal.<br />
5.7a Using pliers, remove the spring cup<br />
and spring. . .<br />
A<br />
Warning: Renew BOTH sets of<br />
brake shoes at the same time -<br />
! NEVER renew the shoes on only<br />
one wheel, as uneven braking<br />
may result. Note that the dust created by<br />
wear of the shoes may contain asbestos,<br />
which is a health hazard. Never blow it out<br />
with compressed air, and DO NOT inhale<br />
any of it. An approved filtering mask<br />
should be worn when working on the<br />
brakes. DO NOT use petrol or petroleumbased<br />
solvents to clean brake parts; use<br />
brake cleaner or methylated spirit only.<br />
1 Remove the brake drum (see Section 7).<br />
2 Working carefully, and taking the necessary<br />
precautions, remove all traces of brake dust<br />
from the brake drum, backplate and shoes.<br />
3 Measure the thickness of the friction material<br />
of each brake shoe at several points; if either<br />
shoe is worn at any point to the specified<br />
minimum thickness or less, all four shoes must<br />
be renewed as a set. The shoes should also be<br />
renewed if any are fouled with oil or grease;<br />
there is no satisfactory way of degreasing<br />
friction material, once contaminated.<br />
4 If any of the brake shoes are worn unevenly,<br />
or fouled with oil or grease, trace and rectify<br />
the cause before reassembly.<br />
5 To renew the brake shoes, continue as<br />
follows. If the brake shoes are not worn<br />
excessively and all is well, refit the brake drum<br />
as described in Section 7.<br />
6 Note the position of the brake shoes and<br />
springs, and mark the webs of the shoes, if<br />
necessary, to aid refitting.<br />
7 Using a pair of pliers, remove the shoe<br />
retainer spring cups by depressing and<br />
turning them through 90°. With the cups<br />
removed, lift off the springs and withdraw the<br />
retainer pins (see illustrations).<br />
8 Ease the shoes out one at a time from the<br />
lower pivot point, to release the tension of the<br />
return spring, then disconnect the lower return<br />
spring from both shoes. Use a pair of pliers or<br />
an adjustable spanner to release the shoes<br />
(see illustrations).<br />
5.7b . . . and withdraw the retainer pin<br />
from the rear of the backplate


