

Contents - Volkspage
Contents - Volkspage
Contents - Volkspage

Create successful ePaper yourself
Turn your PDF publications into a flip-book with our unique Google optimized e-Paper software.
12.10 Body electrical system<br />
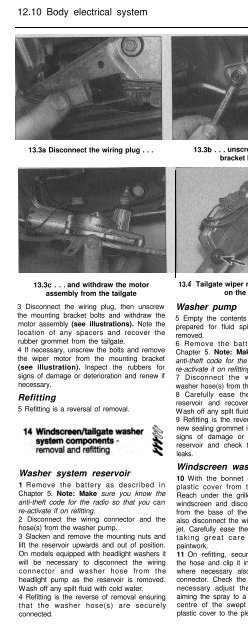
13.3a Disconnect the wiring plug . . . 13.3b . . . unscrew the mounting<br />
bracket bolts . . .<br />
13.3c . . . and withdraw the motor<br />
assembly from the tailgate<br />
3 Disconnect the wiring plug, then unscrew<br />
the mounting bracket bolts and withdraw the<br />
motor assembly (see illustrations). Note the<br />
location of any spacers and recover the<br />
rubber grommet from the tailgate.<br />
4 If necessary, unscrew the bolts and remove<br />
the wiper motor from the mounting bracket<br />
(see illustration). Inspect the rubbers for<br />
signs of damage or deterioration and renew if<br />
necessary.<br />
Refitting<br />
5 Refitting is a reversal of removal.<br />
Washer system reservoir<br />
1 Remove the battery as described in<br />
Chapter 5. Note: Make sure you know the<br />
anti-theft code for the radio so that you can<br />
re-activate if on refitting.<br />
2 Disconnect the wiring connector and the<br />
hose(s) from the washer pump.<br />
3 Slacken and remove the mounting nuts and<br />
lift the reservoir upwards and out of position.<br />
On models equipped with headlight washers it<br />
will be necessary to disconnect the wiring<br />
connector and washer hose from the<br />
headlight pump as the reservoir is removed.<br />
Wash off any spilt fluid with cold water.<br />
4 Refitting is the reverse of removal ensuring<br />
that the washer hose(s) are securely<br />
connected.<br />
13.4 Tailgate wiper motor mounting<br />
on the bracket<br />
Washer pump<br />
5 Empty the contents of the reservoir or be<br />
prepared for fluid spillage as the pump is<br />
removed.<br />
6 Remove the battery as described in<br />
Chapter 5. Note: Make sure you know the<br />
anti-theft code for the radio so that you can<br />
re-activate it on refitting.<br />
7 Disconnect the wiring connector and<br />
washer hose(s) from the pump.<br />
8 Carefully ease the pump out from the<br />
reservoir and recover its sealing grommet.<br />
Wash off any spilt fluid with cold water.<br />
9 Refitting is the reverse of removal, using a<br />
new sealing grommet if the original one shows<br />
signs of damage or deterioration. Refill the<br />
reservoir and check the pump grommet for<br />
leaks.<br />
Windscreen washer jets<br />
10 With the bonnet open first remove the<br />
plastic cover from the plenum chamber.<br />
Reach under the grille at the bottom of the<br />
windscreen and disconnect the washer hose<br />
from the base of the jet. Where necessary,<br />
also disconnect the wiring connector from the<br />
jet. Carefully ease the jet out from the grille,<br />
taking great care not to damage the<br />
paintwork.<br />
11 On refitting, securely connect the jet to<br />
the hose and clip it into position in the grille;<br />
where necessary also reconnect the wiring<br />
connector. Check the operation of the jet. If<br />
necessary adjust the nozzle using a pin,<br />
aiming the spray to a point slightly above the<br />
centre of the swept area. Finally refit the<br />
plastic cover to the plenum chamber.<br />
Washer system reservoir<br />
1 Refer to Section 14. Two pumps are fitted<br />
to the reservoir, the larger one being the<br />
headlight washer pump.<br />
Washer pump<br />
2 Remove the washer reservoir as described<br />
in paragraph 1.<br />
3 Carefully ease the pump out from the<br />
reservoir and recover its sealing grommet.<br />
Wash off any spilt fluid with cold water.<br />
4 Refitting is the reverse of removal, using a<br />
new sealing grommet if the original one shows<br />
signs of damage or deterioration. Refill the<br />
reservoir and check the pump grommet for<br />
leaks.<br />
Washer jets<br />
5 If necessary for improved access to the jet<br />
retaining nut, remove the front bumper as<br />
described in Chapter 11.<br />
6 Disconnect the washer tubing then unscrew<br />
the mounting nut and remove the jet from the<br />
bumper.<br />
7 Refitting is the reverse of removal making<br />
sure that the washer jets are correctly aimed<br />
at the headlight.<br />
Note: The following removal and refitting<br />
procedure is for the range of radio/cassette<br />
units which VW fit as standard equipment.<br />
Removal and refitting procedures of nonstandard<br />
radio/cassettes will differ slightly.<br />
Removal<br />
Early (pre 1994) models<br />
1 The radio/cassette players fitted prior to<br />
1994 have DIN standard fixings. Two special<br />
tools, obtainable from most car accessory<br />
shops, are required for removal. Alternatively<br />
suitable tools can be fabricated from 3 mm<br />
diameter wire, such as welding rod.


