

Contents - Volkspage
Contents - Volkspage
Contents - Volkspage

Create successful ePaper yourself
Turn your PDF publications into a flip-book with our unique Google optimized e-Paper software.
Braking system 9.7<br />
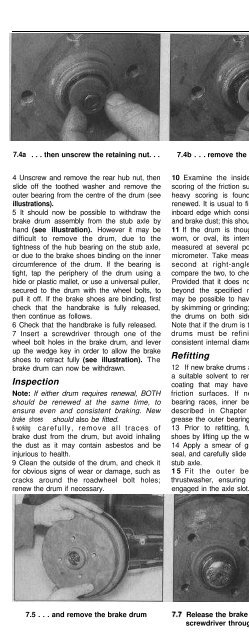
7.4a . . . then unscrew the retaining nut. . . 7.4b . . . remove the toothed washer. . . 7.4c . . . and withdraw the outer bearing<br />
4 Unscrew and remove the rear hub nut, then<br />
slide off the toothed washer and remove the<br />
outer bearing from the centre of the drum (see<br />
illustrations).<br />
5 It should now be possible to withdraw the<br />
brake drum assembly from the stub axle by<br />
hand (see illustration). However it may be<br />
difficult to remove the drum, due to the<br />
tightness of the hub bearing on the stub axle,<br />
or due to the brake shoes binding on the inner<br />
circumference of the drum. If the bearing is<br />
tight, tap the periphery of the drum using a<br />
hide or plastic mallet, or use a universal puller,<br />
secured to the drum with the wheel bolts, to<br />
pull it off. If the brake shoes are binding, first<br />
check that the handbrake is fully released,<br />
then continue as follows.<br />
6 Check that the handbrake is fully released.<br />
7 Insert a screwdriver through one of the<br />
wheel bolt holes in the brake drum, and lever<br />
up the wedge key in order to allow the brake<br />
shoes to retract fully (see illustration). The<br />
brake drum can now be withdrawn.<br />
Inspection<br />
Note: If either drum requires renewal, BOTH<br />
should be renewed at the same time, to<br />
ensure even and consistent braking. New<br />
brake shoes should also be fitted.<br />
8 working carefully, remove all traces of<br />
brake dust from the drum, but avoid inhaling<br />
the dust as it may contain asbestos and be<br />
injurious to health.<br />
9 Clean the outside of the drum, and check it<br />
for obvious signs of wear or damage, such as<br />
cracks around the roadwheel bolt holes;<br />
renew the drum if necessary.<br />
10 Examine the inside of the drum. Light<br />
scoring of the friction surface is normal, but if<br />
heavy scoring is found, the drum must be<br />
renewed. It is usual to find a lip on the drum’s<br />
inboard edge which consists of a mixture of rust<br />
and brake dust; this should be scraped away.<br />
11 If the drum is thought to be excessively<br />
worn, or oval, its internal diameter must be<br />
measured at several points using an internal<br />
micrometer. Take measurements in pairs, the<br />
second at right-angles to the first, and<br />
compare the two, to check for signs of ovality.<br />
Provided that it does not enlarge the drum to<br />
beyond the specified maximum diameter, it<br />
may be possible to have the drum refinished<br />
by skimming or grinding; if this is not possible,<br />
the drums on both sides must be renewed.<br />
Note that if the drum is to be skimmed, BOTH<br />
drums must be refinished to maintain a<br />
consistent internal diameter on both sides.<br />
Refitting<br />
12 If new brake drums are to be installed, use<br />
a suitable solvent to remove any preservative<br />
coating that may have been applied to the<br />
friction surfaces. If necessary, install the<br />
bearing races, inner bearing and oil seal as<br />
described in Chapter 10, and thoroughly<br />
grease the outer bearing.<br />
13 Prior to refitting, fully retract the brake<br />
shoes by lifting up the wedge key.<br />
14 Apply a smear of grease to the drum oil<br />
seal, and carefully slide the assembly onto the<br />
stub axle.<br />
15 Fit the outer bearing and toothed<br />
thrustwasher, ensuring its tooth is correctly<br />
engaged in the axle slot.<br />
16 Refit the hub nut and moderately tighten it<br />
whilst rotating the brake drum to settle the<br />
hub bearings in position. Gradually slacken<br />
the hub nut until the position is found where it<br />
is just possible to move the toothed washer<br />
from side-to-side using a screwdriver (see<br />
illustration). Note: On/y finger pressure<br />
should be needed to move the washer. Do not<br />
turn or /ever the screwdriver. When the hub<br />
nut is correctly positioned, refit the locking<br />
cap and secure the nut in position with a new<br />
split pin.<br />
17 Fit the cap to the centre of the brake<br />
drum, tapping it fully into position with a light<br />
hammer.<br />
18 Depress the footbrake several times to<br />
operate the self-adjusting mechanism.<br />
19 Repeat the above procedure on the<br />
remaining rear brake assembly (where<br />
necessary), then check and if necessary<br />
adjust the handbrake cable (see Section 14).<br />
20 On completion, refit the roadwheel(<br />
then lower the vehicle to the ground and<br />
tighten the wheel bolts to the specified<br />
torque.<br />
Note: Before starting work, refer to the<br />
warning at the beginning of Section 2<br />
concerning the dangers of hydraulic fluid, and<br />
to the warning at the beginning of Section 4<br />
concerning the dangers of asbestos dust.<br />
7.5 . . . and remove the brake drum<br />
Release the brake shoes by inserting a<br />
screwdriver through the drum hole<br />
7.16 Checking the adjustment of the<br />
hub bearing with a screwdriver


