

Contents - Volkspage
Contents - Volkspage
Contents - Volkspage

Create successful ePaper yourself
Turn your PDF publications into a flip-book with our unique Google optimized e-Paper software.
Engine in-car repair procedures 2A.3<br />
in the form of a small cut-out , however if the<br />
terminal is not marked, follow the HT lead<br />
from the No 1 cylinder spark plug back to the<br />
distributor cap (No 1 cylinder is at the timing<br />
belt end of the engine) and using chalk or a<br />
pen (not a pencil, as the graphite will conduct<br />
electricity), place a mark on the distributor<br />
body directly under the terminal.<br />
10 Remove the distributor cap, as described<br />
in Chapter 5B<br />
11 Disconnect the HT leads from the spark<br />
plugs, noting their order of connection.<br />
12 To bring any piston up to TDC, it will be<br />
necessary to rotate the crankshaft manually.<br />
This can be done by using a wrench and<br />
socket on the bolt that retains the crankshaft<br />
pulley (refer to the following sub-Section for<br />
more detail).<br />
13 Rotate the crankshaft in its normal<br />
direction of rotation until the distributor rotor<br />
arm electrode begins to approach the No 1<br />
terminal marking made on the distributor<br />
Remove all four spark plugs;<br />
the lack of cylinder<br />
compression will make the<br />
engine easier to turn; refer<br />
to Chapter 1 for details.<br />
14 Carry out the following operations:<br />
a) Refer to Chapter 4A or B (as applicable)<br />
and remove the air cleaner assembly, to<br />
improve access.<br />
b) Refer to Chapter 1 and remove the<br />
auxiliary drivebelt.<br />
15 Prise open the clips and lift off the upper<br />
section of the outer timing belt cover to<br />
expose the timing belt sprockets beneath.<br />
Where applicable, remove the dipstick tube<br />
and engine earth lead, if they are secured to<br />
the timing belt cover.<br />
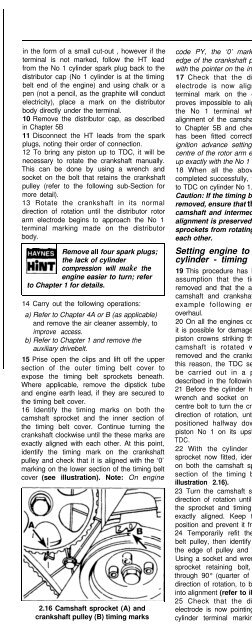
16 Identify the timing marks on both the<br />
camshaft sprocket and the inner section of<br />
the timing belt cover. Continue turning the<br />
crankshaft clockwise until the these marks are<br />
exactly aligned with each other. At this point,<br />
identify the timing mark on the crankshaft<br />
pulley and check that it is aligned with the ‘0’<br />
marking on the lower section of the timing belt<br />
cover (see illustration). Note: On engine<br />
2.16 Camshaft sprocket (A) and<br />
crankshaft pulley (B) timing marks<br />
code PY, the ‘0’ marking stamped on the<br />
edge of the crankshaft pulley must be aligned<br />
with the pointer on the inner timing be/t cover.<br />
17 Check that the distributor rotor arm<br />
electrode is now aligned with the No 1<br />
terminal mark on the distributor body. If it<br />
proves impossible to align the rotor arm with<br />
the No 1 terminal whilst maintaining the<br />
alignment of the camshaft timing marks, refer<br />
to Chapter 5B and check that the distributor<br />
has been fitted correctly. Note: The basic<br />
ignition advance setting may mean that the<br />
centre of the rotor arm electrode does not line<br />
up exactly with the No 1 terminal marking<br />
18 When all the above steps have been<br />
completed successfully, the engine will be set<br />
to TDC on cylinder No 1.<br />
Caution: If the timing belt is to be<br />
removed, ensure that the crankshaft,<br />
camshaft and intermediate shaft<br />
alignment is preserved by preventing the<br />
sprockets from rotating with respect to<br />
each other.<br />
Setting engine to TDC on No 1<br />
cylinder - timing belt removed<br />
19 This procedure has been written with the<br />
assumption that the timing belt has been<br />
removed and that the alignment between the<br />
camshaft and crankshaft has been lost, for<br />
example following engine removal and<br />
overhaul.<br />
20 On all the engines covered in this manual,<br />
it is possible for damage to be caused by the<br />
piston crowns striking the valve heads, if the<br />
camshaft is rotated with the timing belt<br />
removed and the crankshaft set to TDC. For<br />
this reason, the TDC setting procedure must<br />
be carried out in a particular order, as<br />
described in the following paragraphs.<br />
21 Before the cylinder head is refitted, use a<br />
wrench and socket on the crankshaft pulley<br />
centre bolt to turn the crankshaft in its normal<br />
direction of rotation, until all four pistons are<br />
positioned halfway down their bores, with<br />
piston No 1 on its upstroke -i.e. 90° before<br />
TDC.<br />
22 With the cylinder head and camshaft<br />
sprocket now fitted, identify the timing marks<br />
on both the camshaft sprocket and the inner<br />
section of the timing belt cover (refer to<br />
illustration 2.16).<br />
23 Turn the camshaft sprocket in its normal<br />
direction of rotation until the timing marks on<br />
the sprocket and timing belt inner cover are<br />
exactly aligned. Keep the camshaft in this<br />
position and prevent it from moving.<br />
24 Temporarily refit the crankshaft auxiliary<br />
belt pulley, then identify the timing marks on<br />
the edge of pulley and the timing belt cover.<br />
Using a socket and wrench on the crankshaft<br />
sprocket retaining bolt, turn the crankshaft<br />
through 90° (quarter of a turn) in its normal<br />
direction of rotation, to bring the timing marks<br />
into alignment (refer to illustration 2.16)<br />
25 Check that the distributor rotor arm<br />
electrode is now pointing roughly at the No1<br />
cylinder terminal marking on the distributor<br />
body. If this is not the case, refer to Chapter<br />
5B and check that the distributor has been<br />
fitted correctly. Note: The basic ignition<br />
advance setting may mean that the centre of<br />
the rotor arm electrode does not line up<br />
exactly with the No 1 terminal marking.<br />
26 When all the above steps have been<br />
completed successfully, the engine will be set<br />
at TDC on cylinder No 1. The timing belt can<br />
now be fitted as described in Section 4.<br />
Caution: Until the timing belt is fitted,<br />
ensure that the crankshaft and camshaft<br />
alignment is preserved by preventing the<br />
sprockets from rotating with respect to<br />
each other.<br />
1 When engine performance is down, or if<br />
misfiring occurs which cannot be attributed to<br />
the ignition or fuel systems, a compression<br />
test can provide diagnostic clues as to the<br />
engine’s condition. If the test is performed<br />
regularly, it can give warning of trouble before<br />
any other symptoms become apparent.<br />
2 The engine must be fully warmed-up to<br />
normal operating temperature, the battery<br />
must be fully charged, and all the spark plugs<br />
must be removed (refer to Chapter 1). The aid<br />
of an assistant will also be required.<br />
3 Disable the ignition system by<br />
disconnecting the ignition HT coil lead from<br />
the distributor cap and earthing it on the<br />
cylinder block. Use a jumper lead or similar<br />
wire to make a good connection.<br />
4 Fit a compression tester to the No 1<br />
cylinder spark plug hole - the type of tester<br />
which screws into the plug thread is<br />
preferable.<br />
5 Have an assistant hold the throttle wide<br />
open, then crank the engine on the starter<br />
motor; after one or two revolutions, the<br />
compression pressure should build up to a<br />
maximum figure, and then stabilise. Record<br />
the highest reading obtained.<br />
6 Repeat the test on the remaining cylinders,<br />
recording the pressure in each. Keep the<br />
throttle wide open.<br />
7 All cylinders should produce very similar<br />
pressures; a difference of more than 2 bars<br />
between any two cylinders indicates a fault.<br />
Note that the compression should build up<br />
quickly in a healthy engine; low compression<br />
on the first stroke, followed by graduallyincreasing<br />
pressure on successive strokes,<br />
indicates worn piston rings. A low<br />
compression reading on the first stroke, which<br />
does not build up during successive strokes,<br />
indicates leaking valves or a blown head<br />
gasket (a cracked head could also be the<br />
cause). Deposits on the undersides of the<br />
valve heads can also cause low compression.<br />
8 Refer to the Specifications section of this<br />
Chapter and compare the recorded<br />
compression figures with those stated by the


