

Contents - Volkspage
Contents - Volkspage
Contents - Volkspage

You also want an ePaper? Increase the reach of your titles
YUMPU automatically turns print PDFs into web optimized ePapers that Google loves.
Braking system 9.5<br />
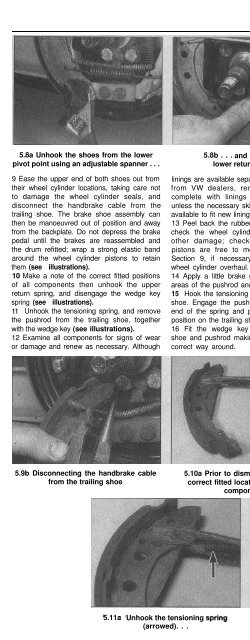
5.8a Unhook the shoes from the lower<br />
pivot point using an adjustable spanner . . .<br />
9 Ease the upper end of both shoes out from<br />
their wheel cylinder locations, taking care not<br />
to damage the wheel cylinder seals, and<br />
disconnect the handbrake cable from the<br />
trailing shoe. The brake shoe assembly can<br />
then be manoeuvred out of position and away<br />
from the backplate. Do not depress the brake<br />
pedal until the brakes are reassembled and<br />
the drum refitted; wrap a strong elastic band<br />
around the wheel cylinder pistons to retain<br />
them (see illustrations).<br />
10 Make a note of the correct fitted positions<br />
of all components then unhook the upper<br />
return spring, and disengage the wedge key<br />
spring (see illustrations).<br />
11 Unhook the tensioning spring, and remove<br />
the pushrod from the trailing shoe, together<br />
with the wedge key (see illustrations).<br />
12 Examine all components for signs of wear<br />
or damage and renew as necessary. Although<br />
5.8b . . . and remove the<br />
lower return spring<br />
linings are available separately (without shoes)<br />
from VW dealers, renewal of the shoes<br />
complete with linings is to be preferred,<br />
unless the necessary skills and equipment are<br />
available to fit new linings to the old shoes.<br />
13 Peel back the rubber protective caps, and<br />
check the wheel cylinder for fluid leaks or<br />
other damage; check that both cylinder<br />
pistons are free to move easily. Refer to<br />
Section 9, if necessary, for information on<br />
wheel cylinder overhaul.<br />
14 Apply a little brake grease to the contact<br />
areas of the pushrod and handbrake lever.<br />
15 Hook the tensioning spring into the trailing<br />
shoe. Engage the pushrod with the opposite<br />
end of the spring and pivot the pushrod into<br />
position on the trailing shoe.<br />
16 Fit the wedge key between the trailing<br />
shoe and pushrod making sure it is fitted the<br />
correct way around.<br />
5.9a Note the elastic band (arrowed)<br />
used to retain pistons<br />
17 Locate the handbrake lever on the leading<br />
shoe in the pushrod, and fit the upper return<br />
spring using a pair of pliers.<br />
18 Fit the spring to the wedge key and hook<br />
it onto the trailing shoe.<br />
19 Prior to installation, clean the backplate,<br />
and apply a thin smear of high-temperature<br />
brake grease or anti-seize compound to all<br />
those surfaces of the backplate which bear on<br />
the shoes, particularly the wheel cylinder<br />
pistons and lower pivot’ point. Do not allow<br />
the lubricant to foul the friction material.<br />
20 Remove the elastic band from the wheel<br />
cylinder and offer up the shoe assembly.<br />
21 Connect the handbrake cable to the<br />
handbrake lever and locate the top of the<br />
shoes in the wheel cylinder piston slots.<br />
22 Fit the lower return spring to the shoes,<br />
then lever the bottom of the shoes onto the<br />
bottom anchor.<br />
5.9b Disconnecting the handbrake cable<br />
from the trailing shoe<br />
5.10a Prior to dismantling, note the<br />
correct fitted location of the shoe<br />
components<br />
5.10b Wedge key and spring<br />
5.11a Unhook the tensioning<br />
(arrowed). . .<br />
5.11b . . . and remove the pushrod from<br />
the trailing shoe


