

Contents - Volkspage
Contents - Volkspage
Contents - Volkspage

You also want an ePaper? Increase the reach of your titles
YUMPU automatically turns print PDFs into web optimized ePapers that Google loves.
11.8 Bodywork and fittings<br />
14.7a Unscrew the mounting screws . . . 14.7b . . . and withdraw the lock<br />
from the door<br />
15.3a Bolts securing the window regulator<br />
to the door<br />
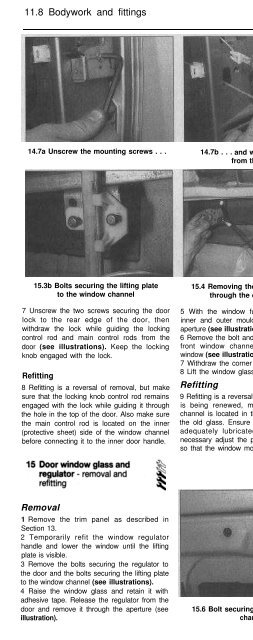
15.3b Bolts securing the lifting plate<br />
to the window channel<br />
7 Unscrew the two screws securing the door<br />
lock to the rear edge of the door, then<br />
withdraw the lock while guiding the locking<br />
control rod and main control rods from the<br />
door (see illustrations). Keep the locking<br />
knob engaged with the lock.<br />
Refitting<br />
8 Refitting is a reversal of removal, but make<br />
sure that the locking knob control rod remains<br />
engaged with the lock while guiding it through<br />
the hole in the top of the door. Also make sure<br />
the main control rod is located on the inner<br />
(protective sheet) side of the window channel<br />
before connecting it to the inner door handle.<br />
15.4 Removing the window regulator<br />
through the door aperture<br />
5 With the window fully lowered unclip the<br />
inner and outer mouldings from the window<br />
aperture (see illustration).<br />
6 Remove the bolt and screw and pull out the<br />
front window channel abutting the corner<br />
window (see illustration).<br />
7 Withdraw the corner window and seal.<br />
8 Lift the window glass from the door.<br />
Refitting<br />
9 Refitting is a reversal of removal. If the glass<br />
is being renewed, make sure that the lift<br />
channel is located in the same position as in<br />
the old glass. Ensure that the inner cable is<br />
adequately lubricated with grease and if<br />
necessary adjust the position of the regulator<br />
so that the window moves smoothly.<br />
15.5 Unclip the mouldings from the<br />
window aperture<br />
Removal<br />
Tailgate<br />
1 Disconnect the battery negative terminal.<br />
Open up the tailgate.<br />
2 Remove the inner trim panel by extracting<br />
the retaining clips first; use a wide blade<br />
screwdriver inserted beneath each retaining<br />
clip position in turn (see illustration).<br />
3 Disconnect the wiring connectors situated<br />
behind the trim panel and disconnect the<br />
washer hose. Also disconnect the wiring<br />
connectors from the heated rear screen<br />
terminals and free the wiring grommets from<br />
the tailgate.<br />
Removal<br />
1 Remove the trim panel as described in<br />
Section 13.<br />
2 Temporarily refit the window regulator<br />
handle and lower the window until the lifting<br />
plate is visible.<br />
3 Remove the bolts securing the regulator to<br />
the door and the bolts securing the lifting plate<br />
to the window channel (see illustrations).<br />
4 Raise the window glass and retain it with<br />
adhesive tape. Release the regulator from the<br />
door and remove it through the aperture (see<br />
illustration).<br />
15.6 Bolt securing the front window<br />
channel<br />
16.2 Removing the tailgate inner<br />
trim panel and clips


