

Contents - Volkspage
Contents - Volkspage
Contents - Volkspage

You also want an ePaper? Increase the reach of your titles
YUMPU automatically turns print PDFs into web optimized ePapers that Google loves.
12.4 Body electrical system<br />
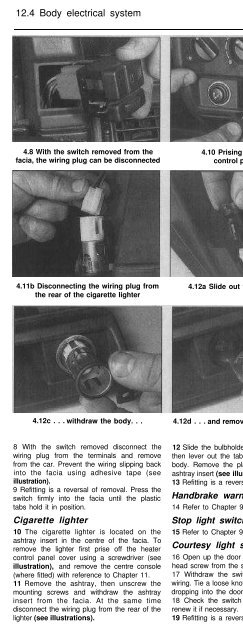
4.8 With the switch removed from the<br />
facia, the wiring plug can be disconnected<br />
4.10 Prising off the heater<br />
control panel cover<br />
4.11a Removing the ashtray insert<br />
mounting screws<br />
4.11b Disconnecting the wiring plug from<br />
the rear of the cigarette lighter<br />
4.12a Slide out the bulbholder. . . 4.12b . . . lever the tab . . .<br />
4.12c . . . withdraw the body. . .<br />
8 With the switch removed disconnect the<br />
wiring plug from the terminals and remove<br />
from the car. Prevent the wiring slipping back<br />
into the facia using adhesive tape (see<br />
illustration).<br />
9 Refitting is a reversal of removal. Press the<br />
switch firmly into the facia until the plastic<br />
tabs hold it in position.<br />
Cigarette lighter<br />
10 The cigarette lighter is located on the<br />
ashtray insert in the centre of the facia. To<br />
remove the lighter first prise off the heater<br />
control panel cover using a screwdriver (see<br />
illustration), and remove the centre console<br />
(where fitted) with reference to Chapter 11.<br />
11 Remove the ashtray, then unscrew the<br />
mounting screws and withdraw the ashtray<br />
insert from the facia. At the same time<br />
disconnect the wiring plug from the rear of the<br />
lighter (see illustrations).<br />
4.12d . . . and remove the plastic surround<br />
12 Slide the bulbholder from the lighter body,<br />
then lever out the tab in order to remove the<br />
body. Remove the plastic surround from the<br />
ashtray insert (see illustrations).<br />
13 Refitting is a reversal of removal.<br />
Handbrake warning light switch<br />
14 Refer to Chapter 9.<br />
Stop light switch<br />
15 Refer to Chapter 9.<br />
Courtesy light switches<br />
16 Open up the door and unscrew the crosshead<br />
screw from the switch.<br />
17 Withdraw the switch and disconnect the<br />
wiring. Tie a loose knot in the wire to prevent it<br />
dropping into the door pillar.<br />
18 Check the switch seal for condition and<br />
renew it if necessary.<br />
19 Refitting is a reversal of removal.<br />
General<br />
1 Whenever a bulb is renewed, note the<br />
following points.<br />
a) Make sure that the relevant circuit is<br />
switched off before starting work.<br />
b) Remember that if the light has just been<br />
in use the bulb may be extremely hot.<br />
c) Always check the bulb contacts and<br />
holder, ensuring that there is clean metalto-metal<br />
contact. Clean off any corrosion<br />
or dirt before fitting a new bulb.<br />
d) Wherever bayonet-type bulbs are fitted<br />
ensure the live contacts bear firmly<br />
against the bulb contact.<br />
e) A/ways ensure the new bulb is the correct<br />
rating and is completely clean before fitting.<br />
Headlight<br />
2 To remove a headlamp bulb first open the<br />
bonnet. On G40 models it is necessary to<br />
remove the turbocharger inlet in order to gain<br />
access to the rear of the headlight. Move the<br />
hinged cover to the rear and pull it out<br />
upwards, then unscrew the crosshead screw<br />
and disconnect the inlet from the turbocharger.<br />
3 Disconnect the wiring from the rear of the<br />
headlamp bulb (see illustration).<br />
4 Remove the rubber dust cap.<br />
5 Unhook and release the ends of the<br />
retaining clip and remove the bulb from the


