

Contents - Volkspage
Contents - Volkspage
Contents - Volkspage

You also want an ePaper? Increase the reach of your titles
YUMPU automatically turns print PDFs into web optimized ePapers that Google loves.
2A.6 Engine in-car repair procedures<br />
12 Restore the ignition system by<br />
reconnecting the distributor multiway wiring<br />
plug.<br />
1 Disconnect the battery negative cable and<br />
position from the terminal.<br />
2 Refer to Chapter 1 and remove the auxiliary<br />
drivebelt(<br />
3 With reference to Sections 2 and 4 of this<br />
Chapter, remove the auxiliary belt pulley and<br />
timing belt cover, then set the engine to TDC<br />
on cylinder No 1 and remove the timing belt<br />
and camshaft sprocket.<br />
4 Note that the inner timing belt cover shares<br />
mounting bolts with the coolant pump - refer<br />
to Chapter 3 and remove the coolant pump.<br />
After removing the retaining screws, lift the<br />
inner timing belt cover away from the engine<br />
block - this will expose the camshaft oil seal.<br />
5 Drill two small holes into the existing oil<br />
seal, diagonally opposite each other. Thread<br />
two self tapping screws into the holes and<br />
using two pairs of pliers, pull on the heads of<br />
the screws to extract oil seal. Take great care<br />
to avoid drilling through into the seal housing<br />
or camshaft sealing surface.<br />
6 Clean out the seal housing and sealing<br />
surface of the camshaft by wiping it with a<br />
lint-free cloth - avoid using solvents that may<br />
enter the cylinder head and affect component<br />
lubrication. Remove any swarf or burrs that<br />
may cause the seal to leak.<br />
8.13a Withdraw the rear oil seal housing<br />
from the dowels on the cylinder block. . .<br />
7 Lubricate the lip of the new oil seal with<br />
clean engine oil and push it over the camshaft<br />
until it is positioned above its housing.<br />
8 Using a hammer and a socket of suitable<br />
diameter, drive the seal squarely into its<br />
housing. Note: Select a socket that beats only<br />
on the hard outer surface of the seal, not the<br />
inner lip which can easily be damaged.<br />
9 With reference to Sections 2 and 4 of this<br />
Chapter, refit the inner timing belt cover,<br />
timing sprockets, then refit and tension the<br />
timing belt. On completion, refit the timing belt<br />
outer cover.<br />
10 With reference to Chapter 1, refit and<br />
tension the auxiliary drivebelt(<br />
Crankshaft front oil seal<br />
1 Remove the crankshaft timing belt<br />
sprocket, with reference to Section 5.<br />
2 If available use VW tool 2085 to remove the<br />
oil seal from the oil pump. Alternatively, drill<br />
two small holes into the existing oil seal,<br />
diagonally opposite each other. Thread two<br />
self tapping screws into the holes and using<br />
two pairs of pliers, pull on the heads of the<br />
screws to extract oil seal. Take great care to<br />
avoid drilling through into the seal housing or<br />
crankshaft sealing surface.<br />
3 Clean out the seal housing and sealing<br />
surface of the crankshaft by wiping it with a<br />
lint-free cloth - avoid using solvents that may<br />
8.13b . . . and recover the gasket<br />
enter the oil pump and affect component<br />
lubrication. Remove any swarf or burrs that<br />
may cause the seal to leak.<br />
4 Lubricate the lip of the new oil seal with<br />
clean engine oil and push it over the crankshaft<br />
until it is positioned above its housing.<br />
5 Using a hammer and a socket of suitable<br />
diameter, drive the seal squarely into its<br />
housing. Note: Select a socket that bears only<br />
on the hard outer surface of the seal, not the<br />
inner lip which can easily be damaged.<br />
6 Refit the crankshaft sprocket with reference<br />
to Section 5.<br />
Crankshaft rear oil seal<br />
7 Remove the flywheel (see Section 11).<br />
Method 1<br />
8 Drill two diagonally opposite holes in the oil<br />
seal, insert two self-tapping screws, and pull<br />
out the seal with grips.<br />
9 Clean out the seal housing and sealing<br />
surface of the crankshaft by wiping it with a<br />
lint-free cloth - avoid using solvents that may<br />
enter the crankcase and affect component<br />
lubrication. Remove any swarf or burrs that<br />
may cause the seal to leak.<br />
10 Using the plastic fitting tool supplied with<br />
the new oil seal, tap the seal into the housing<br />
using a suitable metal tube. Note: Do not<br />
lubricate the seal to ease fitting - it is supplied<br />
with a friction-reducing coating.<br />
11 Refit the flywheel (see Section 11).<br />
Method 2<br />
12 Remove the sump (see Section 13).<br />
13 Unscrew the bolts and withdraw the seal<br />
housing from the dowels on the cylinder<br />
block. Remove the gasket (see illustrations).<br />
14 Support the housing on blocks of wood<br />
and drive out the oil seal (see illustration)<br />
15 Clean out the seal housing by wiping it<br />
with a lint-free cloth - avoid using solvents<br />
that may enter the crankcase and affect<br />
component lubrication. Remove any swarf or<br />
burrs that may cause the seal to leak.<br />
16 Using the plastic fitting tool supplied with<br />
the new oil seal, tap the seal squarely into the<br />
housing using a block of wood (see<br />
illustration). Note: Do not lubricate the seal to<br />
ease fitting - it is supplied with a frictionreducing<br />
coating.<br />
17 Clean the mating faces then refit the<br />
housing, together with a new gasket, and<br />
tighten the bolts evenly in diagonal sequence<br />
to the specified torque.<br />
18 Refit the sump and flywheel as described<br />
in Sections 13 and 11 respectively.<br />
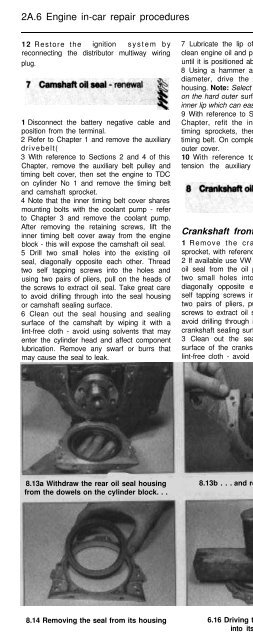
8.14 Removing the seal from its housing 6.16 Driving the new oil seal<br />
into its housing<br />
Removal<br />
1 Select a solid, level surface to park the<br />
vehicle upon. Give yourself enough space to<br />
move around it easily.


