

Contents - Volkspage
Contents - Volkspage
Contents - Volkspage

Create successful ePaper yourself
Turn your PDF publications into a flip-book with our unique Google optimized e-Paper software.
Braking system 9.11<br />
Refitting<br />
5 Refitting is a reversal of the removal<br />
procedure, but finally adjust the handbrake as<br />
described in Section 14.<br />
I<br />
Front cable<br />
Removal<br />
16.10 Release the retaining clips (arrowed)<br />
1 Chock the front wheels then jack up the and detach the handbrake cable from the<br />
rear of the car and support on axle stands<br />
trailing arm<br />
(see “Jacking and vehicle support”). Release<br />
the handbrake.<br />
4 Working beneath the car, unhook the rear<br />
2 If fitted, remove the plastic cover from the<br />
end of the inner cable from the compensator.<br />
handbrake lever (see illustration). Where<br />
5 Release the cable from the underbody<br />
necessary remove the rear section of the<br />
supports and clips and withdraw from under<br />
centre console with reference to Chapter 11.<br />
the car.<br />
3 Pull back the carpet, then unscrew the<br />
adjusting nut from the front end of the Refitting<br />
handbrake cable. Release the cable from the 6 Refitting is a reversal of removal but adjust<br />
handbrake. the cable as described in Section 14.<br />
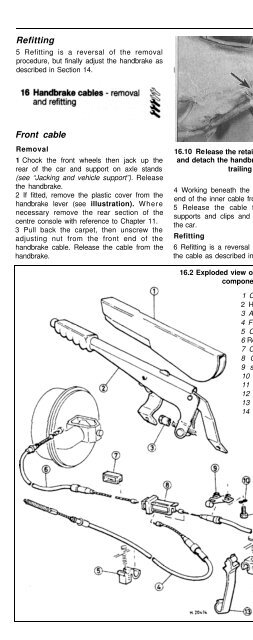
16.2 Exploded view of the handbrake<br />
components<br />
1 Cover<br />
2 Handbrake lever<br />
3 Adjuster nut<br />
4 Front cable<br />
5 Clamp<br />
6 Rear cables<br />
7 Clip<br />
8 Compensator<br />
9 support<br />
10 Spring washer<br />
11 Bolt<br />
12 Clamp<br />
13 Bracket<br />
14 Clip<br />
16.11 With the shoes removed, detach the<br />
cable from the backplate<br />
Rear cable<br />
Removal<br />
7 Chock the front wheels then jack up the<br />
rear of the car and support on axle stands<br />
(see “Jacking and vehicle support”). Release<br />
the handbrake.<br />
8 Remove the rear brake shoes on the<br />
relevant side as described in Section 5.<br />
9 Working beneath the car, unhook the inner<br />
cable from the compensator.<br />
10 Release the outer cable from the support<br />
and clips (see illustration).<br />
11 Withdraw the cable from the rear brake<br />
backplate and remove from under the car<br />
(see illustration).<br />
Refitting<br />
12 Refitting is a reversal of removal but<br />
adjust the cable as described in Section 14.<br />
Note: Before starting work refer to the<br />
warning at the beginning of Section 2<br />
concerning the dangers of hydraulic fluid.<br />
Removal<br />
1 A brake pressure regulator is fitted in the<br />
rear brake circuit of most models and its<br />
purpose is to prevent the rear wheels locking<br />
in advance of the front wheels during heavy<br />
application of the brakes. The regulator is also<br />
load sensitive in order to vary the pressure<br />
according to the load being carried. The 9<br />
regulator is located on the underbody, in front<br />
of the left-hand rear wheel.<br />
2 Minimise fluid loss by first removing the<br />
master cylinder reservoir cap, and then<br />
tightening it down onto a piece of polythene,<br />
to obtain an airtight seal.<br />
3 Chock the front wheels then jack up the<br />
rear of the car and support on axle stands<br />
(see “Jacking and vehicle support”).<br />
4 Working beneath the car unhook the spring<br />
from the regulator.<br />
5 Identify each hydraulic brake line for<br />
position, then unscrew the union nuts and


