

Contents - Volkspage
Contents - Volkspage
Contents - Volkspage

Create successful ePaper yourself
Turn your PDF publications into a flip-book with our unique Google optimized e-Paper software.
Manual transmission 7.3<br />
removal, refitting and<br />
adjustment<br />
2.15 Removing the rear engine mounting<br />
and bracket<br />
2.16a Disconnecting the shift rod coupling<br />
2.16b Removing the shift rod coupling 2.16c Shift rod adapter and bush<br />
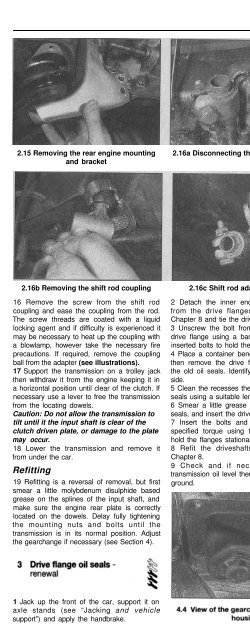
16 Remove the screw from the shift rod<br />
coupling and ease the coupling from the rod.<br />
The screw threads are coated with a liquid<br />
locking agent and if difficulty is experienced it<br />
may be necessary to heat up the coupling with<br />
a blowlamp, however take the necessary fire<br />
precautions. If required, remove the coupling<br />
ball from the adapter (see illustrations).<br />
17 Support the transmission on a trolley jack<br />
then withdraw it from the engine keeping it in<br />
a horizontal position until clear of the clutch. If<br />
necessary use a lever to free the transmission<br />
from the locating dowels.<br />
Caution: Do not allow the transmission to<br />
tilt until it the input shaft is clear of the<br />
clutch driven plate, or damage to the plate<br />
may occur.<br />
18 Lower the transmission and remove it<br />
from under the car.<br />
Refitting<br />
19 Refitting is a reversal of removal, but first<br />
smear a little molybdenum disulphide based<br />
grease on the splines of the input shaft, and<br />
make sure the engine rear plate is correctly<br />
located on the dowels. Delay fully tightening<br />
the mounting nuts and bolts until the<br />
transmission is in its normal position. Adjust<br />
the gearchange if necessary (see Section 4).<br />
2 Detach the inner ends of the driveshafts<br />
from the drive flanges with reference to<br />
Chapter 8 and tie the driveshafts to one side.<br />
3 Unscrew the bolt from the centre of each<br />
drive flange using a bar and two temporarily<br />
inserted bolts to hold the flange stationary.<br />
4 Place a container beneath the transmission<br />
then remove the drive flanges and lever out<br />
the old oil seals. Identify the flanges side for<br />
side.<br />
5 Clean the recesses then drive in the new oil<br />
seals using a suitable length of metal tubing.<br />
6 Smear a little grease on the lips of the oil<br />
seals, and insert the drive flanges.<br />
7 Insert the bolts and tighten them to the<br />
specified torque using the bar and bolts to<br />
hold the flanges stationary.<br />
8 Refit the driveshafts with reference to<br />
Chapter 8.<br />
9 Check and if necessary top-up the<br />
transmission oil level then lower the car to the<br />
ground.<br />
Removal<br />
1 Jack up the front of the car and support on<br />
axle stands (see “Jacking and vehicle<br />
support”). Apply the handbrake.<br />
2 With neutral selected, mark the shift rod<br />
and coupling in relation to each other, then<br />
unscrew the coupling clamp and pull out the<br />
shift rod.<br />
3 Working inside the car unscrew the gear<br />
knob and remove the gaiter.<br />
4 Unscrew the nuts from the ball housing<br />
stop plate, and withdraw the complete<br />
gearchange mechanism upwards into the car<br />
(see illustration). Recover the spacers.<br />
5 Dismantle the mechanism as necessary<br />
and examine the components for wear and<br />
damage. Renew those showing signs of wear<br />
or deterioration. Note that the selector rod<br />
bush is in two parts, and both parts are<br />
destroyed when removing the mechanism.<br />
When fitting the new bush, ensure that the<br />
two plastic cups are not pushed apart.<br />
Refitting<br />
6 Lubricate the joints and bearing surfaces<br />
with high-melting-point grease then refit using<br />
a reversal of the removal procedure. If a new<br />
coupling has been fitted it will be necessary to<br />
adjust the coupling position - this is best<br />
carried out by a VW dealer, as a specially<br />
shaped template is required, but if necessary<br />
the method described in the following sub-<br />
Section can be used in an emergency.<br />
Adjustment<br />
7 With the car raised and supported on axle<br />
stands (see “Jacking and vehicle support”),<br />
loosen the shift rod clamp bolt.<br />
8 Have an assistant position the gear lever as<br />
shown (see illustration). Use a twist drill for<br />
dimension (a), and align the lever so that the<br />
reverse gear catch is exactly opposite the<br />
recess in the housing.<br />
9 With the transmission still in neutral, tighten 7<br />
the clamp bolt.<br />
10 Check that all gears can be selected<br />
easily.<br />
1 Jack up the front of the car, support it on<br />
axle stands (see “Jacking and vehicle<br />
support”) and apply the handbrake.


