

Contents - Volkspage
Contents - Volkspage
Contents - Volkspage

Create successful ePaper yourself
Turn your PDF publications into a flip-book with our unique Google optimized e-Paper software.
12.6 Body electrical system<br />
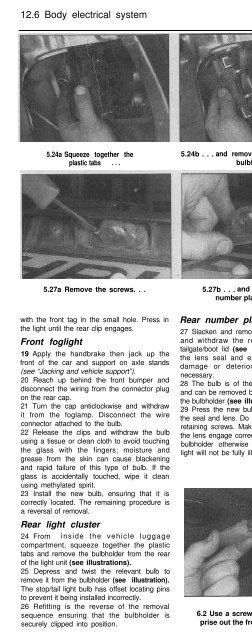
5.24a Squeeze together the<br />
plastic tabs . . .<br />
5.24b . . . and remove the rear light cluster<br />
bulbholder<br />
5.25 Removing a bulb from the rear light<br />
cluster bulbholder<br />
5.27a Remove the screws. . . 5.27b . . . and remove the rear<br />
number plate light lens<br />
5.28 Rear number plate light bulb removal<br />
with the front tag in the small hole. Press in<br />
the light until the rear clip engages.<br />
Front foglight<br />
19 Apply the handbrake then jack up the<br />
front of the car and support on axle stands<br />
(see “Jacking and vehicle support”).<br />
20 Reach up behind the front bumper and<br />
disconnect the wiring from the connector plug<br />
on the rear cap.<br />
21 Turn the cap anticlockwise and withdraw<br />
it from the foglamp. Disconnect the wire<br />
connector attached to the bulb.<br />
22 Release the clips and withdraw the bulb<br />
using a tissue or clean cloth to avoid touching<br />
the glass with the fingers; moisture and<br />
grease from the skin can cause blackening<br />
and rapid failure of this type of bulb. If the<br />
glass is accidentally touched, wipe it clean<br />
using methylated spirit.<br />
23 Install the new bulb, ensuring that it is<br />
correctly located. The remaining procedure is<br />
a reversal of removal.<br />
Rear light cluster<br />
24 From inside the vehicle luggage<br />
compartment, squeeze together the plastic<br />
tabs and remove the bulbholder from the rear<br />
of the light unit (see illustrations).<br />
25 Depress and twist the relevant bulb to<br />
remove it from the bulbholder (see illustration).<br />
The stop/tail light bulb has offset locating pins<br />
to prevent it being installed incorrectly.<br />
26 Refitting is the reverse of the removal<br />
sequence ensuring that the bulbholder is<br />
securely clipped into position.<br />
Rear number plate light<br />
27 Slacken and remove the retaining screws<br />
and withdraw the relevant lens from the<br />
tailgate/boot lid (see illustrations). Recover<br />
the lens seal and examine it for signs of<br />
damage or deterioration, renewing it if<br />
necessary.<br />
28 The bulb is of the capless (push-fit) type<br />
and can be removed by simply pulling it out of<br />
the bulbholder (see illustration).<br />
29 Press the new bulb into position and refit<br />
the seal and lens. Do not over-tighten the lens<br />
retaining screws. Make sure that the lugs on<br />
the lens engage correctly with the holes in the<br />
bulbholder otherwise the rear number plate<br />
light will not be fully illuminated.<br />
6.2 Use a screwdriver to carefully<br />
prise out the front courtesy light<br />
General<br />
1 Refer to Section 5, paragraph 1.<br />
Front courtesy light and rear<br />
luggage compartment light<br />
2 Using a small flat-bladed screwdriver<br />
carefully prise the light unit out of position<br />
(see illustration).<br />
3 Release the festoon type bulb from the light<br />
unit contacts (see illustration).<br />
4 Install the new bulb, ensuring it is securely<br />
held in position by the contacts, and clip the<br />
light unit back into position.<br />
6.3 Remove the festoon type bulb<br />
from the contacts


