

Contents - Volkspage
Contents - Volkspage
Contents - Volkspage

You also want an ePaper? Increase the reach of your titles
YUMPU automatically turns print PDFs into web optimized ePapers that Google loves.
Body electrical system 12.9<br />
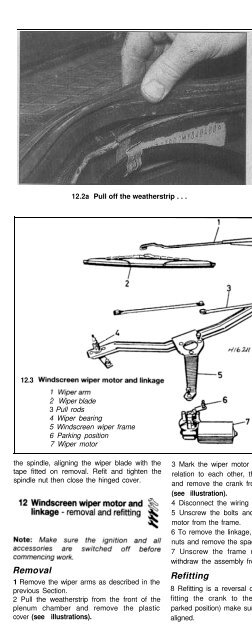
12.2a Pull off the weatherstrip . . . 12.2b . . . and remove the plastic cover<br />
from over the windscreen wiper motor<br />
Note: Make sure the ignition and all<br />
accessories are switched off before<br />
commencing work.<br />
Removal<br />
1 Open the tailgate and carefully prise off the<br />
inner trim panel.<br />
2 Remove the wiper arm as described in<br />
Section 11, then unscrew the spindle outer<br />
nut and remove the spacers (see<br />
illustrations).<br />
12.3<br />
2 Wiper blade<br />
3 Pull rods<br />
4 Wiper bearing<br />
5 Windscreen wiper frame<br />
6 Parking position<br />
7 Wiper motor<br />
the spindle, aligning the wiper blade with the<br />
tape fitted on removal. Refit and tighten the<br />
spindle nut then close the hinged cover.<br />
3 Mark the wiper motor crank and spindle in<br />
relation to each other, then unscrew the nut<br />
and remove the crank from the motor spindle<br />
(see illustration).<br />
4 Disconnect the wiring multi-plug.<br />
5 Unscrew the bolts and withdraw the wiper<br />
motor from the frame.<br />
6 To remove the linkage, unscrew the bearing<br />
nuts and remove the spacers.<br />
7 Unscrew the frame mounting bolt, then<br />
withdraw the assembly from the bulkhead.<br />
Refitting<br />
8 Refitting is a reversal of removal, but when<br />
Removal<br />
1 Remove the wiper arms as described in the<br />
previous Section.<br />
2 Pull the weatherstrip from the front of the fitting the crank to the spindle (motor in<br />
plenum chamber and remove the plastic parked position) make sure that the marks are<br />
cover (see illustrations).<br />
aligned.<br />
13.2a Unscrew the tailgate wiper motor<br />
outer nut . . .<br />
13.2b . . . and remove the spacer


