

Contents - Volkspage
Contents - Volkspage
Contents - Volkspage

Create successful ePaper yourself
Turn your PDF publications into a flip-book with our unique Google optimized e-Paper software.
20 000 mile service 1.11<br />
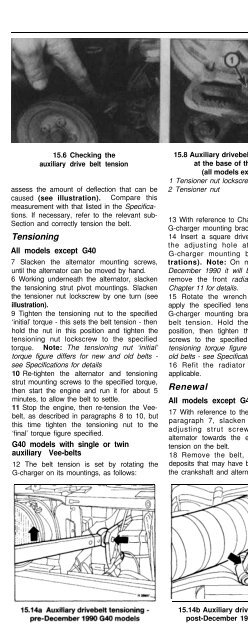
15.6 Checking the<br />
auxiliary drive belt tension<br />
assess the amount of deflection that can be<br />
caused (see illustration). Compare this<br />
measurement with that listed in the Specifications.<br />
If necessary, refer to the relevant sub-<br />
Section and correctly tension the belt.<br />
Tensioning<br />
All models except G40<br />
7 Slacken the alternator mounting screws,<br />
until the alternator can be moved by hand.<br />
6 Working underneath the alternator, slacken<br />
the tensioning strut pivot mountings. Slacken<br />
the tensioner nut lockscrew by one turn (see<br />
illustration).<br />
9 Tighten the tensioning nut to the specified<br />
‘initial’ torque - this sets the belt tension - then<br />
hold the nut in this position and tighten the<br />
tensioning nut lockscrew to the specified<br />
torque. Note: The tensioning nut ‘initial’<br />
torque figure differs for new and old belts -<br />
see Specifications for details<br />
10 Re-tighten the alternator and tensioning<br />
strut mounting screws to the specified torque,<br />
then start the engine and run it for about 5<br />
minutes, to allow the belt to settle.<br />
11 Stop the engine, then re-tension the Veebelt,<br />
as described in paragraphs 8 to 10, but<br />
this time tighten the tensioning nut to the<br />
‘final’ torque figure specified.<br />
G40 models with single or twin<br />
auxiliary Vee-belts<br />
12 The belt tension is set by rotating the<br />
G-charger on its mountings, as follows:<br />
15.8 Auxiliary drivebelt tensioning strut,<br />
at the base of the alternator<br />
(all models except G40)<br />
1 Tensioner nut lockscrew<br />
2 Tensioner nut<br />
13 With reference to Chapter 4B, slacken the<br />
G-charger mounting bracket screws.<br />
14 Insert a square drive torque wrench into<br />
the adjusting hole at the edge of the<br />
G-charger mounting bracket (see illustrations).<br />
Note: On mode/s built before<br />
December 1990 it will be necessary to first<br />
remove the front radiator grille - refer to<br />
Chapter 11 for details.<br />
15 Rotate the wrench anti-clockwise and<br />
apply the specified tensioning torque to the<br />
G-charger mounting bracket - this sets the<br />
belt tension. Hold the G-charger in this<br />
position, then tighten the mounting bracket<br />
screws to the specified torque. Note: The<br />
tensioning torque figure differs for new and<br />
old belts - see Specifications for details.<br />
16 Refit the radiator front grille, where<br />
applicable.<br />
Renewal<br />
All models except G40<br />
17 With reference to the information given in<br />
paragraph 7, slacken the alternator and<br />
adjusting strut screws, then pivot the<br />
alternator towards the engine to relieve the<br />
tension on the belt.<br />
18 Remove the belt, then clean off any<br />
deposits that may have built up in the ‘vee’ of<br />
the crankshaft and alternator pulleys.<br />
19 Fit the new belt to the crankshaft and<br />
alternator pulleys, then refer to the relevant<br />
sub-Section and adjust the belt tension.<br />
G40 models with single or twin<br />
auxiliary V-belts<br />
20 With reference to the information given in<br />
paragraph 13, slacken the mounting bracket<br />
screws, then allow the G-charger to pivot<br />
down towards the engine to relieve the<br />
tension on the belt(s).<br />
21 Lift the off the belt(s), then clean off any<br />
deposits that may have built up in the ‘vee’ of<br />
the crankshaft, alternator and G-charger<br />
pulleys.<br />
22 Fit the new belt over the pulleys, then<br />
refer to the relevant sub-Section and adjust<br />
the belt tension.<br />
1 The correct functioning of the spark plugs is<br />
vital for the correct running and efficiency of<br />
the engine. It is essential that the plugs fitted<br />
are appropriate for the engine (a suitable type<br />
is specified at the beginning of this Chapter). If<br />
this type is used and the engine is in good<br />
condition, the spark plugs should not need<br />
attention between scheduled replacement<br />
intervals. Spark plug cleaning is rarely<br />
necessary, and should not be attempted unless<br />
specialised equipment is available, as damage<br />
can easily be caused to the electrodes.<br />
2 If the marks on the original-equipment spark<br />
plug (HT) leads cannot be seen, mark the leads<br />
“1” to “4”, to correspond to the cylinder the<br />
lead serves (No 1 cylinder is at the timing belt<br />
end of the engine). Pull the leads from the<br />
plugs by gripping the end fitting, not the lead,<br />
otherwise the internal lead connection may be<br />
fractured (see illustration).<br />
3 It is advisable to remove any dirt from the<br />
spark plug recesses using a clean brush or<br />
compressed air before removing the plugs, to<br />
prevent dirt dropping into the cylinders (see<br />
illustration). Note: On engine codes AAU,<br />
AAV it will be necessary to remove the air<br />
cleaner housing to gain access to the plugs.<br />
15.14b Auxiliary drivebelt tensioning -<br />
post-December 1990 G40 models<br />
16.2 Pull the leads from the plugs by<br />
gripping the end fitting


