

Contents - Volkspage
Contents - Volkspage
Contents - Volkspage

You also want an ePaper? Increase the reach of your titles
YUMPU automatically turns print PDFs into web optimized ePapers that Google loves.
20 000 mile service 1.13<br />
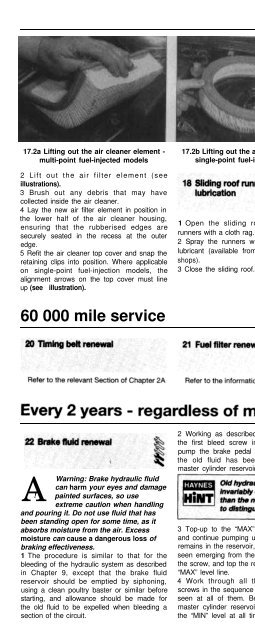
17.2a Lifting out the air cleaner element -<br />
multi-point fuel-injected models<br />
17.2b Lifting out the air cleaner element -<br />
single-point fuel-injected models<br />
17.5 Air cleaner top cover alignment -<br />
single-point fuel-injection models<br />
2 Lift out the air filter element (see<br />
illustrations).<br />
3 Brush out any debris that may have<br />
collected inside the air cleaner.<br />
4 Lay the new air filter element in position in<br />
the lower half of the air cleaner housing,<br />
ensuring that the rubberised edges are<br />
securely seated in the recess at the outer<br />
edge.<br />
5 Refit the air cleaner top cover and snap the<br />
retaining clips into position. Where applicable<br />
on single-point fuel-injection models, the<br />
alignment arrows on the top cover must line<br />
up (see illustration).<br />
1 Open the sliding roof, then clean the<br />
runners with a cloth rag.<br />
2 Spray the runners with a suitable silicone<br />
lubricant (available from most car accessory<br />
shops).<br />
3 Close the sliding roof.<br />
Check the complete underbody, wheel<br />
housings and side sills for damage to the<br />
underbody sealant. If evident, repair as<br />
necessary.<br />
60 000 mile service<br />
A<br />
Warning:<br />
!<br />
Brake hydraulic fluid<br />
can harm your eyes and damage<br />
painted surfaces, so use<br />
extreme caution when handling<br />
and pouring it. Do not use fluid that has<br />
been standing open for some time, as it<br />
absorbs moisture from the air. Excess<br />
moisture can cause a dangerous loss of<br />
braking effectiveness.<br />
1 The procedure is similar to that for the<br />
bleeding of the hydraulic system as described<br />
in Chapter 9, except that the brake fluid<br />
reservoir should be emptied by siphoning,<br />
using a clean poultry baster or similar before<br />
starting, and allowance should be made for<br />
the old fluid to be expelled when bleeding a<br />
section of the circuit.<br />
2 Working as described in Chapter 9, open<br />
the first bleed screw in the sequence, and<br />
pump the brake pedal gently until nearly all<br />
the old fluid has been emptied from the<br />
master cylinder reservoir.<br />
3 Top-up to the “MAX” level with new fluid,<br />
and continue pumping until only the new fluid<br />
remains in the reservoir, and new fluid can be<br />
seen emerging from the bleed screw. Tighten<br />
the screw, and top the reservoir level up to the<br />
“MAX” level line.<br />
4 Work through all the remaining bleed<br />
screws in the sequence until new fluid can be<br />
seen at all of them. Be careful to keep the<br />
master cylinder reservoir topped-up to above<br />
the “MIN” level at all times, or air may enter<br />
the system and greatly increase the length of<br />
the task.<br />
5 When the operation is complete, check that<br />
all bleed screws are securely tightened, and<br />
that their dust caps are refitted. Wash off all<br />
traces of spilt fluid, and recheck the master<br />
cylinder reservoir fluid level.<br />
6 Check the operation of the brakes before<br />
taking the car on the road.<br />
23 Coolant renewal<br />
Cooling system draining<br />
A<br />
Warning: Wait until the engine is<br />
cold before starting this<br />
! procedure. Do not allow<br />
antifreeze to come in contact<br />
with your skin, or with the painted


