

Contents - Volkspage
Contents - Volkspage
Contents - Volkspage

You also want an ePaper? Increase the reach of your titles
YUMPU automatically turns print PDFs into web optimized ePapers that Google loves.
Suspension and steering 10.7<br />
and the axle beam pivot bolts to the specified<br />
torques until the full weight of the car is on the<br />
roadwheels. Bleed the brake hydraulic system<br />
as described in Chapter 9.<br />
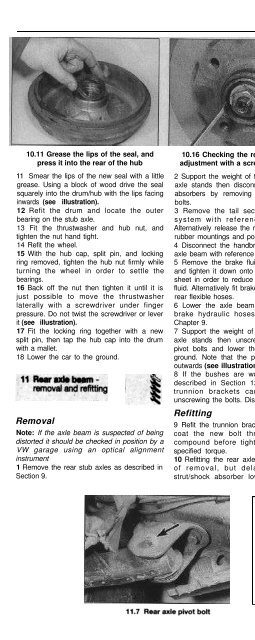
10.11 Grease the lips of the seal, and<br />
press it into the rear of the hub<br />
11 Smear the lips of the new seal with a little<br />
grease. Using a block of wood drive the seal<br />
squarely into the drum/hub with the lips facing<br />
inwards (see illustration).<br />
12 Refit the drum and locate the outer<br />
bearing on the stub axle.<br />
13 Fit the thrustwasher and hub nut, and<br />
tighten the nut hand tight.<br />
14 Refit the wheel.<br />
15 With the hub cap, split pin, and locking<br />
ring removed, tighten the hub nut firmly while<br />
turning the wheel in order to settle the<br />
bearings.<br />
16 Back off the nut then tighten it until it is<br />
just possible to move the thrustwasher<br />
laterally with a screwdriver under finger<br />
pressure. Do not twist the screwdriver or lever<br />
it (see illustration).<br />
17 Fit the locking ring together with a new<br />
split pin, then tap the hub cap into the drum<br />
with a mallet.<br />
18 Lower the car to the ground.<br />
Removal<br />
Note: If the axle beam is suspected of being<br />
distorted it should be checked in position by a<br />
VW garage using an optical alignment<br />
instrument<br />
1 Remove the rear stub axles as described in<br />
Section 9.<br />
10.16 Checking the rear wheel bearing<br />
adjustment with a screwdriver (see text)<br />
2 Support the weight of the trailing arms with<br />
axle stands then disconnect the struts/shock<br />
absorbers by removing the lower mounting<br />
bolts.<br />
3 Remove the tail section of the exhaust<br />
system with reference to Chapter 4.<br />
Alternatively release the rear exhaust from the<br />
rubber mountings and position it to one side.<br />
4 Disconnect the handbrake cables from the<br />
axle beam with reference to Chapter 9.<br />
5 Remove the brake fluid reservoir filler cap<br />
and tighten it down onto a piece of polythene<br />
sheet in order to reduce the loss of hydraulic<br />
fluid. Alternatively fit brake hose clamps to the<br />
rear flexible hoses.<br />
6 Lower the axle beam and disconnect the<br />
brake hydraulic hoses with reference to<br />
Chapter 9.<br />
7 Support the weight of the axle beam with<br />
axle stands then unscrew and remove the<br />
pivot bolts and lower the axle beam to the<br />
ground. Note that the pivot bolt heads face<br />
outwards (see illustration).<br />
8 If the bushes are worn renew them as<br />
described in Section 12. If necessary the<br />
trunnion brackets can be removed by<br />
unscrewing the bolts. Discard the bolts.<br />
Refitting<br />
9 Refit the trunnion brackets if removed, but<br />
coat the new bolt threads with locking<br />
compound before tightening them to the<br />
specified torque.<br />
10 Refitting the rear axle beam is a reversal<br />
of removal, but delay tightening the<br />
strut/shock absorber lower mounting bolts<br />
1 Chock the front wheels then jack up the<br />
rear of the car and support on axle stands<br />
(see “Jacking and vehicle support”). Release<br />
the handbrake and remove the rear wheels.<br />
2 Remove the tail section of the exhaust<br />
system with reference to Chapter 4.<br />
3 Disconnect the handbrake cables from the<br />
underbody brackets and axle beam with<br />
reference to Chapter 9.<br />
4 Unscrew and remove the pivot bolts and<br />
lower the axle beam onto axle stands making<br />
sure the flexible brake hoses are not strained.<br />
5 Using a two-arm puller, force the bushes<br />
from the axle beam (see illustration). Dip the<br />
new bushes in soapy water before pressing<br />
them in from the outside with the puller.<br />
6 Refit the pivot bolts, handbrake cables,<br />
exhaust and rear wheels using a reversal of<br />
the removal procedure, but delay tightening<br />
the pivot bolt nuts to the specified torque until<br />
the full weight of the car is on the roadwheels.<br />
Removal<br />
1 Set the front wheels in the straight-ahead<br />
position.<br />
2 Prise the cover from the centre of the<br />
steering wheel, note the location of the wires<br />
and disconnect them from the terminals on<br />
the cover.<br />
3 Mark the steering wheel, inner column and<br />
adapter sleeve in relation to each other, then<br />
unscrew the nut, remove the washer and<br />
withdraw the steering wheel. If it is tight, try<br />
rocking it slowly but firmly. Remove the<br />
washer (see illustrations).<br />
12.5 Use a puller to remove the rear axle<br />
beam pivot bushes


