

Contents - Volkspage
Contents - Volkspage
Contents - Volkspage

Create successful ePaper yourself
Turn your PDF publications into a flip-book with our unique Google optimized e-Paper software.
Body electrical system 12.5<br />
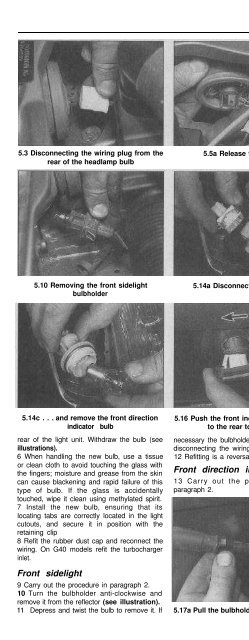
5.3 Disconnecting the wiring plug from the<br />
rear of the headlamp bulb<br />
5.5a Release the clips . . . 5.5b . . . and remove the bulb from the rear<br />
of the headlight unit<br />
5.10 Removing the front sidelight<br />
bulbholder<br />
5.14a Disconnect the wiring . . .<br />
5.14b . . . then remove the bulbholder. . .<br />
14 Reach down behind the front direction<br />
indicator light, alternatively remove the<br />
indicator light first as described later.<br />
Disconnect the wiring, then turn the<br />
bulbholder anticlockwise and withdraw it from<br />
the light body. Depress and twist the bulb to<br />
remove it (see illustrations).<br />
15 Refitting is a reversal of the removal<br />
procedure.<br />
5.14c . . . and remove the front direction<br />
indicator bulb<br />
rear of the light unit. Withdraw the bulb (see<br />
illustrations).<br />
6 When handling the new bulb, use a tissue<br />
or clean cloth to avoid touching the glass with<br />
the fingers; moisture and grease from the skin<br />
can cause blackening and rapid failure of this<br />
type of bulb. If the glass is accidentally<br />
touched, wipe it clean using methylated spirit.<br />
7 Install the new bulb, ensuring that its<br />
locating tabs are correctly located in the light<br />
cutouts, and secure it in position with the<br />
retaining clip<br />
8 Refit the rubber dust cap and reconnect the<br />
wiring. On G40 models refit the turbocharger<br />
inlet.<br />
Front sidelight<br />
9 Carry out the procedure in paragraph 2.<br />
10 Turn the bulbholder anti-clockwise and<br />
remove it from the reflector (see illustration).<br />
11 Depress and twist the bulb to remove it. If<br />
5.16 Push the front indicator side repeater<br />
to the rear to remove it<br />
necessary the bulbholder may be removed by<br />
disconnecting the wiring.<br />
12 Refitting is a reversal of removal.<br />
Front direction indicator<br />
13 Carry out the procedure given in<br />
paragraph 2.<br />
Front direction indicator side<br />
repeater<br />
16 Push/slide the repeater body to the rear,<br />
then withdraw the light from the wing (see<br />
illustration).<br />
17 Pull the bulbholder from the body. The<br />
bulb is of the capless (push-fit) type and can<br />
be removed by simply pulling it out of the<br />
bulbholder (see illustrations).<br />
18 To refit the light, first check the seal and<br />
renew it if necessary. Insert the bulbholder in<br />
its guides then locate the light on the wing<br />
5.17a Pull the bulbholder from the body . . . 5.17b . . . then remove the bulb


