CANoe DENoe - KEMT FEI TUKE
CANoe DENoe - KEMT FEI TUKE
CANoe DENoe - KEMT FEI TUKE

Create successful ePaper yourself
Turn your PDF publications into a flip-book with our unique Google optimized e-Paper software.
12<br />
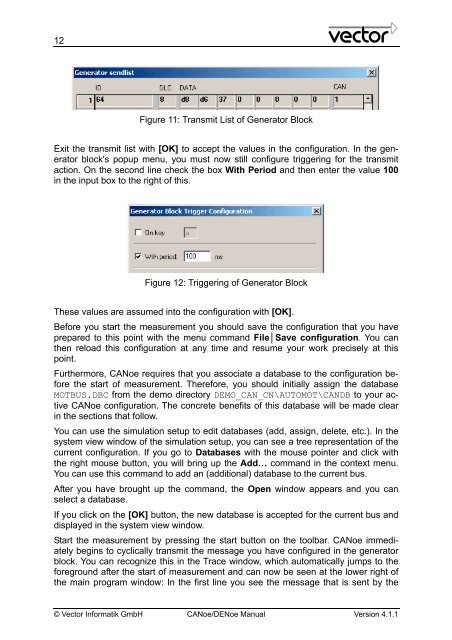
Figure 11: Transmit List of Generator Block<br />
Exit the transmit list with [OK] to accept the values in the configuration. In the generator<br />
block's popup menu, you must now still configure triggering for the transmit<br />
action. On the second line check the box With Period and then enter the value 100<br />
in the input box to the right of this.<br />
Figure 12: Triggering of Generator Block<br />
These values are assumed into the configuration with [OK].<br />
Before you start the measurement you should save the configuration that you have<br />
prepared to this point with the menu command File│Save configuration. You can<br />
then reload this configuration at any time and resume your work precisely at this<br />
point.<br />
Furthermore, <strong>CANoe</strong> requires that you associate a database to the configuration before<br />
the start of measurement. Therefore, you should initially assign the database<br />
MOTBUS.DBC from the demo directory DEMO_CAN_CN\AUTOMOT\CANDB to your active<br />
<strong>CANoe</strong> configuration. The concrete benefits of this database will be made clear<br />
in the sections that follow.<br />
You can use the simulation setup to edit databases (add, assign, delete, etc.). In the<br />
system view window of the simulation setup, you can see a tree representation of the<br />
current configuration. If you go to Databases with the mouse pointer and click with<br />
the right mouse button, you will bring up the Add… command in the context menu.<br />
You can use this command to add an (additional) database to the current bus.<br />
After you have brought up the command, the Open window appears and you can<br />
select a database.<br />
If you click on the [OK] button, the new database is accepted for the current bus and<br />
displayed in the system view window.<br />
Start the measurement by pressing the start button on the toolbar. <strong>CANoe</strong> immediately<br />
begins to cyclically transmit the message you have configured in the generator<br />
block. You can recognize this in the Trace window, which automatically jumps to the<br />
foreground after the start of measurement and can now be seen at the lower right of<br />
the main program window: In the first line you see the message that is sent by the<br />
© Vector Informatik GmbH <strong>CANoe</strong>/<strong>DENoe</strong> Manual Version 4.1.1