- Page 1:
Expression 3 Lighting control syste
- Page 4 and 5:
Chapter 3 System settings . . . . .
- Page 6 and 7:
Chapter 7 Cues . . . . . . . . . .
- Page 8 and 9:
Chapter 13 Submasters . . . . . . .
- Page 10 and 11: Chapter 17 Subroutines . . . . . .
- Page 12 and 13: Resetting loop time . . . . . . . .
- Page 14 and 15: xiv Contents
- Page 16 and 17: Using this manual This manual provi
- Page 18 and 19: Output level conventions The consol
- Page 20 and 21: Effects LTP channels may be used to
- Page 22 and 23: The Only command Only is a particul
- Page 24 and 25: Help from ETC Technical Services If
- Page 26 and 27: Colors in displays The colors in wh
- Page 28 and 29: Stage The Stage display shows you t
- Page 30 and 31: Tracksheet The Tracksheet display s
- Page 32 and 33: Park Press [Park] to bring up the P
- Page 34 and 35: Time Code List display You may togg
- Page 36 and 37: 22 Chapter 2 Monitor displays
- Page 38 and 39: Setting the number of dimmers Your
- Page 40 and 41: Setting default fade times The cons
- Page 42 and 43: Setting default sneak time The snea
- Page 44 and 45: Enabling the template The procedure
- Page 46 and 47: Set grandmaster type You may set th
- Page 48 and 49: Setting the clock The console clock
- Page 50 and 51: Latitude, longitude, time zone Choo
- Page 52 and 53: About Show About Show provides you
- Page 54 and 55: Selecting one-to-one patch The one-
- Page 56 and 57: Proportional patching Normally, dim
- Page 58 and 59: Labeling dimmers The console allows
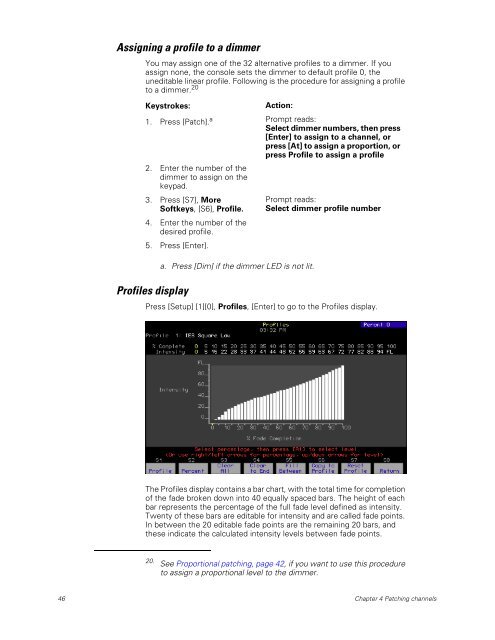
- Page 62 and 63: Clear All For a selected profile, C
- Page 65 and 66: About Dimmer The About Dimmer displ
- Page 67 and 68: Setting dimmers to Dimmer Doubling
- Page 69 and 70: Chapter 5 Setting channel levels Se
- Page 71 and 72: Channel Attributes display The Chan
- Page 73 and 74: Channel data type Channels normally
- Page 75 and 76: Selecting channels Using the keypad
- Page 77 and 78: Sneak Sneak is a softkey that you c
- Page 79 and 80: About Channel The About Channel dis
- Page 81 and 82: Chapter 6 Adding moving lights to t
- Page 83 and 84: Personality Setup You may find that
- Page 85 and 86: Viewing a personality 1. From the P
- Page 87 and 88: Patching one fixture or a fixture r
- Page 89 and 90: Attribute Setup Personalities may h
- Page 91 and 92: Encoder Setup Level setting control
- Page 93 and 94: Change individually 1. Select an en
- Page 95 and 96: Working with fixtures Following are
- Page 97 and 98: Fixture focus with Solo Solo provid
- Page 99 and 100: Chapter 7 Cues The console allows y
- Page 101 and 102: Recording functions Viewing cues Th
- Page 103 and 104: Working with cues in Stage When rec
- Page 105 and 106: Recording a cue with a single fade
- Page 107 and 108: Recording a cue with a wait time Wa
- Page 109 and 110: Follow [Follow] allows you to play
- Page 111 and 112:
Linking a macro to a cue [Link] all
- Page 113 and 114:
Labeling cues The console allows yo
- Page 115 and 116:
Modifying cue attributes If all you
- Page 117 and 118:
Updating a recorded cue You need no
- Page 119 and 120:
Copying cues You may want to use a
- Page 121 and 122:
Chapter 8 Track Track record functi
- Page 123 and 124:
Recording modified cues The differe
- Page 125 and 126:
Inserting cues If you insert a cue
- Page 127 and 128:
Pulling channels in Blind If you in
- Page 129 and 130:
If cue 5 is an allfade, the console
- Page 131 and 132:
Chapter 9 Multipart cues A multipar
- Page 133 and 134:
Converting a standard cue to a mult
- Page 135 and 136:
Editing a multipart cue Once you ha
- Page 137 and 138:
Modifying fade and wait times If yo
- Page 139 and 140:
Chapter 10 Playing back cues The co
- Page 141 and 142:
Fader keys Clear Each fader is equi
- Page 143 and 144:
Fader Status display The fader stat
- Page 145 and 146:
Controlling fades manually The cons
- Page 147 and 148:
Quickstep Quickstep allows you to r
- Page 149 and 150:
Chapter 11 Groups The console allow
- Page 151 and 152:
Recording a group using Solo You ca
- Page 153 and 154:
Working with groups in Stage Displa
- Page 155 and 156:
Updating a recorded group You need
- Page 157 and 158:
Deleting groups Delete a group from
- Page 159 and 160:
Modifying cues or submasters You ca
- Page 161 and 162:
Chapter 12 Focus points When workin
- Page 163 and 164:
Recording a focus point using Solo
- Page 165 and 166:
Updating focus points Update allows
- Page 167 and 168:
Editing a focus point in Blind You
- Page 169 and 170:
Deleting focus points Delete a focu
- Page 171 and 172:
Chapter 13 Submasters Expression 3
- Page 173 and 174:
Changing type You can change a subm
- Page 175 and 176:
Playback Submaster List The Playbac
- Page 177 and 178:
Submaster LEDs Each submaster bump
- Page 179 and 180:
Adding fade and dwell times You can
- Page 181 and 182:
Adding a rate to a submaster Rate a
- Page 183 and 184:
Inhibitive submasters Creating A re
- Page 185 and 186:
Modifying submasters in Blind To mo
- Page 187 and 188:
Updating a recorded submaster You n
- Page 189 and 190:
Labeling submasters The console all
- Page 191 and 192:
Copying cues or groups to submaster
- Page 193 and 194:
Chapter 14 Command display lists an
- Page 195 and 196:
Submaster List The Submaster List o
- Page 197 and 198:
7. Press [5] [Enter]. Specifies 5 s
- Page 199 and 200:
Deleting a group Follow this proced
- Page 201 and 202:
Working in spreadsheets Cues, subma
- Page 203 and 204:
Replacing channel level As a conven
- Page 205 and 206:
Deleting submasters After entering
- Page 207 and 208:
Editing groups You may edit a group
- Page 209 and 210:
Editing focus points You may edit a
- Page 211 and 212:
Chapter 15 Park Park allows you to
- Page 213 and 214:
Unparking dimmers Unparking one dim
- Page 215 and 216:
Unparking channels Unparking one ch
- Page 217 and 218:
Parking fixtures You can park fixtu
- Page 219 and 220:
Chapter 16 Effects An effect is a c
- Page 221 and 222:
• Out - The Out Time, the meaning
- Page 223 and 224:
Notes on working with steps in Blin
- Page 225 and 226:
Adding grouped channels The procedu
- Page 227 and 228:
Adding groups or focus points The p
- Page 229 and 230:
Modifying the effect You can set ch
- Page 231 and 232:
Deleting channels Delete channels f
- Page 233 and 234:
Deleting steps You may delete any s
- Page 235 and 236:
Modifying step timing and levels On
- Page 237 and 238:
Changing upfade, dwell and downfade
- Page 239 and 240:
Setting a random effect rate An eff
- Page 241 and 242:
Chapter 17 Subroutines A subroutine
- Page 243 and 244:
Style steps The following playback
- Page 245 and 246:
15. Press [S1], Step, [6] [Enter].
- Page 247 and 248:
Chapter 18 Macros A macro allows yo
- Page 249 and 250:
6. Press [5] [Enter]. Inserts a fiv
- Page 251 and 252:
Follow these steps to create a macr
- Page 253 and 254:
Using submasters in macros Submaste
- Page 255 and 256:
Modifying macros Editing mode In th
- Page 257 and 258:
Auto channel check This macro autom
- Page 259 and 260:
Chapter 19 Link lists Console chann
- Page 261 and 262:
Setting up a link To set up a link,
- Page 263 and 264:
Moving a link Use [S7], Move Link,
- Page 265 and 266:
Chapter 20 Diskette functions This
- Page 267 and 268:
Contents of the showfile When you w
- Page 269 and 270:
Read show components only Frequentl
- Page 271 and 272:
Chapter 21 Printing The console sup
- Page 273 and 274:
Printouts available Following is a
- Page 275 and 276:
Chapter 22 Clear functions This cha
- Page 277 and 278:
Clear and reset options Following i
- Page 279 and 280:
Chapter 23 Dimmer monitoring ETC co
- Page 281 and 282:
Error messages ETCLink provides mes
- Page 283 and 284:
ETCLink displays Dimming system sta
- Page 285 and 286:
Dimmer status The Dimmer Status dis
- Page 287 and 288:
Record Loads procedure Perform a Re
- Page 289 and 290:
Clear Loads procedure Clear Loads a
- Page 291 and 292:
Working with Sensor backup looks A
- Page 293 and 294:
Chapter 24 Control interfaces The c
- Page 295 and 296:
ETC MIDI message formats The follow
- Page 297 and 298:
MIDI Show Control (MSC) The console
- Page 299 and 300:
MSC commands transmitted by the con
- Page 301 and 302:
Examples In the examples below, MSC
- Page 303 and 304:
Enabling / disabling real time prog
- Page 305 and 306:
Referencing sunrise or sunset To re
- Page 307 and 308:
Copying real time programs Keystrok
- Page 309 and 310:
Keystrokes: Action: 1. Press [Setup
- Page 311 and 312:
Time Code You can create and run sh
- Page 313 and 314:
Creating a program by definition Us
- Page 315 and 316:
Sorting/recording events Events are
- Page 317 and 318:
Deleting time code events Follow th
- Page 319 and 320:
Moving time code events Follow this
- Page 321 and 322:
Or, if you wanted to move ten event
- Page 323 and 324:
External time code clock When runni
- Page 325 and 326:
Remote macros The remote macro feat
- Page 327 and 328:
Chapter 25 Accessories Chapter 25 p
- Page 329 and 330:
Designer’s Worksheet Designer’s
- Page 331 and 332:
6. To create a new region or to add
- Page 333 and 334:
Clearing regions You must be in Des
- Page 335 and 336:
Full Tracking Backup Full Tracking
- Page 337 and 338:
Moving Lights Module The Moving Lig
- Page 339 and 340:
Appendix A Installation This append
- Page 341 and 342:
AC Input fuses These fuses are cont
- Page 343 and 344:
Understanding ETCNet The console is
- Page 345 and 346:
Setting Expression 3 DIP switches A
- Page 347 and 348:
Configuring the DMX512 ports Once y
- Page 349 and 350:
Mouse or other pointing device Expr
- Page 351 and 352:
Installing a printer The console su
- Page 353 and 354:
6. Turn on your console or Remote I
- Page 355 and 356:
Installing Remote Focus Unit The Re
- Page 357 and 358:
MIDI Out/Thru jumper setting You ma
- Page 359 and 360:
Wiring remote macros There are thre
- Page 361 and 362:
Characteristics of the display The
- Page 363 and 364:
Appendix B References DIP switches
- Page 365 and 366:
RIU DIP switch and jumper settings
- Page 367 and 368:
Remote Video Interface settings The
- Page 369 and 370:
Appendix C Error messages Full Trac
- Page 371 and 372:
ETCLink errors ETCLink is the commu
- Page 373 and 374:
Appendix D Showfile Each showfile s
- Page 375 and 376:
Appendix E Softkeys Stage [Stage] S
- Page 377 and 378:
Blind/Submaster Sub List Sub SS 1 B
- Page 379 and 380:
Setup - System Settings (1) [Setup]
- Page 381 and 382:
Setup - Real Time Programs (12) Rea
- Page 383 and 384:
Appendix F Time and location United
- Page 385 and 386:
Appendix G Specifications Electrica
- Page 387 and 388:
• Control keypad features • Sub
- Page 389 and 390:
Profile functions • Profiles may
- Page 391 and 392:
Appendix H Declaration of Conformit
- Page 393 and 394:
Appendix I Limited Warranty Electro
- Page 395 and 396:
and one-half percent) per month lat
- Page 397 and 398:
Index Numerics 16-bit About Channel
- Page 399 and 400:
Delete Cues . . . . . . . . . . . .
- Page 401 and 402:
Category. . . . . . . . . . . . . .
- Page 403 and 404:
Macros, Designer’s Worksheet Clea
- Page 405 and 406:
Remote dimmer, patching . . . . . .
- Page 407:
Fixture . . . . . . . . . . . . . .