

How To Rebuild Your Ford V-8 351C-351M-400-429-460.pdf - Index of
How To Rebuild Your Ford V-8 351C-351M-400-429-460.pdf - Index of
How To Rebuild Your Ford V-8 351C-351M-400-429-460.pdf - Index of

You also want an ePaper? Increase the reach of your titles
YUMPU automatically turns print PDFs into web optimized ePapers that Google loves.
may be causing the problem at this pointa<br />
leaky head gasket and/or a valve. If two<br />
cylinders are down on pressure and they<br />
are adjacent to one another, chances are<br />
good the problem is a blown head gasket<br />
between the cylinders. It could still be a<br />
head gasket even if only one cylinder is<br />
affected. A blown gasket is nearly always<br />
accompanied by an unusual amount <strong>of</strong><br />
coolant loss from the radiator as cylinder<br />
pressure will leak into the cooling system.<br />
This situation is easy to diagnose. Remove<br />
your radiator cap and look at the coolant<br />
while your engine is running and warming<br />
up. If cylinder pressure is escaping into it,<br />
you'll see bubbles. Before making this<br />
check, make sure your coolant level is up<br />
to the mark. If you see bubbles, smell the<br />
coolant. You should be able to detect<br />
gasoline or exhaust fumes as the bubbles<br />
surface and burst if they are caused by a<br />
blown head gasket.<br />
A sure way to test for this is to take<br />
your car to a pr<strong>of</strong>essional who has a<br />
device which "sniffs" the coolant, It indicates<br />
whether or not the bubbles are<br />
cylinder gases and not just recirculating<br />
air bubbles. If vou determine it is a bad<br />
gasket, you'll have to remove a head to<br />
replace it. Use the procedures outlined in<br />
the engine teardown and assembly chapters<br />
for this job. Check the head and block<br />
surfaces for flatness. Fix any problems or<br />
you may end up having to repeat the job.<br />
Now for the valves. If you didn't find<br />
your compression-loss problem with the<br />
piston rings or a head gasket, the last<br />
probable culprit will be a valve/s. There<br />
are numerous reasons for valves leaking.<br />
A valve may not be fully closing or it may<br />
be burned. Both result in an unsealed<br />
combustion chamber. If a fully closed<br />
valve leaks, it's probably burned. So check<br />
for full closure first. Unless the problem<br />
is severe, you'll need vernier calipers or a<br />
dial indicator.<br />
Pull <strong>of</strong>f the valve covers and locate the<br />
cylinder you want-to check. It should be<br />
on TDC (top dead center) just at the beginning<br />
<strong>of</strong> its power stroke-not between<br />
its exhaust and intake stroke. This ensures<br />
both valves should be fully closed.<br />
<strong>To</strong> do this, trace the spark-plug leads <strong>of</strong><br />
the cylinders you are going to check in<br />
the distributor. Put a mark/s on the distributor<br />
body in line with the terminals<br />
on the distributor cap. Remove the cap.<br />
When you crank your engine over and<br />
line up the distributor rotor with the<br />
mark on the distributor, you'll know the<br />
cylinder will be reasonably near TDC on<br />
its power stroke.<br />
If both valves are fully closed, you<br />
<strong>429</strong>CJ and SCJ VACUUM LEAK<br />
Here's a problem that can frustrate the<br />
best mechanic, and the solution can't<br />
be found in any shop manual. The<br />
problem is with the <strong>429</strong>CJ and SCJ<br />
end cylinders-numbers 1, 4, 5 and 8.<br />
They won't fire at idle with the valve<br />
covers removed, only when RPM is increased.<br />
Chances are you won't run<br />
into this problem if you have a CJ.<br />
<strong>How</strong>ever, because SCJ's valves require<br />
hot lashing, you obviously have to run<br />
your engine without the valve covers.<br />
It will idle rough with one <strong>of</strong>f and<br />
won't run at idle with both <strong>of</strong>f! The<br />
reason is the end, or corner cylinders,<br />
fire in sequence-8, 1, 5,4-compounding<br />
the problem. Four fire, then four<br />
don't.<br />
The cause <strong>of</strong> this problem is a vacuum<br />
leak. I'll bet you think it has<br />
something to do with the valve covers<br />
being <strong>of</strong>f You're right. The <strong>429</strong>CJ/<br />
SCJ intake ports are so large that the<br />
end valve-cover bolt holes in the top<br />
row are not blind like those in the<br />
standard <strong>429</strong>1460 head. They go<br />
straight through into the number -1,<br />
-4, -5, -8 intake ports as shown in the<br />
photo on page 33. This creates a huge<br />
vacuum leak when one <strong>of</strong> these bolts is<br />
removed. The fuel charge is leaned so<br />
much at low RPM that it won't fire.<br />
Thread the bolts back in while the<br />
engine is running-valve cover or nota'<br />
and the cylinders start firing. So,<br />
before running your <strong>429</strong>CJ or SCJ<br />
without its valve covers, thread the<br />
bolts back in the holes immediately<br />
above the end intake ports.<br />
should be able to rotate the pushrods<br />
with your fingers. It's unlikely the cam is<br />
holding a valve open unless the valves<br />
have been misadjusted. I know <strong>of</strong> no instances<br />
where valve adjustment has gotten<br />
tighter. If adjustment changes, it gets<br />
looser. If the pushrod rotates, the rocker<br />
arm has unloaded the valve, so it is free to<br />
close. If it won't rotate, first check to<br />
make sure that cylinder is at TDC, ready<br />
to start the power stroke, then back <strong>of</strong>f<br />
on the adjustment using the procedure in<br />
the engine assembly chapter.<br />
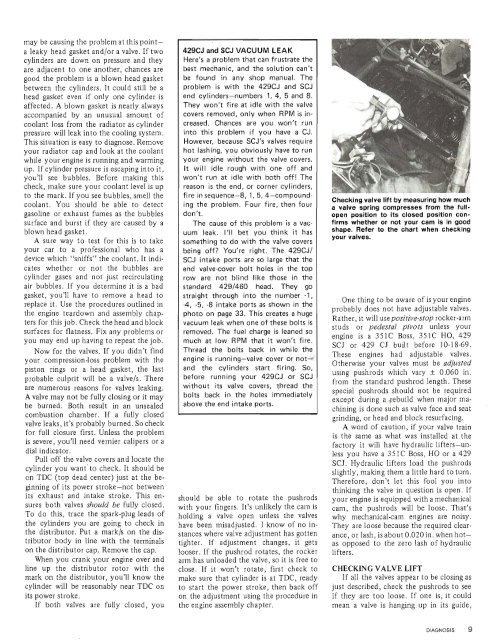
Checking valve lift by measuring how much<br />
a valve spring compresses from the fullopen<br />
position to its closed position confirms<br />
whether or not your cam is in good<br />
shape. Refer to the chart when checking<br />
your valves.<br />
One thing to be aware <strong>of</strong> is your engine<br />
probably does not have adjustable valves.<br />
Rather, it will use positive-stop rocker-arm<br />
studs or pedestal pivots unless your<br />
engine is a <strong>351C</strong> Boss, <strong>351C</strong> HO, <strong>429</strong><br />
SCJ or <strong>429</strong> CJ built before 10-18-69.<br />
These engines had adjustable valves.<br />
Otherwise your valves must be adjusted<br />
using pushrods which vary k 0.060 in.<br />
from the standard pushrod length. These<br />
special pushrods should not be required<br />
except during a jebuild when major machining<br />
is done such as valve face and seat<br />
grinding, or head and block resurfacing.<br />
A word <strong>of</strong> caution, if your valve train<br />
is the same as what was installed at the<br />
factory it will have hydraulic lifters-unless<br />
you have a 35 1 C Boss, HO or a <strong>429</strong><br />
SCJ. Hydraulic lifters load the pushrods<br />
slightly, making them a little hard to turn.<br />
Therefore, don't let this fool you into<br />
thinking the valve in question is open. If<br />
your engine is equipped with a mechanical<br />
cam, the pushrods will be loose. That's<br />
why mechanical-cam engines are noisy.<br />
They are loose because the required clearance,<br />
or lash, is about 0.020 in. when hotas<br />
opposed to the zero lash <strong>of</strong> hydraulic<br />
lifters.<br />
CHECKING VALVE LIFT<br />
If all the valves appear to be closing as<br />
just described, check the pushrods to see<br />
if they are too loose. If one is, it could<br />
mean a valve is hanging up in its guide,


