

How To Rebuild Your Ford V-8 351C-351M-400-429-460.pdf - Index of
How To Rebuild Your Ford V-8 351C-351M-400-429-460.pdf - Index of
How To Rebuild Your Ford V-8 351C-351M-400-429-460.pdf - Index of

You also want an ePaper? Increase the reach of your titles
YUMPU automatically turns print PDFs into web optimized ePapers that Google loves.
ent-down tab on the back <strong>of</strong> the inner<br />
part <strong>of</strong> the cam. It fits loosely in the cam<br />
drive-pin hole.<br />
Install the fuel-pump cam using the<br />
3/8-16 x 2-inch or 1 -112-inch-long, grade-8<br />
bolt-depending on whether you have a<br />
<strong>351C</strong> and <strong>351M</strong>/<strong>400</strong> or a <strong>429</strong>1460. A dab<br />
<strong>of</strong> Loctite on the bolt threads is good insurance<br />
against the bolt loosening. With<br />
a washer behind the bolt. attach the cam<br />
to the camshaft nose and timing-chain<br />
sprocket and torque it to 40-45 ft. lbs.<br />
Slide the oil slinger over the end <strong>of</strong> the<br />
crank extension and you're ready to install<br />
the timing-chain cover. Don't worry<br />
about the loose slinger. When the crankshaft<br />
damper is installed, it will sandwich<br />
the slinger (and spacer sleeve in the case<br />
<strong>of</strong> the <strong>429</strong>1460) between it and the crank<br />
sprocket.<br />
TIMING-CHAIN COVER<br />
AND CRANKSHAFT DAMPER<br />
If you haven't cleaned the front engine<br />
cover yet, do it now. Remove all the dirt,<br />
grease and old gasket material. Use a punch<br />
and a hammer to remove the crankshaft<br />
oil seal. Carefully knock the seal out the<br />
back <strong>of</strong> the cover by placing the punch<br />
behind the inside lip and gradually<br />
work around the seal until it falls out.<br />
Don't try to knock the seal out with one<br />
whack or you may break the die-cast<br />
aluminum cover <strong>of</strong> your <strong>429</strong>1460. With<br />
the old seal out <strong>of</strong> the way, clean the seal<br />
bore in preparation for receiving the new<br />
seal.<br />
Install the New Seal-You'll find a new<br />
oil seal in your gasket set. Coat the outside<br />
periphery <strong>of</strong> its shell with sealer.<br />
<strong>How</strong> you install it depends on whether<br />
you have the 351 C, 35 1 MI<strong>400</strong> sheet-metal<br />
cover, or the <strong>429</strong>1460 aluminum cover.<br />
The seal is best installed in the sheet-metal<br />
cover by clamping the seal and cover<br />
between the jaws <strong>of</strong> a vise and using the<br />
vise like a press. This forces the seal<br />
straight in without. it cocking. If you<br />
don't have a vise, you can install the seal<br />
with the cover on a bench. Use a socket<br />
or piece <strong>of</strong> pipe slightly smaller than the<br />
seal OD-2-112-inch diameter is about<br />
right-which will seat against the seal edge.<br />
Doing the installation this way is frustrating<br />
because the seal will cock, but it<br />
can be done with some care and patience.<br />
An aluminum cover seal can be installed<br />
similarly, but the seal must go in from<br />
back-to-front rather than from the front<br />
side <strong>of</strong> the cover. <strong>To</strong> install the seal on a<br />
bench, support the cover immediately in<br />
front <strong>of</strong> the seal bore, then use a 2-112-<br />
inch OD socket or piece <strong>of</strong> pipe to drive<br />
the seal in as I just described for the sheet.<br />
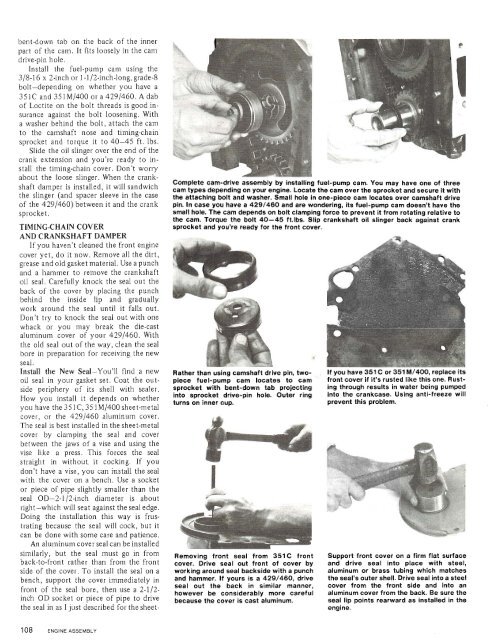
Complete cam-drive assembly by installing fuel-pump cam. You may have one <strong>of</strong> three<br />
cam types depending on your engine. Locate the cam over the sprocket and secure it with<br />
the attaching bolt and washer. Small hole in one-piece cam locates over camshaft drive<br />
pin. In case you have a <strong>429</strong>/460 and are wondering, its fuel-pump cam doesn't have the<br />
small hole. The cam depends on bolt clamping force to prevent it from rotating relative to<br />
the cam. <strong>To</strong>rque the bolt 40-45 ft.lbs. Slip crankshaft oil slinger back against crank<br />
sprocket and you're ready for the front cover.<br />
Rather than using camshaft drlve pln, twopiece<br />
fuel-pump cam locates to cam<br />
sprocket with bent-down tab projecting<br />
into sprocket drive-pin hole. Outer ring<br />
turns on inner cup.<br />
Removing front seal from <strong>351C</strong> front<br />
cover. Drive seal out front <strong>of</strong> cover by<br />
working around seal backside with a punch<br />
and hammer. If yours is a <strong>429</strong>/460, drive<br />
seal out the back in similar manner,<br />
however be considerably more careful<br />
because the cover is cast aluminum.<br />
. If you have 351 C or 351 M/<strong>400</strong>, replace Its<br />
front cover if it's rusted like this one. Rusting<br />
through results in water being pumped<br />
into the crankcase. Using anti-freeze will<br />
prevent this problem.<br />
Support front cover on a firm flat surface<br />
and drive seal into place with steel,<br />
aluminum or brass tubing which matches<br />
the seal's outer shell. Drive seal into a steel<br />
cover from the front side and into an<br />
aluminum cover from the back. Be sure the<br />
seal lip points rearward as installed in the<br />
engine.


