

How To Rebuild Your Ford V-8 351C-351M-400-429-460.pdf - Index of
How To Rebuild Your Ford V-8 351C-351M-400-429-460.pdf - Index of
How To Rebuild Your Ford V-8 351C-351M-400-429-460.pdf - Index of

Create successful ePaper yourself
Turn your PDF publications into a flip-book with our unique Google optimized e-Paper software.
UPPER<br />
COMPRESSION<br />
RING<br />
PISTON<br />
PIN<br />
BOLT -<br />
-<br />
LOWER<br />
COMPRESSION<br />
G<br />
L RlNG<br />
SEMBLY<br />
I<br />
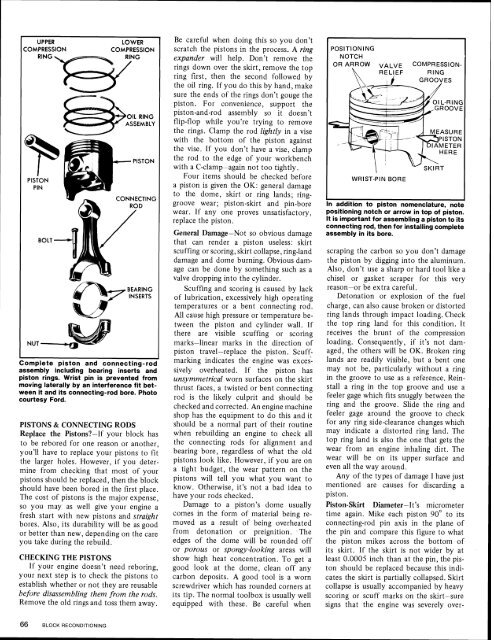
Complete piston and connecting-rod<br />
assembly including bearing inserts and<br />
piston rings. Wrist pin is prevented from<br />
moving laterally by an interference fit between<br />
it and its connecting-rod bore. Photo<br />
courtesy <strong>Ford</strong>.<br />
PISTONS & CONNECTING RODS<br />
Replace the Pistons-If your block has<br />
to be rebored for one reason or another,<br />
you'll have to replace your pistons to fit<br />
the larger holes. <strong>How</strong>ever, if you determine<br />
from checking that most <strong>of</strong> your<br />
pistons should be replaced, then the block<br />
should have been bored in the iirst place.<br />
The cost <strong>of</strong> pistons is the major expense,<br />
so you may as well give your engine a<br />
fresh start with new pistons and straight<br />
bores. Also, its durability will be as good<br />
or better than new, depending on the care<br />
you take during the rebuild.<br />
CHECKING THE PISTONS<br />
If your engine doesn't need reboring,<br />
your next step is to check the pistons to<br />
establish whether or not they are reusable<br />
before disassembling them from the rods.<br />
Remove the old rings and toss them away.<br />
Be careful when doing this so you don't<br />
scratch the pistons in the process. A ring<br />
expander will help. Don't remove the<br />
rings down over the skirt, remove the top<br />
ring first, then the second followed by<br />
the oil ring. If you do this by hand, make<br />
sure the ends <strong>of</strong> tlze rings don't gouge the<br />
piston. For convenience, support the<br />
piston-and-rod assembly so it doesn't<br />
flip-flop while you're trying to remove<br />
the rings. Clamp the rod lightly in a vise<br />
with the bottom <strong>of</strong> the piston against<br />
the vise. If you don't have a vise, clamp<br />
the rod to the edge <strong>of</strong> your workbench<br />
with a C-clamp-again not too tightly.<br />
Four items should be checked before<br />
a piston is given the OK: general damage<br />
to the dome, skirt or ring lands; ringgroove<br />
wear; piston-skirt and pin-bore<br />
wear. If any one proves unsatisfactory,<br />
replace the piston.<br />
General Damage-Not so obvious damage<br />
that can render a piston useless: skirt<br />
scuffing or scoring, skirt collapse, ring-land<br />
damage and dome burning. Obvious damage<br />
can be done by something such as a<br />
valve dropping into the cylinder.<br />
Scuffing and scoring is caused by lack<br />
<strong>of</strong> lubrication, excessively high operating<br />
temperatures or a bent connecting rod.<br />
All cause high pressure or temperature between<br />
the piston and cylinder wall. If<br />
there are visible scuffing or scoring<br />
marks-linear marks in the direction <strong>of</strong><br />
piston travel-replace the piston. Scuffmarking<br />
indicates the engine was excessively<br />
overheated. If the piston has<br />
unsymmetrical worn surfaces on the skirt<br />
thrust faces, a twisted or bent connecting<br />
rod is the likely culprit and should be<br />
checked and corrected. An engine machine<br />
shop has the equipment to do this and it<br />
should be a normal part <strong>of</strong> their routine<br />
when rebuilding an engine to check all<br />
the connecting rods for alignment and<br />
bearing bore, regardless <strong>of</strong> what the old<br />
pistons look like. <strong>How</strong>ever, if you are on<br />
a tight budget, tlze wear pattern on the<br />
pistons will tell you what you want to<br />
know. Otherwise, it's not a bad idea to<br />
have your rods checked.<br />
Damage to a piston's dome usually<br />
comes in the form <strong>of</strong> material being removed<br />
as a result <strong>of</strong> being overheated<br />
from detonation or preignition. The<br />
edges <strong>of</strong> tlze dome will be rounded <strong>of</strong>f<br />
or porous or spongy-looking areas will<br />
show high heat concentration. <strong>To</strong> get a<br />
good look at the dome, clean <strong>of</strong>f any<br />
carbon deposits. A good tool is a worn<br />
screwdriver which has rounded corners at<br />
its tip. The normal toolbox is usually well<br />
equipped with these. Be careful when<br />
POSlTlONl NG<br />
NOTCH<br />
WRIST-PIN BORE<br />
MEASURE<br />
In addition to piston nomenclature, note<br />
positioning notch or arrow in top <strong>of</strong> piston.<br />
It is important for assembling a piston to its<br />
connecting rod, then for installing complete<br />
assembly in its bore.<br />
scraping the carbon so you don't damage<br />
the piston by digging into the aluminum.<br />
Also, don't use a sharp or hard tool like a<br />
chisel or gasket scraper for this very<br />
reason-or be extra careful.<br />
Detonation or explosion <strong>of</strong> the fuel<br />
charge, can also cause broken or distorted<br />
ring lands through impact loading. Check<br />
the top ring land for this condition. It<br />
receives the brunt <strong>of</strong> the compression<br />
loading. Consequently, if it's not damaged,<br />
the others will be OK. Broken ring<br />
lands are readily visible, but a bent one<br />
may not be, particularly without a ring<br />
in the groove - to use as a reference. ~ein;<br />
stall a ring in the top groove and use a<br />
feeler gage which fits snuggly between the<br />
ring and the groove. slide the ring and<br />
feeler gage around the groove to check<br />
for any ring side-clearance changes which<br />
may indicate a distorted ring land. The<br />
top ring land is also the one that gets the<br />
wear from an engine inhaling dirt. The<br />
wear will be on its upper surface and<br />
even all the way around.<br />
Any <strong>of</strong> the types <strong>of</strong> damage I have just<br />
mentioned are causes for discarding a<br />
piston<br />
Piston-Skirt Diameter-It's micrometer<br />
time again. Mike each piston 90' to its<br />
connecting-rod pin axis in the plane <strong>of</strong><br />
the pin and compare this figure-to what<br />
the piston mikes across the bottom <strong>of</strong><br />
its skirt. If the skirt is not wider by at<br />
least 0.0005 inch than at the pin, the piston<br />
should be replaced because this indicates<br />
the skirt is partially collapsed. Skirt<br />
collapse is usually accompanied by heavy<br />
scoring or scuff marks on the skirt-sure<br />
signs that the engine was severely over-


