

How To Rebuild Your Ford V-8 351C-351M-400-429-460.pdf - Index of
How To Rebuild Your Ford V-8 351C-351M-400-429-460.pdf - Index of
How To Rebuild Your Ford V-8 351C-351M-400-429-460.pdf - Index of

Create successful ePaper yourself
Turn your PDF publications into a flip-book with our unique Google optimized e-Paper software.
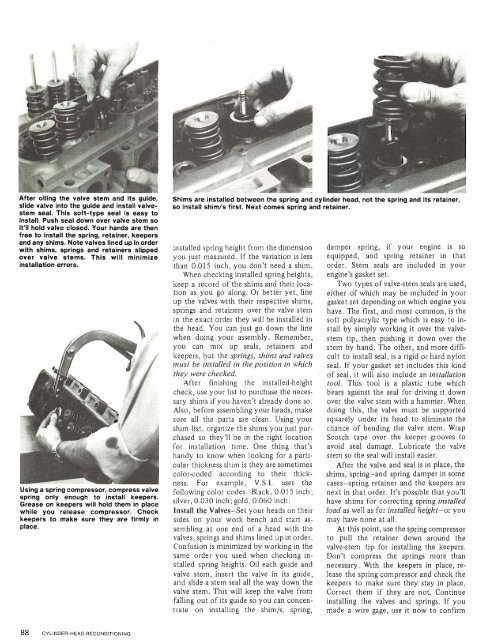
After oiling the valve stem and its guide,<br />
slide valve into the guide and install valvestem<br />
seal. This s<strong>of</strong>t-type seal is easy to<br />
install. Push seal down over valve stem so<br />
it'll hold valve closed. <strong>Your</strong> hands are then<br />
free to install the spring, retainer, keepers<br />
and any shims. Note valves lined up in order<br />
with shims, springs and retainers slipped<br />
over valve stems. This will minimize<br />
installation errors.<br />
Using a spring compressor, compress valve<br />
spring only enough to install keepers.<br />
Grease on keepers will hold them in place<br />
while you release compressor. Check<br />
keepers to make sure they are firmly in<br />
place.<br />
Shims are installed between the spring and cylinder head, not the spring and its retainer,<br />
so install shim/s first. Next comes spring and retainer.<br />
installed spring height from the dimension<br />
you just measured. If the variation is less<br />
than 0.015 inch, you don't need a shim.<br />
When checking installed spring heights,<br />
keep a record <strong>of</strong> the shims and their location<br />
as you go along. Or better yet, line<br />
up the valves with their respective shims,<br />
springs and retainers over the valve stem<br />
in the exact order they wdl be installed in<br />
the head. You can just go down the line<br />
when doing your assembly. Remember,<br />
you can mix up seals, retainers and<br />
keepers, but the springs, shims and valves<br />
must be installed in the position in which<br />
they were checked.<br />
After finishing the installed-height<br />
check, use your list to purchase the necessary<br />
shims if you haven't already done so.<br />
Also, before assembling your heads, make<br />
sure all the parts are clean. Using your<br />
shim list, organize the shims you just purchased<br />
so they'll be in the right location<br />
for installation time. One thing that's<br />
handy to know when looking for a particular<br />
thickness shim is they are sometimes<br />
color-coded according to their thickness.<br />
For example, V.S.I. uses the<br />
following color codes: Black, 0.01 5 inch;<br />
silver, 0.030 inch; gold, 0.060 inch.<br />
Install the Valves-Set your heads on their<br />
sides on your work bench and start assembling<br />
at one end <strong>of</strong> a head with the<br />
valves, springs and shims lined up in order.<br />
Confusion is minimized by working in the<br />
same order you used when checlung installed<br />
spring heights. Oil each guide and<br />
valve stem, insert the valve in its guide,<br />
and slide a stem seal all the way down the<br />
valve stem. This will keep the valve from<br />
falling out <strong>of</strong> its guide so you can concentrate<br />
on installing the shim/s, spring,<br />
damper spring, if your engine is so<br />
equipped, and spring retainer in that<br />
order. Stem seals are included in your<br />
engine's gasket set.<br />
Two types <strong>of</strong> valve-stem seals are used,<br />
either <strong>of</strong> which may be included in your<br />
gasket set depending on which engine you<br />
have. The first, and most common, is the<br />
s<strong>of</strong>t polyacrylic type which is easy to install<br />
by simply working it over the valvestem<br />
tip, then pushing it down over the<br />
stem by hand. The other, and more difficult<br />
to install seal, is a rigid or hard nylon<br />
seal. If your gasket set includes this lund<br />
<strong>of</strong> seal, it will also include an installation<br />
tool. This tool is a plastic tube which<br />
bears against the seal for driving it down<br />
over the valve stem with a hammer. When<br />
doing this, the valve must be supported<br />
squarely under its head to eliminate the<br />
chance <strong>of</strong> bending the valve stem. Wrap<br />
Scotch tape over the keeper g<strong>To</strong>oves to<br />
avoid seal damage. Lubricate the valve<br />
stem so the seal will install easier.<br />
After the valve and seal is in place, the<br />
shims, spring-and spring damper in some<br />
cases-spring retainer and the keepers are<br />
next in that order. It's possible that you'll<br />
have shims for correcting spring installed<br />
load as well as for installed height-or you<br />
may have none at all.<br />
At this point, use the spring compressor<br />
to pull the retainer down around the<br />
valve-stem tip for installing the keepers.<br />
Don't compress the springs more than<br />
necessary. With the keepers in place, release<br />
the spring compressor and check the<br />
keepers to make sure they stay in place.<br />
Correct them if they are not. Continue<br />
installing the valves and springs. If you<br />
made a wire gage, use it now to confirm


