

How To Rebuild Your Ford V-8 351C-351M-400-429-460.pdf - Index of
How To Rebuild Your Ford V-8 351C-351M-400-429-460.pdf - Index of
How To Rebuild Your Ford V-8 351C-351M-400-429-460.pdf - Index of

You also want an ePaper? Increase the reach of your titles
YUMPU automatically turns print PDFs into web optimized ePapers that Google loves.
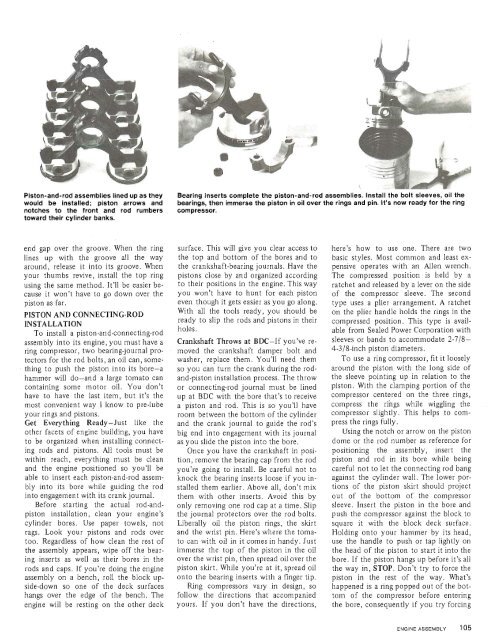
Piston-and-rod assemblies lined up as they<br />
would be installed; piston arrows and<br />
notches to the front and rod rumbers .<br />
toward their cylinder banks.<br />
Bearing inserts complete the piston-and-rod assemblies. Install the bolt sleeves, oil the<br />
bearings, then immerse the piston in oil over the rings and pin. It's now ready for the ring<br />
compressor.<br />
end gap over the groove. When the ring<br />
lines up with the groove all the way<br />
around, release it into its groove. When<br />
your thumbs revive, install the top ring<br />
using the same method. It'll be easier because<br />
it won't have to go down over the<br />
piston as far.<br />
PISTON AND CONNECTING-ROD<br />
INSTALLATION<br />
<strong>To</strong> install a piston-and-connecting-rod<br />
assembly into its engine, you must have a<br />
ring compressor, two bearing-journal protectors<br />
for the rod bolts, an oil can, something<br />
to push the piston into its bore-a<br />
hammer will do-and a large tomato can<br />
containing some motor oil. You don't<br />
have to have the last item, but it's the<br />
most convenient way I know to pre-lube<br />
your rings and pistons.<br />
Get Everything Ready-Just like the<br />
other facets <strong>of</strong> engine building, you have<br />
to be organized when installing connecting<br />
rods and pistons. All tools must be<br />
within reach, everything must be clean<br />
and the engine positioned so you'll be<br />
able to insert each piston-and-rod assembly<br />
into its bore while guiding the rod<br />
into engagement with its crank journal.<br />
Before starting the actual rod-andpiston<br />
installation, clean your engine's<br />
cylinder bores. Use paper towels, not<br />
rags. Look your pistons and rods over<br />
too. Regardless <strong>of</strong> how clean the rest <strong>of</strong><br />
the assembly appears, wipe <strong>of</strong>f the bearing<br />
inserts as well as their bores in the<br />
rods and caps. If you're doing the engine<br />
assembly on a bench, roll the block upside-down<br />
so one <strong>of</strong> the deck surfaces<br />
hangs over the edge <strong>of</strong> the bench. The<br />
engine will be resting on the other deck<br />
surface. This will give you clear access to<br />
the top and bottom <strong>of</strong> the bores and to<br />
the crankshaft-bearing journals. Have the<br />
pistons close by and organized according<br />
to their positions in the engine. This way<br />
you won't have to hunt for each piston<br />
even though it gets easier as you go along.<br />
With all the tools ready, you should be<br />
ready to slip the rods and pistons in their<br />
holes.<br />
Crankshaft Throws at BDC-If you've removed<br />
the crankshaft damper bolt and<br />
washer, replace them. You'll need them<br />
so you cai turn the crank during the rodand-piston<br />
installation process. The throw<br />
or connecting-rod journal must be lined<br />
up at BDC with the bore that's to receive<br />
a piston and rod. This is so you'll have<br />
room between the bottom <strong>of</strong> the cylinder<br />
and the crank journal to guide the rod's<br />
big end into engagement with its journal<br />
as you slide the piston into the bore.<br />
Once you have the crankshaft in position,<br />
remove the bearing cap from the rod<br />
you're going to install. Be careful not to<br />
knock the bearing inserts loose if you installed<br />
them earlier. Above all, don't mix<br />
them with other inserts. Avoid this by<br />
only removing one rod cap at a time. Slip<br />
the journal protectors over the rod bolts.<br />
Liberally oil the piston rings, the skirt<br />
and the wrist pin. Here's where the tomato<br />
can with oil in it comes in handy. Just<br />
immerse the top <strong>of</strong> the piston in the oil<br />
over the wrist pin, then spread oil over the<br />
piston skirt. While you're at it, spread oil<br />
onto the bearing inserts with a finger tip.<br />
Ring compressors vary in design, so<br />
follow the directions that accompanied<br />
yours. If you don't have the directions,<br />
here's how to use one. There are two<br />
basic styles. Most common and least expensive<br />
operates with an Allen wrench.<br />
The compressed position is held by a<br />
ratchet and released .by a lever on the side<br />
<strong>of</strong> the compressor sleeve. The second<br />
type uses a plier arrangement. A ratchet<br />
on the plier handle holds the rings in the<br />
compressed position. This type is available<br />
from Sealed Power Corporation with<br />
sleeves or bands to accommodate 2-718-<br />
4-318-inch piston diameters.<br />
<strong>To</strong> use a ring compressor, fit it loosely<br />
around the piston with the long side <strong>of</strong><br />
the sleeve pointing up in relation to the<br />
piston. With the clamping portion <strong>of</strong> the<br />
compressor centered on the three rings,<br />
compress the rihgs while wiggling the<br />
compressor slightly. This helps to compress<br />
the rings fully.<br />
Using the notch or arrow on the piston<br />
dome or the rod number as reference for<br />
positioning the assembly, insert the<br />
piston and rod in its bore while being<br />
careful not to let the connecting rod bang<br />
against the cylinder wall. The lower portions<br />
<strong>of</strong> the piston skirt should project<br />
out <strong>of</strong> the bottom <strong>of</strong> the compressor<br />
sleeve. Insert the piston in the bore and<br />
push the compressor against the block to<br />
square it with the block deck surface.<br />
Holding onto your hammer by its head,<br />
use the handle to push or tap lightly on<br />
the head <strong>of</strong> the piston to start it into the<br />
bore. If the piston hangs up before it's all<br />
the way in, STOP. Don't try to force the<br />
piston in the rest <strong>of</strong> the way. What's<br />
happened is a ring popped out <strong>of</strong> the bottom<br />
<strong>of</strong> the compressor before entering<br />
the bore, consequently if you try forcing


