

How To Rebuild Your Ford V-8 351C-351M-400-429-460.pdf - Index of
How To Rebuild Your Ford V-8 351C-351M-400-429-460.pdf - Index of
How To Rebuild Your Ford V-8 351C-351M-400-429-460.pdf - Index of

You also want an ePaper? Increase the reach of your titles
YUMPU automatically turns print PDFs into web optimized ePapers that Google loves.
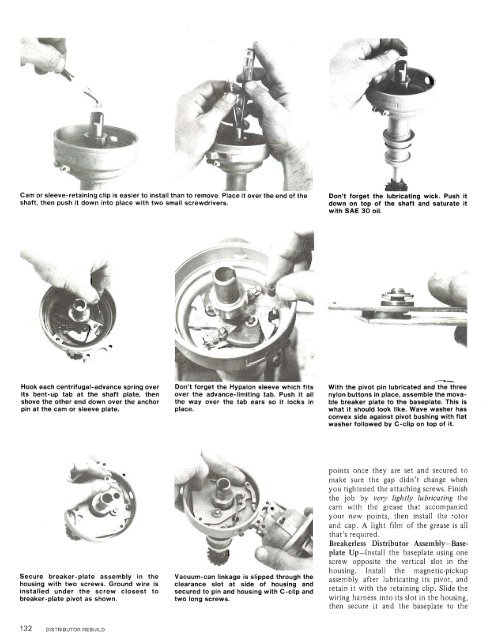
Cam or sleeve-retaining clip is easier to install than to remove. Place it over the end <strong>of</strong> the<br />
shaft, then push it down into place with two small screwdrivers.<br />
Don't forget the lubricating wick. Push it<br />
down on top <strong>of</strong> the shaft and saturate it<br />
with SAE 30 oil.<br />
Hook each centrifugal-advance spring over Don't forget the Hypalon sleeve which fits With the pivot pin lubricated and the three<br />
its bent-up tab at the shaft plate, then over the advance-limiting tab. Push it all nylon buttons in place, assemble the movashove<br />
the other end down over the anchor the way over the tab ears so it locks in ble breaker plate €0 the baseplate. This is<br />
pin at the cam or sleeve plate. place. what it should look like. Wave washer has<br />
convex side against pivot bushing with flat<br />
washer followed by C-clip on top <strong>of</strong> it.<br />
Secure breaker-plate assembly in the<br />
housing with two screws. Ground wire is<br />
installed under the screw closest to<br />
breaker-plate pivot as shown.<br />
Vacuum-can linkage is slipped through the<br />
clearance slot at side <strong>of</strong> housing and<br />
secured to pin and housing with C-clip and<br />
two long screws.<br />
points once they are set and secured to<br />
make sure the gap didn't change when<br />
you tightened the attaching screws. Finish<br />
the job by very lightly lubricating the<br />
cam with the grease that accompanied<br />
your new points, then install the rotor<br />
and cap. A light film <strong>of</strong> the grease is all<br />
that's required.<br />
Breakerless Distributor Assembly-Baseplate<br />
Up-Install the baseplate using one<br />
screw opposite the vertical slot in the<br />
housing. Install the magnetic-pickup<br />
assembly after lubricating its pivot, and<br />
retain it with the retaining clip. Slide the<br />
wiring harness into its slot in the housing,<br />
then secure it and the baseplate to the


