

How To Rebuild Your Ford V-8 351C-351M-400-429-460.pdf - Index of
How To Rebuild Your Ford V-8 351C-351M-400-429-460.pdf - Index of
How To Rebuild Your Ford V-8 351C-351M-400-429-460.pdf - Index of

Create successful ePaper yourself
Turn your PDF publications into a flip-book with our unique Google optimized e-Paper software.
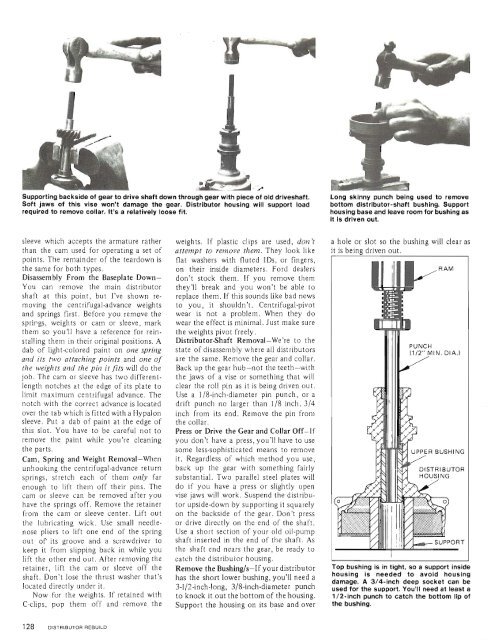
Supporting backside <strong>of</strong> gear to drive shaft down through gear with piece <strong>of</strong> old driveshaft.<br />
S<strong>of</strong>t jaws <strong>of</strong> this vise won't damage the gear. Distributor housing will support load<br />
required to remove collar. It's a relatively loose fit.<br />
Long skinny punch being used to remove<br />
bottom distributor-shaft bushing. Support<br />
housing base and leave room for bushing as<br />
it is driven out.<br />
sleeve which accepts the armature rather<br />
than the cam used for operating a set <strong>of</strong><br />
points. The remainder <strong>of</strong> the teardown is<br />
the same for both types.<br />
Disassembly From the Baseplate Down-<br />
You can rernove the main distributor<br />
shaft at this point, but I've shown removing<br />
the centrifugal-advance weights<br />
and springs first. Before you remove the<br />
spri~gs, weights or cam or sleeve, mark<br />
them so you'll have a reference for reinstalling<br />
them in their original positions. A<br />
dab <strong>of</strong> light-colored paint on one spring<br />
and its hvo attachirzg points and one <strong>of</strong><br />
the weights arzd the pirz it fits will do the<br />
job. The cam or sleeve has two differentlength<br />
notches at the edge <strong>of</strong> its plate to<br />
limit maximum centrifugal advance. The<br />
notch with the correct advance is located<br />
over the tab which is fitted with a Hypalon<br />
sleeve. Put a dab <strong>of</strong> paint at the edge <strong>of</strong><br />
this slot. You have to be careful not to<br />
rernove the paint while you're cleaning<br />
the parts.<br />
Cam, Spring and Weight Removal-When<br />
unhooking the centrifugal-advance return<br />
springs. stretch each <strong>of</strong> them only far<br />
enough to lift them <strong>of</strong>f their pins. The<br />
cam or sleeve can be removed after you<br />
have the springs <strong>of</strong>f. Remove the retainer<br />
from the cam or sleeve center. Lift out<br />
the lubricating wick. Use small needlenose<br />
pliers to lift one end <strong>of</strong> the spring<br />
out <strong>of</strong> its groove and. a screwdriver to<br />
keep it from slipping back in while you<br />
lift the other end out. After removing the<br />
retainer, lift the cam or sleeve <strong>of</strong>f the<br />
shaft. Don't lose the thrust washer that's<br />
located directly under it.<br />
Now for the weights. If retained with<br />
C-clips, pop them <strong>of</strong>f and remove the<br />
weights. If plastic clips are used, don't<br />
attempt to remove them. They look like<br />
flat washers with fluted IDS, or fingers,<br />
on their inside diameters. <strong>Ford</strong> dealers<br />
don't stock them. If you remove them<br />
they'll break and you won't be able to<br />
replace them. If this sounds like bad news<br />
to you, it shouldn't. Centrifugal-pivot<br />
wear is not a problern. When they do<br />
wear the effect is minimal. Just make sure<br />
the weights pivot freely.<br />
DistributorShaft Removal-We're to the<br />
state <strong>of</strong> disassembly where all distributors<br />
are the same. Remove the gear and collar.<br />
Back up the gear hub-not the teeth-with<br />
the jaws <strong>of</strong> a vise or something that will<br />
clear the roll pin as it is being driven out.<br />
Use a 118-inch-diameter pin punch, or a<br />
drift punch no larger than 118 inch. 314<br />
inch from its end. Remove the pin fron~<br />
the collar.<br />
Press or Drive the Gear and Collar Off-If<br />
you don't have a press, you'll have to use<br />
some less-sophisticated means to remove<br />
it. Regardless <strong>of</strong> which method you use,<br />
back up the gear with something fairly<br />
substantial. Two parallel steel plates will<br />
do if you have a press or slightly open<br />
vise jaws will work. Suspend the distributor<br />
upside-down by supporting it squarely<br />
on the backside <strong>of</strong> the gear. Don't press<br />
or drive directly on the end <strong>of</strong> the shaft.<br />
Use a short section <strong>of</strong> your old oil-pump<br />
shaft inserted in the end <strong>of</strong> the shaft. As<br />
the shaft end nears the gear, be ready to<br />
catch the distributor housing.<br />
Remove the Bushingls-If your distributor<br />
has the short lower bushing, you'll need a<br />
3-112-inch-long, 318-inch-diameter punch<br />
to knock it out the bottom <strong>of</strong> the housing.<br />
Support the housing on its base and over<br />
a hole or slot so the bushing will clear as<br />
it is being driven out.<br />
I<br />
I<br />
R BUSHING<br />
1 1<br />
<strong>To</strong>p bushing is in tight, so a support inside<br />
housing is needed to avoid housing<br />
damage. A 3/4-inch deep socket can be<br />
used for the support. You'll need at least a<br />
1/2-inch punch to catch the bottom lip <strong>of</strong><br />
the bushing.


