

How To Rebuild Your Ford V-8 351C-351M-400-429-460.pdf - Index of
How To Rebuild Your Ford V-8 351C-351M-400-429-460.pdf - Index of
How To Rebuild Your Ford V-8 351C-351M-400-429-460.pdf - Index of

Create successful ePaper yourself
Turn your PDF publications into a flip-book with our unique Google optimized e-Paper software.
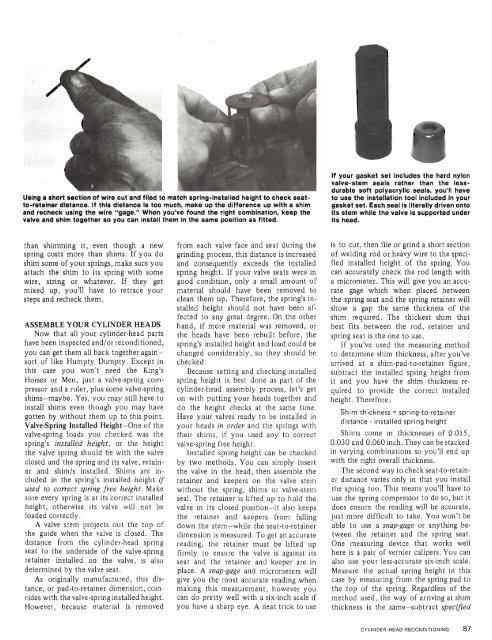
Uslng a short sectlon <strong>of</strong> wlre cut and filed to match sprlng-installed helght to check seatto-retainer<br />
distance. If thls dlstance Is too much, make up the difference up with a shim<br />
and recheck uslng the wire "gage." When you've found the right combination, keep the<br />
valve and shim together so you can install them in the same position as fitted.<br />
If your gasket set includes the hard nylon<br />
valve-stem seals rather than the lessdurable<br />
s<strong>of</strong>t oolvacrvlic seals. vou'll have<br />
to use the instaliatlo; tool incl'uied in your<br />
gasket set. Each seal is literally driven onto<br />
Its stem while the valve Is supported under<br />
its head.<br />
than shimming it, even though a new<br />
spring costs more than shims. If you do<br />
shim some <strong>of</strong> your springs, make sure you<br />
attach the shim to its spring with some<br />
wire, string or whatever. If they get<br />
mixed up, you'll have to retrace your<br />
steps and recheck them.<br />
ASSEMBLE YOUR CYLINDER HEADS<br />
Now that all your cylinder-head parts<br />
have been inspected and/or reconditioned,<br />
you can get them all back together againsort<br />
<strong>of</strong> like Humpty Durnpty. Except in<br />
this case you won't need the King's<br />
Horses or Men, just a valve-spring compressor<br />
and a ruler, plus some valve-spring<br />
shims-maybe. Yes, you may still have to<br />
install shims even though you may have<br />
gotten by without them up to this point.<br />
ValveSpring Installed Height-One <strong>of</strong> the<br />
valve-spring loads you checked was the<br />
spring's installed height, or the height<br />
the valve spring should be with the valve<br />
closed and the spring and its valve, retainer<br />
and shim/s installed. Shims are included<br />
in the spring's installed height if<br />
used to correct spring free height. Make<br />
sure every spring is at its correct installed<br />
height, otherwise its valve will not be<br />
loaded correctly.<br />
A valve stem projects out the top <strong>of</strong><br />
the guide when the valve is closed. The<br />
distance from the cylinder-head spring<br />
seat to the underside <strong>of</strong> the valve-spring<br />
retainer installed on the valve, is also<br />
determined by the valve seat.<br />
As originally manufactured, this distance,<br />
or pad-to-retainer dimension, coincides<br />
with the valve-spring installed height.<br />
<strong>How</strong>ever, because material is removed<br />
from each valve face and seat during the<br />
grinding process, this distance is increased<br />
and consequently exceeds the installed<br />
spring height. If your valve seats were in<br />
good condition, only a small amount <strong>of</strong><br />
material should have been removed to<br />
clean them up. Therefore, the spring's installed<br />
height should not have been affected<br />
to any great' degree. On the other<br />
hand, if more material was removed, or<br />
the heads have been rebuilt before, the<br />
spring's installed height and load could be<br />
changed considerably, so they should b,e<br />
checked.<br />
Because setting and checking installed<br />
spring height is best done as part <strong>of</strong> the<br />
cylinder-head assembly process, let's get<br />
on with putting your heads together and<br />
do the height checks at the same time.<br />
Have your valves ready to be installed in<br />
your heads in order and the springs with<br />
their shims, if you used any to correct<br />
valve-spring free height.<br />
Installed spring height can be checked<br />
by two methods. You can simply insert<br />
the valve in the head, then assemble the<br />
retainer and keepers on the valve stem<br />
without the spring, shims or valve-stem<br />
seal. The retainer is lifted up to hold the<br />
valve in its closed position-it also keeps<br />
the retainer and keepers from falling<br />
down the stem-while the seat-to-retainer<br />
dimension is measured. <strong>To</strong> get an accurate<br />
reading, the retainer must be lifted up<br />
firmly to ensure the valve is against its<br />
seat and the retainer and keeper are in<br />
place. A snap-gage and micrometers will<br />
give you the most accurate reading when<br />
making this measurement, however you<br />
can do pretty well with a six-inch scale if<br />
you have a sharp eye. A neat trick to use<br />
is to cut, then file or grind a short section<br />
<strong>of</strong> welding rod or heavy wire to the specified<br />
installed height <strong>of</strong> the spring. You<br />
can accurately check the rod length with<br />
a micrometer. This will give you an accurate<br />
gage which when placed between<br />
the spring seat and the spring retainer will<br />
show a gap the same thickness <strong>of</strong> the<br />
shim required. The thickest shim that<br />
best fits between the rod, retainer and<br />
spring seat is the one to use.<br />
If you've used the measuring method<br />
to determine shim thickness, after you've<br />
arrived at a shim-pad-to-retainer figure,<br />
subtract the installed spring height from<br />
it and you have the shim thickness required<br />
to provide the correct installed<br />
height. Therefore i<br />
Shim thickness = spring-to-retainer<br />
distance - installed spring height<br />
Shims come in thicknesses <strong>of</strong> 0.015,<br />
0.030 and 0.060 inch. They can be stacked<br />
in varying combinations so you'll end up<br />
with the right overall thickness.<br />
The second way to check seat-to-retainer<br />
distance varies only in that you install<br />
the spring too. This means you'll have to<br />
use the spring compressor to do so, but it<br />
does ensure the reading will be accurate,<br />
just more difficult to take. You won't be<br />
able to use a snap-gage or anything between<br />
the retainer and the spring seat.<br />
One measuring device that works well<br />
here is a pair <strong>of</strong> vernier calipers. You can<br />
also use your less-accurate six-inch scale.<br />
Measure the actual spring height in this<br />
case by measuring from the spring pad to<br />
the top <strong>of</strong> the spring. Regardless <strong>of</strong> the<br />
method used, the way <strong>of</strong> arriving at shim<br />
thickness 'is the same-subtract specified


