

How To Rebuild Your Ford V-8 351C-351M-400-429-460.pdf - Index of
How To Rebuild Your Ford V-8 351C-351M-400-429-460.pdf - Index of
How To Rebuild Your Ford V-8 351C-351M-400-429-460.pdf - Index of

Create successful ePaper yourself
Turn your PDF publications into a flip-book with our unique Google optimized e-Paper software.
<strong>To</strong> ease future repairs, apply some antiseize<br />
compound to the damper ID. Oil its<br />
seal surface and you're ready to install it.<br />
use two gaskets, one between the pump's<br />
cover plate and the pump, and one<br />
between the water-pump assenlbly and<br />
the front engine cover. After you've installed<br />
the pump's cover with its gasket<br />
and sealer, install the assembly to the<br />
front cover, again with the gasket and<br />
some sealer.<br />
Install the Front Cover-Lubricate the<br />
fuel-pump cam with some moly grease<br />
and wipe <strong>of</strong>f any excess oil from the<br />
block's front-cover mounting surface. Use<br />
thinner to get it really clean so the sealer<br />
will seal.<br />
Two dowel pins in the 351 C, 351 MI<strong>400</strong><br />
block locate the front cover whereas the<br />
<strong>429</strong>1460 cover must be centered on the<br />
crankshaft using the damper spacer. If it<br />
isn't, the damper will probably end up<br />
<strong>of</strong>f-center resulting in uneven seal loading<br />
and an oil leak.<br />
Center the aluminum cover by installing<br />
the front cover loosely. Using the<br />
spacer installed on the crank nose and inserted<br />
in the cover seal for centering,<br />
secure the cover to the engine. <strong>To</strong>rque<br />
front-cover bolts 12-18 ft. Ibs. for both<br />
styles <strong>of</strong> front covers.<br />
A tip is in order here if you have a<br />
<strong>429</strong>1460. Now's the time to install the<br />
thermostat-bypass hose. Regardless <strong>of</strong><br />
age, I always replace it because it's so<br />
much easier to do now than a month or<br />
two years later. It's also easier to install<br />
now than after you have the water pump/<br />
front cover in place. You'll need a 518-inch<br />
hose approximately 2-314-inches long.<br />
This is a bit longer than required, so hold<br />
your water pump and cover in place, then<br />
measure exactly how much length you'll<br />
need. Measure from the front <strong>of</strong> the intake<br />
manifold to the back <strong>of</strong> the water pump.<br />
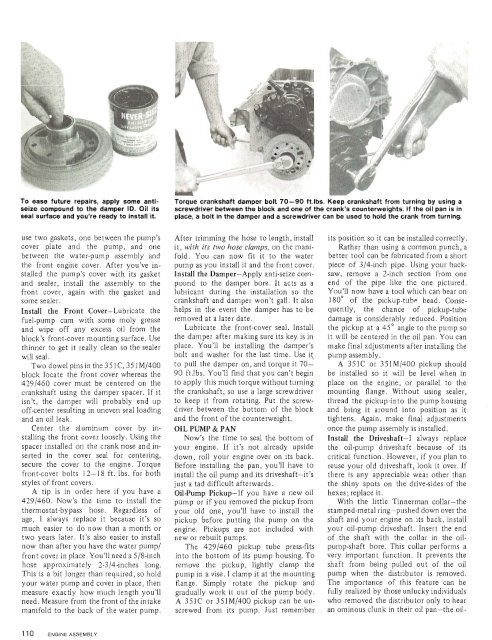
<strong>To</strong>rque crankshaft damper bolt 70-90 ft.lbs. Keep crankshaft from turning by using a<br />
screwdriver between the block and one <strong>of</strong> the crank's counterweights. If the oil pan is in<br />
place, a bolt in the damper and a screwdriver can be used to hold the crank from turning.<br />
After trimming the hose to length, install<br />
it, with its two hose clamps, on the manifold.<br />
You can now fit it to the water<br />
pump as you install it and the front cover.<br />
Install the Damper-Apply anti-seize compound<br />
to the damper bore. It acts as a<br />
lubricant during the installation so the<br />
crankshaft and damper won't gall. It also<br />
helps in the event the damper has to be<br />
removed at a later date.<br />
Lubricate the front-cover seal. Install<br />
the damper after making sure its key is in<br />
place. You'll be installing the damper's<br />
bolt and washer for the last time. Use it<br />
to pull the damper on, and torque it 70-<br />
90 ft.lbs. You'll find that you can't beginto<br />
apply this much torque without turning<br />
the crankshaft; so use a large screwdriver<br />
to keep it from rotating. Put the screwdriver<br />
between the bottom <strong>of</strong> the block<br />
and the front <strong>of</strong> the counterweight.<br />
OIL PUMP & PAN<br />
Now's the time to seal the bottom <strong>of</strong><br />
your engine. If it's not already upside<br />
down, roll your engine over on its back.<br />
Before installing the pan, you'll have to<br />
install the oil pump and its driveshaft-it's<br />
just a tad difficult afterwards.<br />
Oil-Pump Pickup-If you have a new oil<br />
pump or if you removed the pickup from<br />
your old one, you'll have to install the<br />
pickup before putting the pump on the<br />
engine. Pickups are not included with<br />
new or rebuilt pumps.<br />
The <strong>429</strong>1460 pickup tube press-fits<br />
into the bottom <strong>of</strong> its pump housing. <strong>To</strong><br />
remove the pickup, lightly clamp the<br />
pump in a vise. I clamp it at the mounting<br />
flange. Simply rotate the pickup and<br />
gradually work it out <strong>of</strong> the pump body.<br />
A <strong>351C</strong> or <strong>351M</strong>l<strong>400</strong> pickup can be unscrewed<br />
from its pump. Just remember<br />
its position so it can be installed correctly.<br />
Rather than using a common punch, a<br />
better tool can be fabricated from a short<br />
piece <strong>of</strong> 314-inch pipe. Using your hacksaw,<br />
remove a 2-inch section from one<br />
end <strong>of</strong> the pipe like the one pictured.<br />
You'll now have a tool which can bear on<br />
180' <strong>of</strong> the pickiip-tshe bead. Consequently,<br />
the chance <strong>of</strong> pickup-tube<br />
damage is considerably reduced. Position<br />
the pickup at a 45' angle to the pump so<br />
it will be centered in the oil pan. You can<br />
make final adjustments after installing the<br />
pump assembly.<br />
A <strong>351C</strong> or <strong>351M</strong>l<strong>400</strong> pickup should<br />
, be installed so it will be level when in<br />
place on the engine, or parallel to the<br />
mounting flange. Without using sealer,<br />
thread the pickupsinto the pump housing<br />
and bring it around into position as it<br />
tightens. Again, make final adjustments<br />
once the pump assembly is installed.<br />
Install the Driveshaft-l always replace<br />
the oil-pump driveshaft because <strong>of</strong> its<br />
critical function. <strong>How</strong>ever, if you plan to<br />
reuse your old driveshaft, look it over. If<br />
there is any appreciable wear other than<br />
the shiny spots on the drive-sides <strong>of</strong> the<br />
hexes; replace it.<br />
With the littie Tinnerman collar-the<br />
stamped-metal ring-pushed down over the<br />
shaft and your engine on its back, install<br />
your oil-pump driveshaft. Insert the end<br />
<strong>of</strong> the shaft with the collar in the oilpump-shaft<br />
bore. This collar performs a<br />
very important function. It prevents the<br />
shaft from being pulled out <strong>of</strong> the oil<br />
pump when the distributor is removed.<br />
The importance <strong>of</strong> this feature can be<br />
fully realized by those unlucky individuals<br />
who removed the distributor only to hear<br />
an ominous clunk in their oil pan-the oil-


