

How To Rebuild Your Ford V-8 351C-351M-400-429-460.pdf - Index of
How To Rebuild Your Ford V-8 351C-351M-400-429-460.pdf - Index of
How To Rebuild Your Ford V-8 351C-351M-400-429-460.pdf - Index of

You also want an ePaper? Increase the reach of your titles
YUMPU automatically turns print PDFs into web optimized ePapers that Google loves.
CYLINDER HEADS<br />
It's now time to begin buttoning up<br />
the top side, so position your engine upright.<br />
If you are working on a bench or<br />
the floor, your engine will be unstable, so<br />
block it up under the oil-pan flanges or<br />
bell-housing bosses so the engine will sit<br />
level and be stable. If you don't do this<br />
you can count on your engine rolling over,<br />
particularly when it's unbalanced with<br />
one cylinder head installed. If you're<br />
using an engine stand, just make sure the<br />
post is tight.<br />
Get your cylinder heads out <strong>of</strong> storage,<br />
the 2 head gaskets from your gasket set<br />
and the head bolts-20 grade-8 bolts to be<br />
exact. All <strong>351C</strong> and <strong>351M</strong>/<strong>400</strong> head bolts<br />
are the same saize: 1/2-13 x 4-5/16 inches<br />
long. The top <strong>429</strong>1460 head bolts are<br />
shorter than those for the bottom row.<br />
Their sizes are 9/16-12 x 4-318 inches<br />
long and 9/16-12 x 5-118 inches long,<br />
respectively.<br />
Clean the Head-Gasket Surface-<strong>To</strong> ensure<br />
the best possible head-gasket seal, clean<br />
the cylinder-head and cylinder-block gasket<br />
surfaces with solvent. Check to make<br />
sure all cylinder-head locating dowel pins<br />
are in place. They are a must as they<br />
accurately locate the heads on the block<br />
deck surface. If they are missing, replace<br />
them. Do this by inserting the straight<br />
end in the block with the chamfered, or<br />
tapered end projecting outward and tap it<br />
into place. You'll feel the pin bottom in<br />
its hole when it's fully installed.<br />
For pre-'72 engines having high compression<br />
ratios, you'll need the best<br />
sealing head gaskets available. Use Felpro's<br />
"Permatorque" or Victor's "Victorcor"<br />
head gaskets. If you use either <strong>of</strong> these<br />
gaskets, your block and cylinder-head<br />
gasket surfaces must be in the best <strong>of</strong><br />
condition-free from distortions and<br />
smooth. These gaskets are very hard, and<br />
consequently can't conform to surface<br />
irregularities. Because head gaskets are<br />
included in a complete engine-rebuild<br />
gasket set, the set you purchase should<br />
include these head gaskets.<br />
Coat the Head Caskets-Head gaskets can<br />
be installed as is, however I like a little<br />
added insurance. One <strong>of</strong> the most common<br />
and easiest to appy "sealers" is<br />
aluminum paint from a spray can. Evenly<br />
coat both sides <strong>of</strong> your head gaskets with<br />
it. After the paint has dried, position the<br />
gaskets on the engine block by locating<br />
them on the dowel pins with the FRONT<br />
designation on the gaskets to the front.<br />
If you get the gaskets on wrong, you'll be<br />
wondering why your cylinder heads are<br />
melting and your idiot lightlgage is not<br />
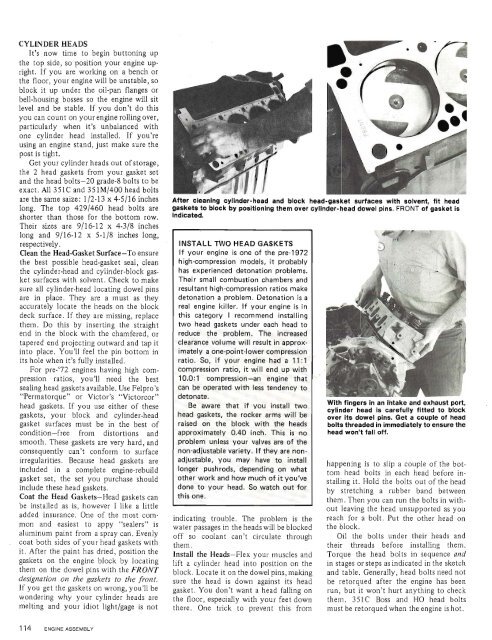
After cleaning cylinder-head and block head-gasket surfaces with solvent, fit head<br />
gaskets to block by positioning them over cylinder-head dowel pins. FRONT <strong>of</strong> gasket is<br />
indicated.<br />
INSTALL TWO HEAD GASKETS<br />
If your engine is one <strong>of</strong> the pre-1972<br />
high-compression models, it probably<br />
has experienced detonation problems.<br />
Their small combustion chambers and<br />
resultant high-compression ratios make<br />
detonation a problem. Detonation is a<br />
real engine killer. If your engine is in<br />
this category I recommend installing<br />
two head gaskets under each head to<br />
reduce the problem. The increased<br />
clearance volume will result in approximately<br />
a one-point-lower compression<br />
ratio. So, if your engine had e 11 : 1<br />
compression ratio, it will end up with<br />
10.0: 1 compression-an engine that<br />
can be operated with less tendency to<br />
detonate.<br />
Be aware that if you install two<br />
head gaskets, the rocker arms will be<br />
raised on the block with the heads<br />
approximately 0.40 inch. This is no<br />
problem unless your valves are <strong>of</strong> the<br />
non-adjustable variety. If they are nonadjustable,<br />
you may have to install<br />
longer pushrods, depending on what<br />
other work and how much <strong>of</strong> it you've<br />
done to your head. So watch out for<br />
this one.<br />
indicating trouble. The problem is the<br />
water passages in the heads will be blocked<br />
<strong>of</strong>f so coolant can't circulate through<br />
them.<br />
Install the Heads-Flex your muscles and<br />
lift a cylinder head into position on the<br />
block. Locate it on the dowel pins, making<br />
sure the head is down against its head<br />
gasket. You don't want a head falling on<br />
the floor, especially with your feet down<br />
there. One trick to prevent this from<br />
-<br />
Wlth fingers In an ihtake and exhaust port,<br />
cylinder head is carefully fitted to block<br />
over its dowel pins. Get a couple <strong>of</strong> head<br />
bolts threaded in immediately to ensure the<br />
head won't fall <strong>of</strong>f.<br />
happening is to slip a couple <strong>of</strong> the bottom<br />
head bolts in each head before installing<br />
it. Hold the bolts out <strong>of</strong> the head<br />
by stretching a rubber band between<br />
them. Then you can run the bolts in without<br />
leaving the head unsupported as you<br />
reach for a bolt. Put the other head on<br />
the block.<br />
Oil the bolts under their heads and<br />
their threads before installing them.<br />
<strong>To</strong>rque the head bolts in sequence and<br />
in stages or steps as indicated in the sketch<br />
and table. Generally, head bolts need not<br />
be retorqued after the engine has been<br />
run, but it won't hurt anything to check<br />
them. <strong>351C</strong> Boss and HO head bolts<br />
must be retorqued when the engine is hot.


