

How To Rebuild Your Ford V-8 351C-351M-400-429-460.pdf - Index of
How To Rebuild Your Ford V-8 351C-351M-400-429-460.pdf - Index of
How To Rebuild Your Ford V-8 351C-351M-400-429-460.pdf - Index of

Create successful ePaper yourself
Turn your PDF publications into a flip-book with our unique Google optimized e-Paper software.
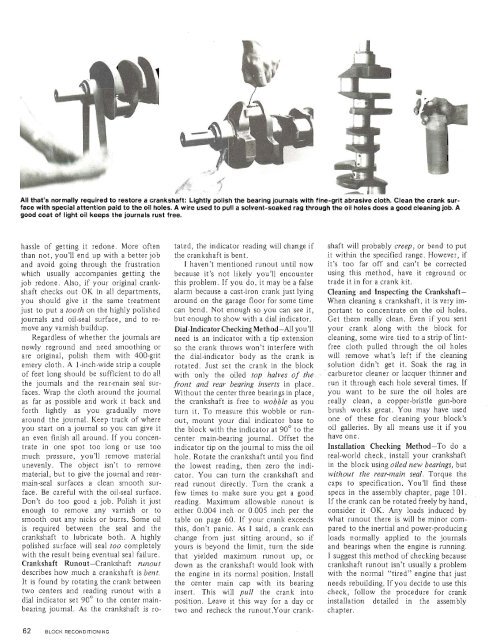
All that's normally required to restore a crankshaft: Lightly polish the bearing journals with fine-grit abrasive cloth. Clean the crank surface<br />
with special attention paid to the oil holes. A wire used to pull a solvent-soaked rag through the oil holes does a good cleaning job. A<br />
good coat <strong>of</strong> light oil keeps the journals rust free.<br />
hassle <strong>of</strong> getting it redone. More <strong>of</strong>ten<br />
than not, you'll end up with a better job<br />
and avoid going through the frustration<br />
which usually accompanies getting the<br />
job redone. Also, if your original crankshaft<br />
checks out OK in all departments,<br />
you should give it the same treatment<br />
just to put a tooth on the highly polished<br />
journals and oil-seal surface, and to remove<br />
any varnish buildup.<br />
Regardless <strong>of</strong> whether the journals are<br />
newly reground and need smoothing or<br />
are original, polish them with <strong>400</strong>-grit<br />
emery cloth. A 1 -inch-wide strip a couple<br />
<strong>of</strong> feet long should be sufficient to do all<br />
the journals and the rear-main seal surfaces.<br />
Wrap the cloth around the journal<br />
as far as possible and work it back and<br />
forth lightly as you gradually move<br />
around the journal. Keep track <strong>of</strong> where<br />
you start on a journal so you can give it<br />
an even finish all around. If you concentrate<br />
in one spot too long or use too<br />
much pressure, you'll remove material<br />
unevenly. The object isn't to remove<br />
material, but to give the journal and rearmain-seal<br />
surfaces a clean smooth surface.<br />
Be careful with the oil-seal surface.<br />
Don't do too good a job. Polish it just<br />
enough to remove any varnish or to<br />
smooth out any nicks or burrs. Some oil<br />
is required between the seal and the<br />
crankshaft to lubricate both. A highly<br />
polished surface will seal too completely<br />
with the result being eventual seal failure.<br />
Crankshaft Runout-Crankshaft ruizout<br />
describes how much a crankshaft is bent.<br />
It is found by rotating the crank between<br />
two centers and reading runout with a<br />
dial indicator set 90' to the center mainbearing<br />
journal. As the crankshaft is ro-<br />
tated, the indicator reading will change if<br />
the crankshaft is bent.<br />
I haven't mentioned runout until now<br />
because it's not likely you'll encounter<br />
this problem. If you do, it may be a false<br />
alarm because a cast-iron crank just lying<br />
around on the garage floor for some time<br />
can bend. Not enough so you can see it,<br />
but enough to show with a dial indicator.<br />
Dial-Indicator Checking Method-All you'll<br />
need is an indicator with a tip extension<br />
so the crank throws won't interfere with<br />
the dial-indicator body as the crank isrotated.<br />
Just set the crank in the block<br />
with only the oiled top halves <strong>of</strong> the<br />
front and rear bearing inserts in place.<br />
Without the center three bearingsin place,<br />
the crankshaft is free to wobble as you<br />
turn it. <strong>To</strong> measure this wobble or runout,<br />
mount your dial indicator base to<br />
the block with the indicator at 90° to the<br />
center main-bearing journal. Offset the<br />
indicator tip on the journal to miss the oil<br />
hole. Rotate the crankshaft until you find<br />
the lowest reading, then zero the indicator.<br />
You can turn the crankshaft and<br />
read runout directly. Turn the crank a<br />
few times to make sure you get a good<br />
reading. Maximum allowable runout is<br />
either 0.004 inch or 0.005 inch per the<br />
table on page 60. If your crank exceeds<br />
this, don't panic. As I said, a crank can<br />
change from just sitting around, so if<br />
yours is beyond the limit, turn the side<br />
that yielded maximum runout up, or<br />
down as the crankshaft would look with<br />
the engine in its normal position. Install<br />
the center main cap with its bearing<br />
insert. This will pull the crank into<br />
position. Leave it this way for a day or<br />
two and recheck the runout.<strong>Your</strong> crank-<br />
shaft will probably creep, or bend to put<br />
it within the specified range. <strong>How</strong>ever, if<br />
it's too far <strong>of</strong>f and can't be corrected<br />
using this method, have it reground or<br />
trade it in for a crank kit.<br />
Cleaning and Inspecting the Crankshaft-<br />
When cleaning a crankshaft, it is very important<br />
to concentrate on the oil holes.<br />
Get them really clean. Even if you sent<br />
your crank along with the block for<br />
cleaning, some wire tied to a strip <strong>of</strong> lintfree<br />
cloth pulled through the oil holes<br />
will remove what's left if the cleaning<br />
solution didn't get it. Soak the rag in<br />
carburetor cleaner or lacquer thinner and<br />
run it through each hole several times. If<br />
you want to be sure the oil holes are<br />
really clean, a copper-bristle gun-bore<br />
brush works great. You may have used<br />
one <strong>of</strong> these for cleaning your block's<br />
oil galleries. By all means use it if you<br />
have one.<br />
Installation Checking Method-<strong>To</strong> do a<br />
real-world check, install your crankshaft<br />
in the block using oiled new bearings, but<br />
without the rear-main seal. <strong>To</strong>rque the<br />
caps to specification. You'll find these<br />
specs in the assembly chapter, page 101.<br />
If the crank can be rotated freely by hand,<br />
consider it OK. Any loads induced by<br />
what runout there is will be minor compared<br />
to the inertial and power-producing<br />
loads normally applied to the journals<br />
and bearings when the engine is running.<br />
I suggest this method <strong>of</strong> checking because<br />
crankshaft runout isn't usually a problem<br />
with the normal "tired" engine that just<br />
needs rebuilding. If you decide to use this<br />
check, follow the procedure for crank<br />
installation detailed in the assembly<br />
chapter.


