

How To Rebuild Your Ford V-8 351C-351M-400-429-460.pdf - Index of
How To Rebuild Your Ford V-8 351C-351M-400-429-460.pdf - Index of
How To Rebuild Your Ford V-8 351C-351M-400-429-460.pdf - Index of

You also want an ePaper? Increase the reach of your titles
YUMPU automatically turns print PDFs into web optimized ePapers that Google loves.
94 ENGINE ASSEMBLY<br />
If you have the threaded, or pull-type<br />
tool, locate the bearing and mandrel on<br />
the opposite side <strong>of</strong> the bearing web from<br />
which you'll be pulling. You'll put the<br />
drive-type mandrel on the same side from<br />
which you'll be hammering. Regardless <strong>of</strong><br />
the type tool you're using, check the<br />
bearing immediately after you've started<br />
it in the bore to make sure it's going in<br />
straight, then finish installing it if it's OK.<br />
If not, straighten it up and finish the installation.<br />
Except for the front bearing, it<br />
will be positioned correctly when it looks<br />
centered in its web. The front bearing<br />
must be located more precisely.<br />
Feeler Gage for the Front Bearing-The<br />
front edge <strong>of</strong> the number-one cam bearing<br />
must be located accurately behind the<br />
front face <strong>of</strong> the front bearing housing.<br />
When you think the bearing is close to<br />
being in position, check it with your<br />
feeler gages between a straight edge laid<br />
across the thrust-plate mounting surface<br />
and the front edge <strong>of</strong> the bearing insert.<br />
If the clearance is not within the specified<br />
tolerance range, move the bearing accordingly<br />
and check it again. Also, check to<br />
see if the bearing is installed squarely by<br />
gaging around the bearing with your<br />
feeler gages in three or four locations.<br />
If it's more than a few thousandths <strong>of</strong>f,<br />
square it up. Number-one camshaftbearing<br />
setback for 351 Cs and 351 M/<strong>400</strong>s<br />
is 0.005-0.020 inch. Use 0.040-0.060<br />
inch for <strong>429</strong>1460s.<br />
Install All the Plugs-With the cam<br />
bearings in place, you can install the camshaft-bore<br />
plug. While you're in the pluginstallation<br />
business, now's a good time<br />
to install the balance <strong>of</strong> the plugs that go<br />
in the block: 6 core plugs which fit in the<br />
sides <strong>of</strong> the block-3 per side-and 4 oilgallery<br />
plugs, 2 in front and 2 in back.<br />
Water-Jacket Plugs-Water-jacket, or core<br />
plugs are 1-112-inch diameter cup-type<br />
plugs. It's not essential to use sealer when<br />
installing these but I do anyway. Apply a<br />
small bead <strong>of</strong> sealer around the front edge<br />
<strong>of</strong> the plug or the outside edge <strong>of</strong> the<br />
hole and set the plug squarely over it so<br />
you're looking into the concave side <strong>of</strong><br />
the plug. Use a hammer and the largest<br />
diameter punch you have-not over 1-318-<br />
inch diameter-to drive the plug into<br />
place. A punch 1116-inch smaller than the<br />
ID <strong>of</strong> the plug is ideal. Don't use a punch<br />
less than 112-inch round because it may<br />
distort the plug, causing it to leak. Likewise,<br />
don't drive the plugs in by hitting<br />
them on their edges, otherwise the same<br />
thing will happen. Install them by driving<br />
a little at a time. Work around the inside<br />
edge <strong>of</strong> the plug, making sure it goes in<br />
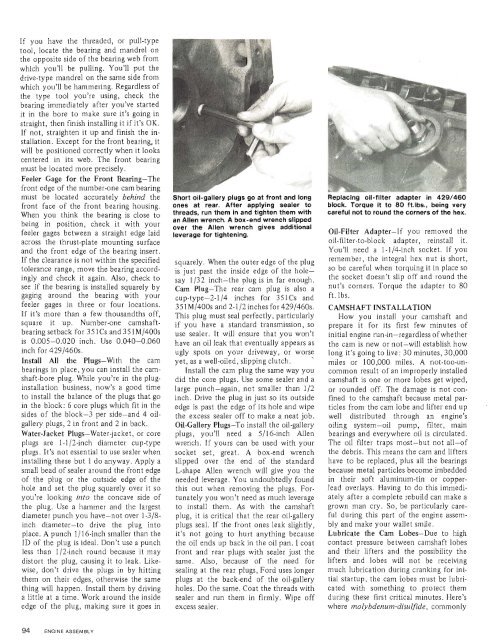
Short oil-gallery plugs go at front and long Replacing oil-filter adapter in <strong>429</strong>/460<br />
ones at rear. After applying sealer to block. <strong>To</strong>rque it to 80 ft.lbs., being very<br />
threads, run them in and tighten them with careful not to round the corners <strong>of</strong> the hex.<br />
an Allen wrench. A box-end wrench slipped<br />
over the Allen wrench gives additional<br />
leverage for tightening. Oil-Filter Adapter-If you removed the<br />
oil-filter-to-block adapter, reinstall it.<br />
You'll need a 1-114-inch socket. If you<br />
remember, the integral hex nut is short,<br />
so be careful when torquing it in place so<br />
the socket.doesn't slip <strong>of</strong>f and round the<br />
nut's corners. <strong>To</strong>rque the adapter to 80<br />
ft. lbs.<br />
CAMSHAFT INSTALLATION<br />
<strong>How</strong> you install your camshaft and<br />
prepare it for its first few minutes <strong>of</strong><br />
initial engine run-in-regardless <strong>of</strong> whether<br />
the cam is new or not-will establish how<br />
long it's going to live: 30 minutes, 30,000<br />
miles or 100,000 miles. A not-too-uncommon<br />
result <strong>of</strong> an improperly installed<br />
camshaft is one or more lobes get wiped,<br />
or rounded <strong>of</strong>f. The damage is not confined<br />
to the camshaft because metal particles<br />
from the cam lobe and lifter end up<br />
well distributed through an engine's<br />
squarely. When the outer edge <strong>of</strong> the plug<br />
is just past the inside edge <strong>of</strong> the holesay<br />
1/32 inch-the plug is in far enough.<br />
Cam Plug-The rear cam plug is also a<br />
cup-type-2-1 14 inches for 351 Cs and<br />
<strong>351M</strong>/<strong>400</strong>s and 2-112 inches for <strong>429</strong>1460s.<br />
This plug must seal perfectly, particularly<br />
if you have a standard transmission, so<br />
use sealer. It will ensure that you won't<br />
have an oil leak that eventually appears as<br />
ugly spots on your driveway, or worse,<br />
yet, as a well-oiled, slipping clutch.<br />
Install the cam plug the same way you<br />
did the core plugs. Use some sealer and a<br />
large punch-again, not smaller than 112<br />
inch. Drive the plug in just so its outside<br />
edge is past the edge <strong>of</strong> its hole and wipe<br />
the excess sealer <strong>of</strong>f to make a neat job.<br />
Oil-Gallery Plugs-<strong>To</strong> install the oil-gallery<br />
plugs, you'll need a 5116-inch Allen<br />
wrench. If yours can be used with your<br />
socket set, great. A box-end wrench<br />
slipped over the end <strong>of</strong> the standard<br />
~-sha~e Allen wrench will give you the<br />
needed leverage. You undoubtedly found<br />
this out when removing the plugs. Fortunately<br />
you won't need as much leverage<br />
to install them. As with the camshaft<br />
plug, it is critical that the rear oil-gallery<br />
plugs seal. If the front ones leak slightly,<br />
it's not going to hurt anything because<br />
the oil ends up back in the oil pan. I coat<br />
front and rear plugs with sealer just the<br />
same. Also. because <strong>of</strong> the need for<br />
sealing at the rear plugs, <strong>Ford</strong> uses longer<br />
plugs at the back-end <strong>of</strong> the oil-gallery<br />
holes. Do the same. Coat the threads with<br />
sealer and run them in firmly. Wipe <strong>of</strong>f<br />
excess sealer.<br />
oiling system-oil pump, filter, main<br />
bearings and everywhere oil is circulated.<br />
The oil filter traps most-but not all-<strong>of</strong><br />
the debris. This means the cam and lifters<br />
have to be replaced, plus all the bearings<br />
because metal particles become imbedded<br />
in their s<strong>of</strong>t aluminum-tin or copperlead<br />
overlays. Having to do this immediately<br />
after a complete rebuild can make a<br />
grown man cry. So, be particularly careful<br />
during this part <strong>of</strong> the engine assembly<br />
and make your wallet smile.<br />
Lubricate the Cam Lobes-Due to high<br />
contact pressure between camshaft lobes<br />
and their lifters and the possibility the<br />
lifters and lobes wffl not be receiving<br />
much lubrication during cranking for initial<br />
startup, the cam lobes must be lubricated<br />
with something to protect them<br />
during these first critical minutes. Here's<br />
where molybdenum-disulfide, commonly


