

How To Rebuild Your Ford V-8 351C-351M-400-429-460.pdf - Index of
How To Rebuild Your Ford V-8 351C-351M-400-429-460.pdf - Index of
How To Rebuild Your Ford V-8 351C-351M-400-429-460.pdf - Index of

Create successful ePaper yourself
Turn your PDF publications into a flip-book with our unique Google optimized e-Paper software.
from losing it, put it back on the pushrod<br />
along with the clip. There may also be a<br />
wave washer. Put it back too.<br />
The equalizer bar fits between the<br />
engine and the frame or body. It pivots<br />
on a bracket attached to the frame or<br />
body with 2 bolts. After removing these<br />
bolts and the bracket, the equalizer bar<br />
will be free to pull <strong>of</strong>f its pivot at the engine,<br />
but you'll have to finish this job<br />
from underneath. This can usually be<br />
accomplished without raising your car by<br />
simply reaching the bellcrank-to-release<br />
lever under the car. Unhook it and the<br />
release-lever pushrod will swing free. You<br />
can now remove the bellcrank and pushrod<br />
together by sliding the bellcrank <strong>of</strong>f<br />
its engine pivot.<br />
Disconnect the Fuel Pump-Before breaking<br />
any fuel-line connections, make sure<br />
there are no open flames close by such as<br />
a gas water-heater pilot light. Disconnect<br />
the fuel-tank-to-fuel-pump line at the fuel<br />
pump. <strong>To</strong> prevent siphoning and the consequent<br />
fire hazard created by spilled gasoline,<br />
push a 318-in. diameter bolt into<br />
the end <strong>of</strong> the hose. Make sure the bolt<br />
isn't fully threaded. Otherwise fuel will<br />
leak out around the threads. It should<br />
have at least 112 in. <strong>of</strong> unthreaded shank.<br />
Get What You Can From the <strong>To</strong>p-If the<br />
exhaust-manifold-to-exhaust-pipe bolts<br />
are accessible from above, particularly the<br />
top ones, get them now. They are definitely<br />
easier to remove this way unless you<br />
have a 12-inch extension in your socket<br />
set. Some penetrating oil on the threads<br />
about an hour prior to removing the nuts<br />
and the use <strong>of</strong> a box-end wrench help<br />
avoid damaged knuckles. An open-end<br />
wrench slips <strong>of</strong>f too easily and there may<br />
not be enough room for a ratchet handle.<br />
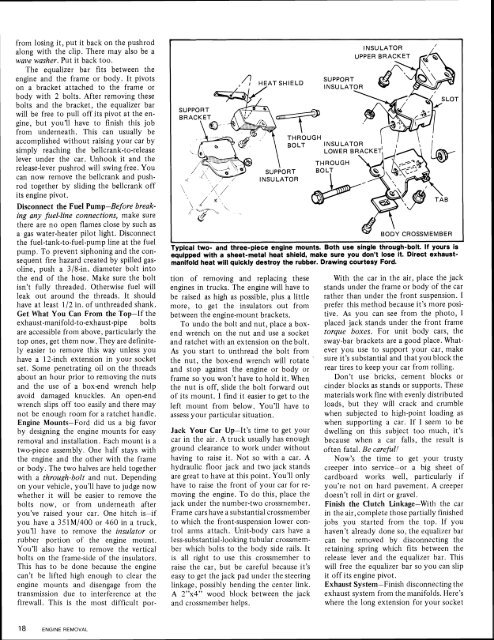
Engine Mounts-<strong>Ford</strong> did us a big favor<br />
by designing the engine mounts for easy<br />
removal and installation. Each mount is a<br />
two-piece assembly. One half stays with<br />
the engine and the other with the frame<br />
or bod;. The two halves are held together<br />
with a through-bolt and nut. Depending<br />
on your vehicle, you'll have to judge now<br />
whether it will be easier to remove the<br />
bolts now, or from underneath after<br />
you've raised your car. One hitch is-if<br />
you have a <strong>351M</strong>/<strong>400</strong> or 460 in a truck,<br />
you'll have to remove the insulator or<br />
rubber portion <strong>of</strong> the engine mount.<br />
You'll also have to remove the vertical<br />
bolts on the frame-side <strong>of</strong> the insulators.<br />
This has to be done because the engine<br />
can't be lifted high enough to clear the<br />
engine mounts and disengage from the<br />
transmission due to interference at the<br />
firewall. This is the most difficult por-<br />
l NSU LATOR<br />
Typical two- and three-piece engine mounts. Both use single through-bolt. If yours is<br />
equipped with a sheet-metal heat shield, make sure you don't lose it. Direct exhaustmanifold<br />
heat will quickly destroy the rubber. Drawing courtesy <strong>Ford</strong>.<br />
tion <strong>of</strong> removing and replacing these<br />
engines in trucks. The engine will have to<br />
be raised as high as possible, plus a little<br />
more, to get the insulators out from<br />
between the engine-mount brackets.<br />
<strong>To</strong> undo the bolt and nut, place a boxend<br />
wrench on the nut and use a socket<br />
and ratchet with an extension on the bolt.<br />
As you start to unthread the bolt from<br />
the nut, the box-end wrench will rotate<br />
and stop against the engine or body or<br />
frame so you won't have to hold it. When<br />
the nut is <strong>of</strong>f, slide the bolt forward out<br />
<strong>of</strong> its mount. I find it easier to get to the<br />
left mount from below. You'll have to<br />
assess your particular situation.<br />
Jack <strong>Your</strong> Car Up-It's time to get your<br />
car in the air. A truck usually has enough<br />
ground clearance to work under without<br />
having to raise it. Not so with a car. A<br />
hydraulic floor jack and two jack stands<br />
are great to have at this point. You'll only<br />
have to raise the front <strong>of</strong> your car for removing<br />
the engine. <strong>To</strong> do this, place the<br />
jack under the number-two crossmember.<br />
Frame cars have a substantial crossmember<br />
to which the front-suspension lower control<br />
arms attach. Unit-body cars have a<br />
less-substantial-looking tubular crossmember<br />
which bolts to the body side rails. It<br />
is all right to use this crossmember to<br />
raise the car, but be careful because it's<br />
easy to get the jack pad under the steering<br />
linkage, possibly bending the center link.<br />
A 2"x4" wood block between the jack<br />
and crossmember helps.<br />
With the car in the air, place the jack<br />
stands under the frame or body <strong>of</strong> the car<br />
rather than under the front suspension. I<br />
prefer this method because it's more positive.<br />
As you can see from the photo, I<br />
placed jack stands under the front frame<br />
torque boxes. For unit body cars, the<br />
sway-bar brackets are a good place. Whatever<br />
you use to support your car, make<br />
sure it's substantial and that you block the<br />
rear tires to keep your car from rolling.<br />
Don't use bricks, cement blocks or<br />
cinder blocks as stands or supports. These<br />
materials work fine with evenly distributed<br />
loads, but they will crack and crumble<br />
when subjected to high-point loading as<br />
when supporting a car. If I seem to be<br />
dwelling on this subject too much, it's<br />
because when a car falls, the result is<br />
<strong>of</strong>ten fatal. Be careful!<br />
Now's the time to get your trusty<br />
creeper into service-or a big sheet <strong>of</strong><br />
cardboard works well, particularly if<br />
you're not on hard pavement. A creeper<br />
doesn't roll in dirt or gravel.<br />
Finish the Clutch Linkage-With the car<br />
in the air, complete those partially finished<br />
jobs you started from the top. If you<br />
haven't already done so, the equali~er bar<br />
can be removed by disconnecting the<br />
retaining spring which fits between the<br />
release lever and the equalizer bar. This<br />
will free the equalizer bar so you can slip<br />
it <strong>of</strong>f its engine pivot.<br />
Exhaust System-Finish disconnecting the<br />
exhaust system from the manifolds. Here's<br />
where the long extension for your socket<br />
/<br />
/ I


