

How To Rebuild Your Ford V-8 351C-351M-400-429-460.pdf - Index of
How To Rebuild Your Ford V-8 351C-351M-400-429-460.pdf - Index of
How To Rebuild Your Ford V-8 351C-351M-400-429-460.pdf - Index of

You also want an ePaper? Increase the reach of your titles
YUMPU automatically turns print PDFs into web optimized ePapers that Google loves.
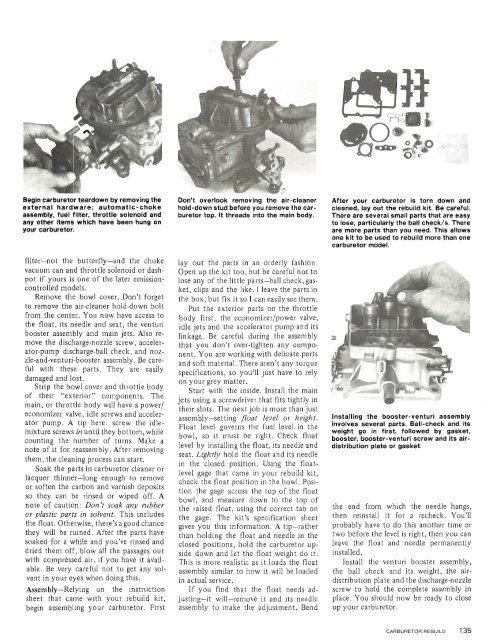
Begin carburetor teardown by removing the<br />
external hardware; automatic-choke<br />
assembly, fuel fllter, throttle solenoid and<br />
any other items which have been hung on<br />
your carburetor.<br />
Don't overlook removing the air-cleaner<br />
hold-down stud before you remove the carburetor<br />
top. It threads into the main body.<br />
After your carburetor is torn down and<br />
cleaned, lay out the rebuild kit. Be careful.<br />
There are several small parts that are easy<br />
to lose, particularly the ball check/s. There<br />
are more parts than you need. This allows<br />
one kit to be used to rebuild more than one<br />
carburetor model.<br />
filter-not the butterfly-and the choke lav out the parts in an orderly fashion.<br />
vacuum can and throttle solenoid or dashpot<br />
if yours is one <strong>of</strong> the later emissioncontrolled<br />
models.<br />
Remove the bowl cover. Don't forget -<br />
to remove the air-cleaner hold-down bolt<br />
from the center. You now have access to<br />
the float, its needle and seat, the venturi<br />
booster assembly and main jets. Also remove<br />
the discharge-nozzle screw, accelerator-pump<br />
discharge-ball check, and nozzle-and-venturi-booster<br />
assembly. Be careful<br />
with these parts. They are easily<br />
damaged and lost.<br />
Strip the bowl cover and throttle body<br />
<strong>of</strong> their "exterior" components. The<br />
main, or throttle body will have a power/<br />
economizer valve, idle screws and accelerator<br />
pump. A tip here: screw the idlemixture<br />
screws in until they bottom, while<br />
counting the number <strong>of</strong> turns. Make a<br />
note <strong>of</strong> it for reassembly. After removing<br />
them, the cleaning-process can start.<br />
Soak the parts in carburetor cleaner or<br />
lacquer thinner-long enough to remove<br />
or s<strong>of</strong>ten the carbon and varnish deposits<br />
so they can be rinsed or wiped <strong>of</strong>f. A<br />
note <strong>of</strong> caution: Don't soak any rubber<br />
or plastic parts in solvent. This includes<br />
the float. Otherwise, there's a good chance<br />
they will be ruined. After the parts have<br />
soaked for a while and you've rinsed and<br />
dried them <strong>of</strong>f, blow all the passages out<br />
with compressed air, if you have it avail-<br />
able. Be very careful not to get any solvent<br />
in your eyes when doing this.<br />
Assembly-Relying on the instruction<br />
sheet that came with your rebuild kit,<br />
begin assembling your carburetor. First<br />
open up the kit too, but be careful not to<br />
lose any <strong>of</strong> the little parts-ball check, gasket,<br />
clips and the like. I leave the parts in<br />
the box, but fix it so I can easily see them.<br />
Put the exterior parts on the throttle<br />
body first, the economizer/power valve,<br />
idle jets and the accelerator pump and its<br />
linkage. Be careful during the assembly<br />
that you don't over-tighten any component.<br />
You are working with delicate parts<br />
and s<strong>of</strong>t material. There aren't any torque<br />
specifications, so you'll just have to rely<br />
on your grey matter.<br />
Start with the inside. Install the main<br />
jets using a screwdriver that fits tightly in<br />
their slots. The next job is more than just<br />
assembly-setting float level or height.<br />
Float level governs the fuel level in the<br />
bowl, so it must be right. Check float<br />
level by installing the float, its needle and<br />
seat. Lightly hold the float and its needle<br />
in the closed position. Using the floatlevel<br />
gage that came in your rebuild kit,<br />
check the float position in the bowl. Position<br />
the gage across the top <strong>of</strong> the float<br />
Installing the booster-venturi assembly<br />
involves several parts. Ball-check and its<br />
weight go in first, followed by gasket,<br />
booster, booster-venturi screw and its airdistribution<br />
plate or gasket.<br />
bowl, and measure down to the top <strong>of</strong><br />
the raised float, using the correct tab on the end from which the needle<br />
the q-he kit's sDecification sheet then reinstall it for a recheck. You'll<br />
'2 0<br />
gives you this informa;ion. A tip-rather probably have to do this another time or<br />
than holding the float and needle in the two before the level is right, then you can<br />
closed ~ositions. hold the carburetor up- leave the float and needle permanently<br />
side dokn and lkt the float weight do it. installed.<br />
This is more realistic as it loads the float Install the venturi booster assembly,<br />
assembly similar to how it will be loaded the ball check and its weight, the airin<br />
actual service.<br />
distribution plate and the discharge-nozzle<br />
If you find that the float needs ad- screw to hold the complete assembly in<br />
justing-it will-remove it and its needle place. YOU should now be ready to close<br />
assembly to make the adjustment. Bend up your carburetor.<br />
CARBURETOR REBUILD 135


