

How To Rebuild Your Ford V-8 351C-351M-400-429-460.pdf - Index of
How To Rebuild Your Ford V-8 351C-351M-400-429-460.pdf - Index of
How To Rebuild Your Ford V-8 351C-351M-400-429-460.pdf - Index of

Create successful ePaper yourself
Turn your PDF publications into a flip-book with our unique Google optimized e-Paper software.
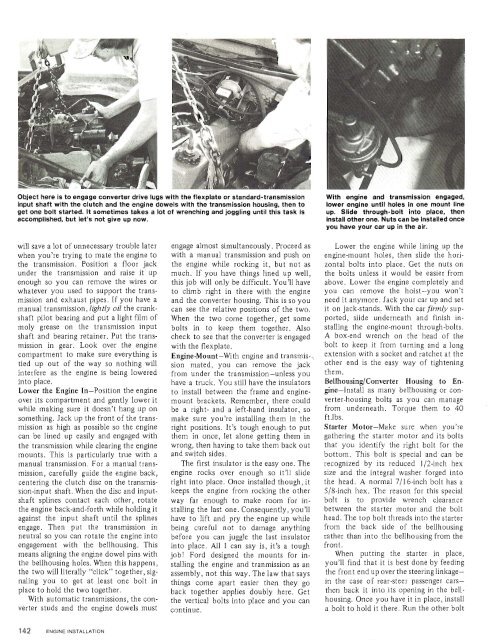
Object here is to engage converter drive lugs with the flexplate or standard-transmission<br />
input shaft with the clutch and the engine dowels with the transmission housing, then to<br />
get one bolt started. It sometimes takes a lot <strong>of</strong> wrenching and joggling until this task is<br />
accomplished, but let's not give up now.<br />
With engine and transmission engaged,<br />
lower engine until holes in one mount line<br />
up. Slide through-bolt into place, then<br />
install other one. Nuts can be installed once<br />
you have your car up in the air.<br />
will save a lot <strong>of</strong> unnecessary trouble later<br />
when you're trying to mate the engine to<br />
the transmission. Position a floor jack<br />
under the transmission and raise it up<br />
enough so you can remove the wires or<br />
whatever you used to support the transmission<br />
and exhaust pipes. If you have a<br />
manual transmission, lightly oil the crankshaft<br />
pilot bearing and put a light film <strong>of</strong><br />
moly grease on the transmission input<br />
shaft and bearing retainer. Put the transmission<br />
in gear. Look over the engine<br />
compartment to make sure everything is<br />
tied up out <strong>of</strong> the way so nothing will<br />
interfere as the engine is being lowered<br />
into place.<br />
Lower the Engine In-Position the engine<br />
over its compartment and gently lower it<br />
while making sure it doesn't hang up on<br />
something. Jack up the front <strong>of</strong> the transmission<br />
as high as possible so the engine<br />
can be lined up easily and engaged with<br />
the transmission while clearing the engine<br />
mounts. This is particularly true with a<br />
manual transmission. For a manual transmission,<br />
carefully guide the engine back,<br />
centering the clutch disc on the transmission-input<br />
shaft. When the disc and inputshaft<br />
splines contact each other, rotate<br />
the engine back-and-forth while holding it<br />
against the input shaft until the splines<br />
engage. Then put the transmission in<br />
neutral so you can rotate the engine into<br />
engagement with the bellhousing. This<br />
means aligning the engine dowel pins with<br />
the bellhousing holes. When this happens,<br />
the two will literally "click" together, signaling<br />
you to get at least one bolt in<br />
place to hold the two together.<br />
With automatic transmissions, the converter<br />
studs and the engine dowels must<br />
engage almost simultaneously. Proceed as<br />
with a manual transmission and push on<br />
the engine while rocking it, but not as<br />
much. If you have things lined up well,<br />
this job will only be difficult. You'll have<br />
to climb right in there with the engine<br />
and the converter housing. This is so you<br />
can see the relative positions <strong>of</strong> the two.<br />
When the two come together, get some<br />
bolts in to keep them together. Also<br />
check to see that the converter is engaged<br />
with the flexplate.<br />
Engine-Mount-With engine and transmis-;<br />
sion mated, you can remove the jack<br />
from under the transmission-unless you<br />
have a truck. You still have the insulators<br />
to install between the frame and enginemount<br />
brackets. Remember, there could<br />
be a right- and a left-hand insulator, so<br />
make sure you're installing them in the<br />
right positions. It's tough enough to put<br />
them in once, let alone getting them in<br />
wrong, then having to take them back out<br />
and switch sides.<br />
The first insulator is the easy one. The<br />
engine rocks over enough so it'll slide<br />
right into place. Once installed though, it<br />
keeps the engine from rocking the other<br />
way far enough to make room for installing<br />
the last one. consequently, you'll<br />
have to lift and pry the engine up while<br />
being careful not to damage anything<br />
before you can juggle the last insulator<br />
into place. All I can say is, it3 a tough<br />
job! <strong>Ford</strong> designed the mounts for installing<br />
the engine and tranmission as an<br />
assembly, not this way. The law that says<br />
things come apart easier then they go<br />
back together applies doubly here. Get<br />
the vertical bolts into place and you can<br />
continue.<br />
Lower the engine while lining up the<br />
engine-mount holes, then slide the horizontal<br />
bolts into place. Get the nuts on<br />
the bolts unless it would be easier from<br />
above. Lower the engine completely and<br />
you can remove the hoist-you won't<br />
need it anymore. Jack your car up and set<br />
it on jack-stands, With the carfirmly supported,<br />
slide underneath and finish installing<br />
the engine-mount through-bolts.<br />
A box-end wrench on the head <strong>of</strong> the<br />
bolt to keep. it from turning and a long<br />
extension with a socket and ratchet at the<br />
other end is the easy way <strong>of</strong> tightening<br />
them.<br />
Bellhousing/Converter Housing to En-<br />
gine-Install as many bellhousing or converter-housing<br />
bolts as you can manage<br />
from underneath. <strong>To</strong>rque them to 40<br />
ft.lbs.<br />
Starter Motor-Make sure when you're<br />
gathering the starter motor and its bolts<br />
that you identify the right bolt for the<br />
bottom. This bolt is special and can be<br />
recognized by its reduced 112-inch hex<br />
size and the integral washer forged into<br />
the head. A normal 7116-inch bolt has a<br />
518-inch hex. The reason for this special<br />
bolt is to provide wrench clearance<br />
between the starter motor and the bolt<br />
head. The top bolt threads into the starter<br />
from the back side <strong>of</strong> the bellhousing<br />
rather than into the bellhousing from the<br />
front.<br />
When putting the starter in place,<br />
you'll find that it is best done by feeding<br />
the front end up over the steeringlinkagein<br />
the case <strong>of</strong> rear-steer passenger carsthen<br />
back it into its opening in the bellhousing.<br />
Once you have it in place, install<br />
a bolt to hold it there. Run the other bolt


