

How To Rebuild Your Ford V-8 351C-351M-400-429-460.pdf - Index of
How To Rebuild Your Ford V-8 351C-351M-400-429-460.pdf - Index of
How To Rebuild Your Ford V-8 351C-351M-400-429-460.pdf - Index of

Create successful ePaper yourself
Turn your PDF publications into a flip-book with our unique Google optimized e-Paper software.
spots, creating little bumps on the friction<br />
surface. A grinding wheel cuts right<br />
through the hard spots.<br />
Although your flywheel appears to be<br />
all right, it should still be cleaned. For<br />
instance, the clutch friction surface will<br />
be shiny, or may have some deposits on<br />
it. <strong>To</strong> help it and the clutch, use fine-grit<br />
sandpaper to roughen the surface. This<br />
will remove resin deposits left from the<br />
clutch disc too. Follow the sanding with<br />
a good cleaning with non-petroleumbased<br />
solvent such as alcohol or lacquer<br />
thinner. This will remove any oil deposits.<br />
Give the same treatment to the pressure<br />
plate if you are planning to reuse your<br />
old one.<br />
Clutch Release Bearing-There are two<br />
rules when it comes to the release bearing:<br />
replace it if you are replacing your clutch.<br />
The next rule is replace it anyway. The<br />
relative cost <strong>of</strong> a new bearing and the<br />
amount <strong>of</strong> work it takes to replace it now<br />
as opposed to when your engine is back<br />
in should give you a good idea as to what<br />
you should do. Regardless <strong>of</strong> whether or<br />
not you replace your bearing, fdl the<br />
bearing-hub-bore groove with grease.<br />
Don't overdo it because too much grease<br />
causes clutch failure if the grease gets on<br />
the clutch disc. Use moly grease to lubricate<br />
the bearing hub and the wear points<br />
on the release lever, then replace the<br />
bearing.<br />
Engine Plate-Whether you have an automatic<br />
transmission or a standard transmission,<br />
there's an engine plate to install<br />
before the flywheellflexplate can go on.<br />
Because it depends on the bellhousing or<br />
converter housing to hold it to the engine,<br />
it'll be constantly falling <strong>of</strong>f while you<br />
are trying to install the flywheel/flexplate.<br />
It can fall away from the block and down<br />
between the block and flywheel/flexplate<br />
while you're trying to bolt the engine to<br />
the transmission. Here's a tip: Apply a<br />
thin bead <strong>of</strong> 3M weatherstrip adhesive to<br />
the rear face <strong>of</strong> your engine block to hold<br />
the engine plate in place. Install the plate<br />
over the locating dowels with the starter<br />
hole to the right. Hold it in place for a<br />
minute or so to make sure the adhesive<br />
gets a grip on the plate.<br />
Flywheel or Flexplate-Make sure your<br />
crankshaft-mounting flange is clean and<br />
free <strong>of</strong> burrs, particularly in the case<br />
where you will be mounting a flywheel to<br />
it. This can cock the flywheel, causing it<br />
to wobble, which will lead to clutch and<br />
transmission problems.<br />
Install the flywheel or flexplate using<br />
the 6 grade8 bolts and a drop <strong>of</strong> Loctite<br />
on the threads. When locating the fly-<br />
wheel or flexplate, rotate it on the crankmounting<br />
flange until the mounting holes<br />
line up. They are drilled so the flywheel/<br />
flexplate can mount in only one position<br />
so the engine will be balanced correctly.<br />
Don't panic when you see the holes don't<br />
line up the first time. Snug the mounting<br />
bolts, then torque them to 75-85 ft.lbs.<br />
Position the crankshaft so the marked<br />
converter-mounting hole is at the bottom.<br />
Mounting the Clutch-As soon as the flywheel<br />
is mounted on the engine, it's<br />
readv for the clutch. Remember to avoid<br />
touching the friction surfaces-pressure<br />
plate, flywheel and disc. Crease on the<br />
clutch surfaces causes bad things like<br />
grabbing or slipping, so be careful not to<br />
touch the operating surfaces.<br />
<strong>To</strong> mount the clutch, you'll need a<br />
tool to align the clutch disc with the center<br />
<strong>of</strong> the crankshaft while you are<br />
tightening down the pressure plate. An<br />
old transmission input shaft works well,<br />
or special inexpensive tools are available<br />
for doing this job. Clutch-alignment tools<br />
are available at most automotive parts<br />
stores.<br />
Although you can probably handle<br />
this job yourself, a friendly third hand<br />
comes in handy. <strong>To</strong> install the clutch,<br />
hold the pressure plate and the disc against<br />
the flywheel while starting at least two<br />
pressure-plate bolts and their lockwashers.<br />
Make sure you have the disc installed in<br />
the right direction. FLYWHEEL' SIDE<br />
should be indicated on the disc, however<br />
if it's not, the spring-and-hub assembly<br />
goes toward the transmission.<br />
With the bolts holding the pressure<br />
plate up, install the input shaft or clutchalignment<br />
tool in the clutch disc and center<br />
it in the pilot bearing. You can now<br />
start the rest <strong>of</strong> the bolts. A word <strong>of</strong><br />
caution4on 't tighten any <strong>of</strong> the bolts all<br />
the way. This will result in junking the<br />
pressure plate because it will bend the<br />
cover. Tighten each bolt a couple <strong>of</strong> turns<br />
at a time. Go around the pressure-plate<br />
bolts several times until the cover is firmly<br />
against the flywheel. Remove the alignment<br />
tool and torque the pressure-plate<br />
bolts to 12-20 ft.lbs.<br />
Spark Plugs-If you haven't already done<br />
so, install a new set <strong>of</strong> spark plugs. They<br />
will be well protected in the heads, particularly<br />
with the exhaust manifolds installed.<br />
Remove the old plugs you installed<br />
to keep the cylinders clean and dry, and<br />
replace them with new ones. Check and<br />
set their gaps first. <strong>To</strong>rque all the plugs to<br />
10 ft.lbs. except for the one in number-1<br />
cylinder. Leave it loose.<br />
Engine Mounts-Engine-mount designs<br />
vary according to the engine and chassis<br />
they are used with, however their basic<br />
design does not change. All use a single<br />
through-bolt for ease <strong>of</strong> engine installation.<br />
Some mounts are not interchangeable<br />
from side to side, so make sure you<br />
identify which is which. R.H. or L.H.<br />
should be stamped on the mounts somewhere<br />
if they don't interchange. Also, I'm<br />
sure you remember that some installations<br />
require that the engine-mount insulators<br />
be removed so the engine can be removed<br />
and re-installed. This is the case with 460<br />
truck installations due to the tight fit<br />
between the firewall and the transmission<br />
bellhousing or converter housing. Once<br />
the engine and transmission are connected,<br />
you can re-install the insulators.<br />
INSTALLING THE ENGINE<br />
There's not much more you can do<br />
with the engine out, so the big moment<br />
has come. Attach a chain or cable to the<br />
front <strong>of</strong> the left head and the rear <strong>of</strong> the<br />
right head or, better yet, make use <strong>of</strong> the<br />
lifting lugs at the exhaust manifolds. Now,<br />
if you have an automatic transmission,<br />
make sure the marked hole on the flexplate<br />
is at the bottom. The marked stud<br />
on the torque converter goes at the bottom<br />
too. It won't take long to find out<br />
how important this is if the converter<br />
won't engage the flexplate.<br />
Lift the engne and check to see that<br />
it's level side-to-side and slightly low at<br />
the rear. Set the engine down if necessary<br />
and adjust the chain until it's right. This<br />
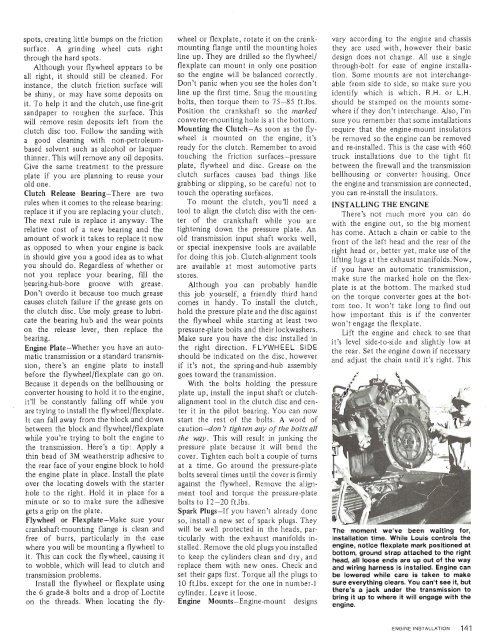
The moment we ., ,en waiting for,<br />
installation time. While Louis controls the<br />
engine, notice flexplate mark positioned at<br />
bottom, ground strap attached to the right<br />
head, all loose ends are up out <strong>of</strong> the way<br />
and wiring harness is installed. Engine can<br />
be lowered while care is taken to make<br />
sure everything clears. You can't see it, but<br />
there's a jack under the transmission to<br />
bring it up to where it will engage with the<br />
engine.


